Week-1: Lab Exercises for Cybersecurity Fundamentals
Please attempt all exercises. Feel free to ask questions at any time, but we encourage you to resolve issues independently to enhance your analytical skills.
Part-1: Cybersecurity Fundamentals
CIA Triad Analysis
Tasks:
- Using Google, find three different cyber-attacks that occurred within the last three years.
- For each attack, identify and discuss which aspect of the CIA Triad (Confidentiality, Integrity, Availability) was breached.
Use interactive timelines or cyber incident databases (e.g., eurepoc)
Part-2: Introduction to Linux and Basic Commands in Kali Linux
This lab will introduce you to the Linux environment using the Kali Linux distribution. you will learn basic Linux commands, file navigation, process management, and user permissions—all without needing internet access.
Pre-requisites:
-
For on-campus users:
If you are doing this lab on campus, log in to the NUC Workstation, locate the module folder (ask if you can't find it), then find the appropriate week's folder. Double-click on the Kali Linux VM (CSF_VM1, password can be found below) with OVA format and proceed (click finish and wait until the VM deployed). You should be able to find on the left-hand cornor of the VirtualBox.If VirtualBox encounters the error E_invalidarg (0x80070057), please follow these steps:
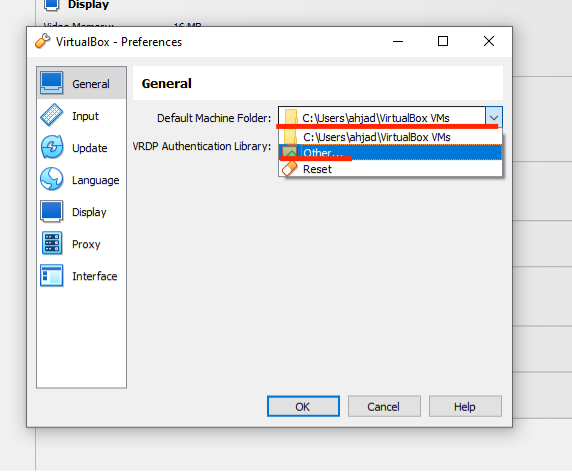
- From the menu bar, click File, then select Preferences.
- In the Preferences window, click Default Machine Folder.
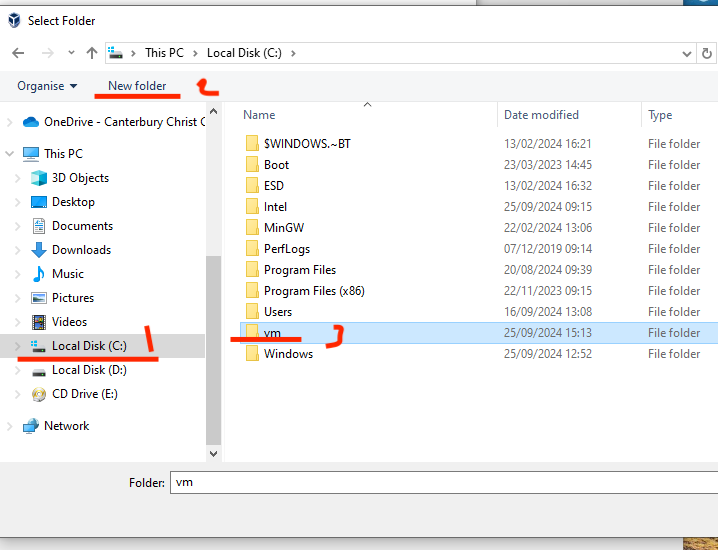
- Choose Other, navigate to the C: drive, and create a new folder named vm.
- Select the newly created folder and click OK.
- After completing these steps, return to step one and attempt to load your virtual machine again.

-
For users with personal machines:
If you are using your own machine, please ensure the following:- A working installation of Kali Linux, either on a VM or directly on your computer. To set up a VM, you'll need:
VMs
| VM | Username | Password |
|---|---|---|
| csf_vm1 | csf_vm1 | kalivm1 |
| csf_vm2 | csf_vm2 | kalivm2 |
Lab 1: Navigating the Linux File System
Step 1: Open the Terminal
- Boot into Kali Linux.
- Open the terminal by clicking the terminal icon or pressing
Ctrl + Alt + T.
Step 2: Basic Command Overview
-
pwd: Print the current working directory.
Command:pwd
This command shows the path of the directory you're currently in. -
ls: List directory contents.
Command:ls
This will show the files and directories in your current location. For more details, usels -lto display file permissions and sizes. -
cd: Change directory.
Command:cd /path/to/directory
Use this command to move between directories. For example,cd /homewill take you to the/homedirectory.
Tip:cd ..will move you one directory up. -
Use
cdto back to the home directory. -
mkdir: Create a new directory.
Command:mkdir <directory_name>
This command creates a new directory. Example:mkdir myFoldercreates a directory namedmyFolder. -
touch: Create an empty file.
Command:touch <file_name>
Usetouchto create an empty file. Example:touch file1.txtcreates an empty file namedfile1.txt.
Exercise:
- Navigate to the
/homedirectory usingcd /home. - Use the
pwdcommand to verify your location. - Create a new directory named
CS_Labusingmkdir CS_Lab. - Change to the
CS_Labdirectory usingcd CS_Lab. - Inside the
CS_Labfolder, create two empty files:test1.txtandtest2.txtusing thetouchcommand. - Use the
lscommand to verify that both files are present.
Lab 2: Viewing and Managing Files
Step 1: File Manipulation Commands
-
cat: Display the contents of a file.
Command:cat <file_name>
Example:cat test1.txtwill display the contents oftest1.txt. -
echo: Append or write text into a file.
Command:echo "text" > <file_name>(Overwrite)
Command:echo "text" >> <file_name>(Append)
Example:echo "Hello Kali Linux" > test1.txtwill write "Hello Kali Linux" into the filetest1.txt. -
nano: A simple text editor.
Command:nano <file_name>
Usenanoto edit files directly in the terminal. For example,nano test1.txtwill open the file in a text editor. -
cp: Copy files or directories.
Command:cp <source> <destination>
Example:cp test1.txt test1_copy.txtwill copytest1.txtto a new file calledtest1_copy.txt. -
mv: Move or rename a file.
Command:mv <source> <destination>
Example:mv test1.txt test1_renamed.txtwill renametest1.txttotest1_renamed.txt. -
rm: Delete a file or directory.
Command:rm <file_name>
Example:rm test1.txtwill delete the filetest1.txt.
Lab 3: Basic Networking Commands
Although your PC has no access to the internet, you can still explore some basic networking commands and configurations.
Step 1: Networking Commands
-
ifconfig: Display network interface information.
Command:ifconfig
This command shows network information such as IP addresses and interfaces. -
ip addr: Show or manipulate routing, devices, and tunnels.
Command:ip addr show -
ping (local): Test connectivity within your local network (if applicable).
Command:ping <local_IP>(replace<local_IP>with another device's IP address in the same network, if available).
Exercise:
- Use
ifconfigto display your network interfaces and IP addresses. - Use
ip addr showto view detailed information about network interfaces. - If applicable, try to ping another machine on your local network using the
pingcommand.
Part-3: Introduction to SSH
Objective:
- Understand what SSH is and its basic usage.
- Set up SSH on two Kali Linux VMs.
- Perform a task to connect between two cloned VMs using SSH.
What is SSH?
SSH (Secure Shell) is a network protocol used to securely log into remote machines, execute commands, and transfer data between them over an encrypted channel. It is commonly used by system administrators and developers to manage servers, perform remote work, and automate scripts securely.
Key features of SSH:
- Encryption: SSH encrypts the data sent between two machines, ensuring privacy and protection from eavesdropping.
- Authentication: SSH supports both password and key-based authentication, providing flexibility and increased security.
- Remote Command Execution: You can execute commands on a remote system as if you were physically present there.
- File Transfer: SSH allows secure file transfers via
scpandsftp.
Task-1: How to Use SSH
Step 1: Installing and Starting SSH on Kali Linux
-
Check if SSH is installed: On most Kali Linux installations, SSH is pre-installed, but you can confirm this with:
If your machine is
connected to the internet, try the following,otherwisejump to step-2sudo apt update sudo apt install openssh-serverThen
sudo apt install openssh-client -
Start the SSH service: After ensuring SSH is installed, start the service:
sudo systemctl start ssh -
Enable SSH to start on boot: To make sure SSH runs every time the system boots, run:
sudo systemctl enable ssh -
Check SSH status: Verify if SSH is running correctly with:
sudo systemctl status sshIf you see "active (running)", SSH is working and ready to accept connections.
-
to
Taks-2: Task - Connect Between Two VMs Using SSH
Step 1: Create VM2
- Go back to the week folder and double click on the second VM (CSF_VM2)
- Wait until it's deployed.
Step 2: Find IP Addresses of Both VMs
-
On VM1: Find the IP address by running:
ip aLook for the IP address of the virtual network interface (usually
eth0orwlan0). For example, you might find10.0.2.14. -
On VM2: Similarly, find the IP address by running:
ip aFor example, VM2’s IP address might be
10.0.2.15.
Note: IMPORTANT
In case the csf_vm1 and csf_vm2 have the same IP address, in this case we need to set a new NAT, otherwise please jump to step-3
Setting up a New NAT Network in VirtualBox
1: Create a New NAT Network
-
Open VirtualBox.
-
From the top menu, select File > Host Network Manager.
-
In the window that appears, switch to the NAT Networks tab.
-
Click the Create button (located on the right side) to create a new NAT network.
-
Once created, select the network and click on the Properties button to adjust the following:
- Network Name: Set a custom name if desired (e.g.,
MyNATNetwork). - Network CIDR: This defines the IP range. You can use something like
10.0.2.0/24or192.168.15.0/24for the network range. - Enable DHCP: Ensure this is checked so that IP addresses will be automatically assigned to your VMs.
- Network Name: Set a custom name if desired (e.g.,
-
Click OK to save and close the settings.
2: Connect a VM to the NAT Network
-
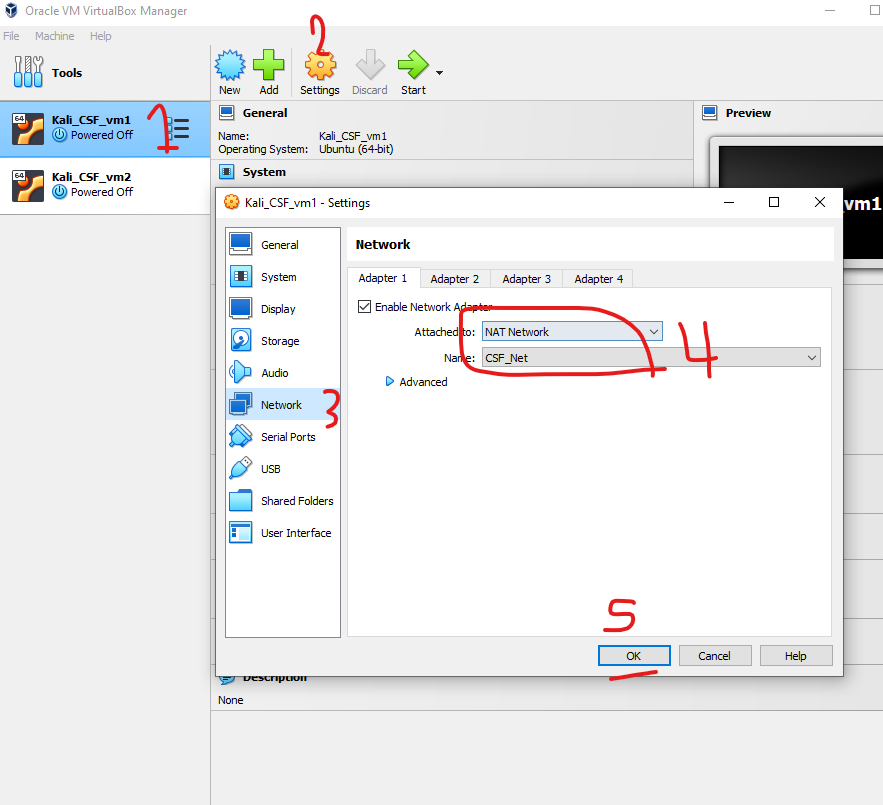
Select the VM you want to connect to the new NAT network from the left panel in VirtualBox.
-
Click on the Settings button (gear icon).
-
In the Settings window, navigate to the Network tab.
-
Under Adapter 1:
- Check Enable Network Adapter.
- Set Attached to: NAT Network.
- Choose the NAT network you created (e.g.,
MyNATNetwork) from the drop-down.
-
Click OK to save the changes.

3: Repeat for Other VMs
- Follow the same steps to connect other VMs to the same NAT network.
- Each VM connected to this NAT network will receive an IP address from the network range you configured.
Step 3: Connecting Between the Two VMs
-
Connect from VM1 to VM2 using SSH
On VM1, open a terminal and connect to VM2 using its IP address:
ssh username_of_vm2@vm2_ipFor example, if vm2's username is
CSF_VM2and VM2’s IP address is10.0.2.15, the command would be:ssh CSF_VM2@10.0.2.15When prompted, enter the password for the user on VM2. If successful, you will be logged into VM2 from VM1.
-
Connect from VM2 to VM1 using SSH
On VM2, open a terminal and connect to VM1:
ssh username_of_vm1@vm1_ipFor example, if VM1’s IP address is
10.0.2.14, and username isCSF_VM1the command would be:ssh CSF_VM1@10.0.2.14Enter the password when prompted, and you will be logged into VM1 from VM2.
Step 4: File Transfer Between VMs Using scp
-
On VM1: Create a simple text file:
echo "Hello from VM1" > vm1_file.txt -
Transfer the file to VM2 using
scp:scp vm1_file.txt username_of_vm2@ip_of_vm2:pathExample
scp vm1_file.txt csf_vm2@10.0.2.14:/home/csf_vm2/ -
On VM2: Verify the file was transferred by listing the files in the
/home/csf_vm2/directory:ls /home/kali/You should see
vm1_file.txtin the directory.
More resourses:
- Book: Linux in Action
- Learn the ways of Linux-fu using Linux Journey