Lab Title: Vulnerability Assessment with Nmap on a Multi-VM Setup
Lab Setup
Virtual Machines:
- Admin Machine: Kali Linux (password:
kalivm1), this will be use to probe the others below.- Robot Machine: No specific configurations (standard setup)
- Victim Machine: No specific configurations (standard setup)
- IoT_raspberry_Pi Machine: A virtual IoT Raspberry Pi device (standard setup)
Please deply all of them, one after the other (or all at the same time, select all then open). It will take about 5 mins for all to be deploied.
Part 1: Setting up the NAT Network in VirtualBox
To allow communication between all four VMs (Admin, Robot, Victim, IoT_raspberry_Pi), we will create a NAT network.
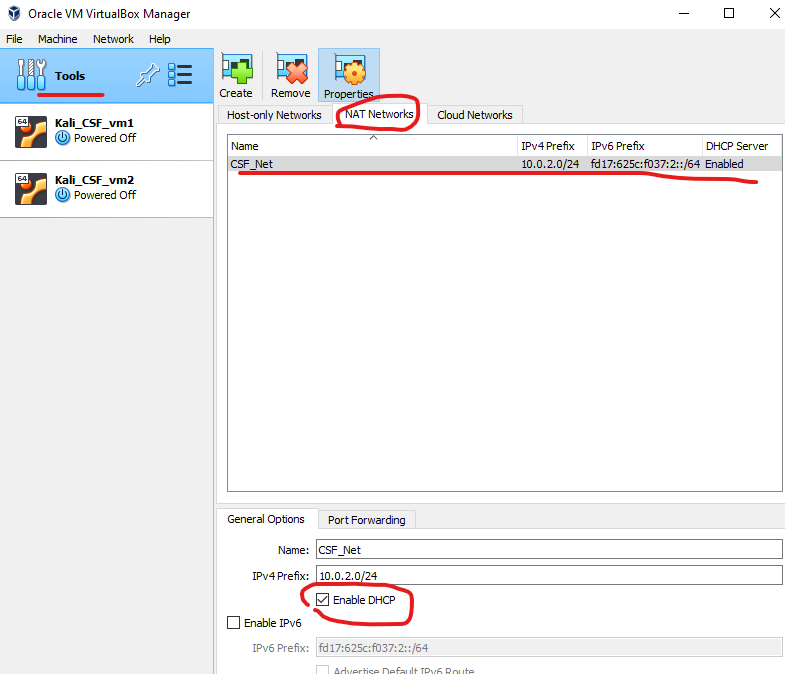
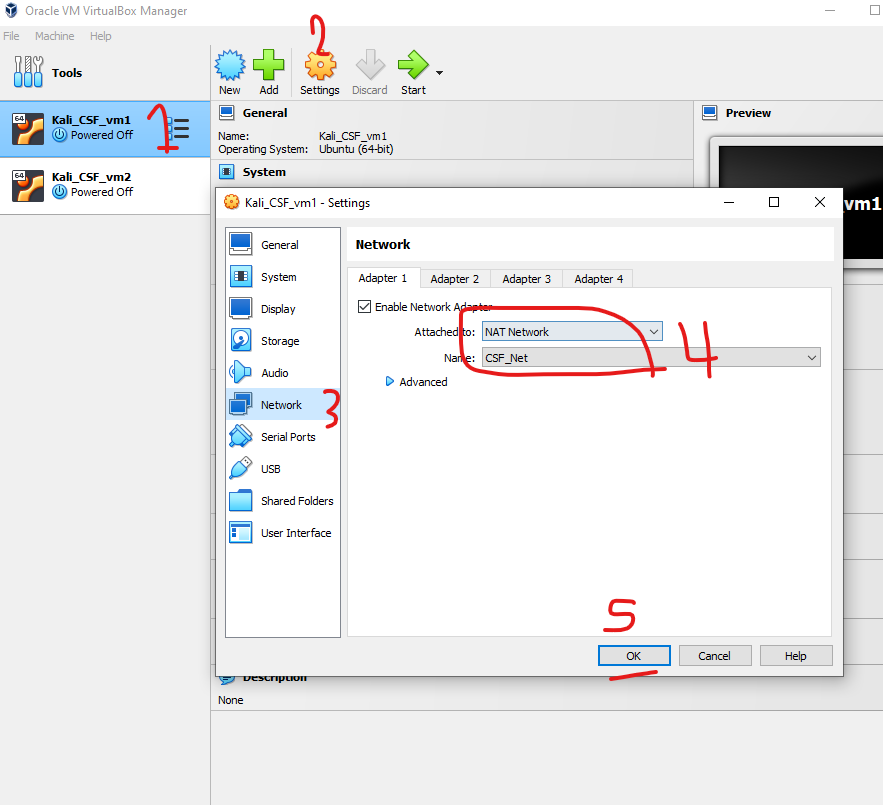
Step 1: Create a New NAT Network in VirtualBox (see images below)
- Open VirtualBox.
- From the top menu, select File > Host Network Manager.
- In the window that appears, switch to the NAT Networks tab.
- Click the Create button (located on the right side) to create a new NAT network.
- Once created, select the network and click on the Properties button to adjust the following:
- Network Name: Set a custom name, e.g.,
MyNATNetwork. - Network CIDR: Set the IP range to something like
192.168.15.0/24. - Enable DHCP: Ensure this is checked so that IP addresses will be automatically assigned to your VMs.
- Network Name: Set a custom name, e.g.,
- Click OK to save the settings.
Part 2: Running Nmap Commands
The Admin Machine will be used to perform the vulnerability assessment using Nmap against the Victim Machine and other VMs. This part will introduce several Nmap commands to discover hosts, services, and vulnerabilities on the target machines.
Step 1: Basic Host Discovery with Nmap
Start by discovering active hosts within the network. We will scan the IP range of the NAT network to identify which machines are online.
Command:
nmap -sn 192.168.15.0/24
- Explanation: This command performs a ping scan (
-sn), which checks which hosts in the given range (e.g.,192.168.15.0/24) are online (connected to the network). - Expected Output: A list of active hosts in the NAT network, including the IP addresses of the Victim, Robot, and IoT machines.
Questions:
- What are some limitations of using a ping scan for host discovery?
- How can firewalls or IDS/IPS systems affect the results of a ping scan?
Step 2: Service and Version Detection
Now that we've discovered active hosts, let’s perform a service scan to detect open ports and services running on the Victim Machine.
Command:
nmap -sV 192.168.15.X
(Replace 192.168.15.X with the actual IP of the Victim Machine.)
- Explanation: The
-sVflag enables version detection, which attempts to determine the versions of services running on open ports. - Expected Output: A list of open ports, services, and their versions on the Victim Machine.
Questions:
- Why is it important to detect service versions when performing a vulnerability assessment?
- What could happen if Nmap incorrectly identifies a service version? How can you mitigate this risk?
Step 3: OS Detection
To assess potential vulnerabilities, it's crucial to know the operating system running on the Victim Machine.
Command:
nmap -O 192.168.15.X
(Replace 192.168.15.X with the actual IP of the Victim Machine.)
- Explanation: The
-Oflag enables OS detection, which attempts to guess the operating system of the target based on fingerprinting. - Expected Output: The OS running on the Victim Machine, along with a confidence level.
Questions:
- How accurate is Nmap’s OS detection? What factors can influence its accuracy?
- Why is identifying the operating system of a target crucial in penetration testing or vulnerability assessments?
Step 4: Aggressive Scan (Combining Multiple Scans)
For a more in-depth assessment, you can perform an aggressive scan that combines several scans: OS detection, service version detection, traceroute, and a script scan for vulnerabilities.
Command:
nmap -A 192.168.15.X
(Replace 192.168.15.X with the actual IP of the Victim Machine.)
- Explanation: The
-Aflag enables aggressive mode, which combines OS detection, version detection, script scanning, and traceroute. - Expected Output: Detailed information on services, operating system, traceroute, and potential vulnerabilities.
Questions:
- Why is the aggressive scan useful in certain scenarios? When might it be inappropriate to use this option?
- How might using an aggressive scan increase the risk of detection by the target machine?
Step 5: Scanning Specific Ports
Sometimes, you may want to scan only specific ports (e.g., common web ports like 80 and 443).
Command:
nmap -p 80,443 192.168.15.X
(Replace 192.168.15.X with the actual IP of the Victim Machine.)
- Explanation: The
-pflag specifies the ports to scan (in this case, ports 80 and 443). - Expected Output: The status of the specified ports on the Victim Machine.
Questions:
- Why might you want to focus on scanning specific ports rather than all ports?
- What are the potential risks of scanning only a limited number of ports during an assessment?
Step 6: Scanning for Vulnerabilities with Nmap Scripts
Nmap has a scripting engine (NSE) that allows you to run scripts to detect specific vulnerabilities.
Command:
nmap --script vuln 192.168.15.X
(Replace 192.168.15.X with the actual IP of the Victim Machine.)
- Explanation: The
--script vulnoption runs vulnerability detection scripts to check for common vulnerabilities. - Expected Output: A report of potential vulnerabilities on the Victim Machine.
Questions:
- What is the purpose of Nmap’s scripting engine, and how can it be expanded?
- Why is it important to verify the results of a script-based vulnerability scan with other tools or manual analysis?
nmap Scripts
| Category | Script Name | Description | Command Example |
|---|---|---|---|
| Vulnerability Detection | vuln | Runs various vulnerability detection scripts | nmap --script vuln <target_IP> |
| Vulnerability Detection | ssl-heartbleed | Checks for the Heartbleed vulnerability in SSL | nmap --script ssl-heartbleed <target_IP> |
| Vulnerability Detection | http-shellshock | Checks for the Shellshock vulnerability in HTTP servers | nmap --script http-shellshock <target_IP> |
| Vulnerability Detection | http-dombased-xss | Checks for DOM-based cross-site scripting vulnerabilities | nmap --script http-dombased-xss <target_IP> |
| Vulnerability Detection | ftp-vsftpd-backdoor | Checks for a backdoor in the vsFTPd service | nmap --script ftp-vsftpd-backdoor <target_IP> |
| Vulnerability Detection | smb-vuln-ms17-010 | Checks for SMB vulnerabilities related to EternalBlue | nmap --script smb-vuln-ms17-010 <target_IP> |
| Information Gathering | banner | Retrieves banner information from services | nmap --script banner <target_IP> |
| Information Gathering | http-title | Retrieves the title of web pages | nmap --script http-title <target_IP> |
| Information Gathering | dns-brute | Performs DNS brute-forcing to enumerate subdomains | nmap --script dns-brute <target_IP> |
| Information Gathering | ssh-hostkey | Retrieves the SSH host key | nmap --script ssh-hostkey <target_IP> |
| Information Gathering | smtp-commands | Lists supported SMTP commands | nmap --script smtp-commands <target_IP> |
| Authentication Bypass/Weakness | ftp-anon | Checks if anonymous FTP login is allowed | nmap --script ftp-anon <target_IP> |
| Authentication Bypass/Weakness | smb-enum-shares | Lists SMB shares without authentication | nmap --script smb-enum-shares <target_IP> |
| Authentication Bypass/Weakness | smb-enum-users | Enumerates SMB users | nmap --script smb-enum-users <target_IP> |
| Password Auditing | http-brute | Performs HTTP brute-force password auditing | nmap --script http-brute <target_IP> |
| Password Auditing | ssh-brute | Performs SSH brute-force password auditing | nmap --script ssh-brute <target_IP> |
| Password Auditing | ftp-brute | Performs FTP brute-force password auditing | nmap --script ftp-brute <target_IP> |
| Exploit Checking | smb-vuln-cve-2017-7494 | Checks for vulnerabilities related to Samba (CVE-2017-7494) | nmap --script smb-vuln-cve-2017-7494 <target_IP> |
| Exploit Checking | http-sql-injection | Checks for SQL injection vulnerabilities | nmap --script http-sql-injection <target_IP> |
| Exploit Checking | rdp-vuln-ms12-020 | Checks for RDP vulnerabilities related to MS12-020 | nmap --script rdp-vuln-ms12-020 <target_IP> |
| Service Enumeration | smb-os-discovery | Detects the operating system through SMB | nmap --script smb-os-discovery <target_IP> |
| Service Enumeration | http-methods | Enumerates HTTP methods supported by the web server | nmap --script http-methods <target_IP> |
| Service Enumeration | smtp-enum-users | Enumerates SMTP users | nmap --script smtp-enum-users <target_IP> |
| Malware Detection | malware-host | Attempts to detect if the host is part of a botnet | nmap --script malware-host <target_IP> |
Step 7: Stealth Scan (SYN Scan)
A stealth scan is useful when you want to perform scanning without being easily detected by the target machine.
Command:
nmap -sS 192.168.15.X
(Replace 192.168.15.X with the actual IP of the Victim Machine.)
- Explanation: The
-sSflag performs a SYN scan, which is a more stealthy approach compared to a regular TCP scan. - Expected Output: A list of open ports with minimal interaction with the target machine.
Questions:
- How does a SYN scan differ from a full TCP scan, and why is it considered stealthy?
- In what scenarios might you want to avoid using a stealth scan?
Step 8: Scan All Ports
To scan all available ports (0-65535) on the Victim Machine:
Command:
nmap -p- 192.168.15.X
(Replace 192.168.15.X with the actual IP of the Victim Machine.)
- Explanation: The
-p-flag scans all 65,535 TCP ports. - Expected Output: A comprehensive report of all open ports on the Victim Machine.
Questions:
- Why is it important to scan all ports in some cases, and what are the trade-offs?
- What security measures could be in place to limit the information gathered from a full port scan?
Step 9: Save Scan Results to a File
To save the output of your scan to a file for future reference:
Command:
nmap -oN scan_results.txt 192.168.15.X
- Explanation: The
-oNflag saves the output to a normal text file (scan_results.txt). - Expected Output: Scan results will be saved to a file named
scan_results.txtin your working directory.
Questions:
- Why is it important to save the results of a vulnerability scan, and how can these results be used later?
- What are the benefits and drawbacks of saving the output in different formats (e.g., normal vs. XML)?
Part-3: SSH Vulnerability Exercises
Exercise 1: Discovering SSH Port and Service
Steps:
- Scan the victim machine (pick any ) for open ports:
nmap -p 22 <victim_IP> - Perform a service version scan on the SSH port:
nmap -sV -p 22 <victim_IP> - Questions:
- Which port is the SSH service running on?
- What version of SSH is running on the victim machine?
Expected Outcome:
Students should identify port 22 as the default SSH port and the version of the SSH service, e.g., OpenSSH 7.6p1.
Exercise 2: Weak Password Brute-Force Attack Using Hydra
Objective:
Demonstrate how a weak password policy can lead to SSH brute-force attacks.
Steps:
- in case you're using your own machine, and if not installted Install Hydra on the attacker machine:
sudo apt-get install hydra - Use Hydra to brute-force the SSH login:
hydra -l root -P /usr/share/wordlists/rockyou.txt ssh://<victim_IP> - Log in to the victim machine using the cracked credentials:
ssh root@<victim_IP> - Questions:
- What steps can be taken to prevent SSH brute-force attacks?
Exercise 3: Identifying and Mitigating Root Login Vulnerability
Objective:
Learn how enabling root login in SSH poses a security risk and how to disable it.
Steps:
- Verify if root login is enabled on the victim machine:
ssh root@<victim_IP> - Disable root login on the victim machine:
- Open the SSH configuration file on the victim machine:
sudo nano /etc/ssh/sshd_config - Find the line
PermitRootLogin yesand change it to:PermitRootLogin no - Restart the SSH service:
sudo systemctl restart ssh
- Open the SSH configuration file on the victim machine:
- Questions:
- Why is root login considered a security risk?
- How does disabling root login enhance SSH security?
Exercise 4: Enforcing Key-Based SSH Authentication
Objective:
Understand how to set up and enforce key-based SSH authentication to secure SSH access.
Steps: (Similar to Part-3 in Lab-1)
- Generate an SSH key pair on the attacker machine:
ssh-keygen -t rsa - Copy the public key to the victim machine:
ssh-copy-id <username>@<victim_IP> - Disable password-based authentication on the victim machine:
sudo nano /etc/ssh/sshd_config- Change the following:
PasswordAuthentication no - Restart SSH:
sudo systemctl restart ssh
- Change the following:
- Questions:
- What are the advantages of using key-based authentication over passwords?
- How does disabling password-based authentication prevent brute-force attacks?
Exercise 5: SSH Configuration Audit Using Nmap Scripts
Use Nmap’s SSH-related scripts to identify vulnerabilities and misconfigurations in the victim’s SSH setup.
Steps:
-
Run Nmap's SSH vulnerability check:
nmap --script ssh2-enum-algos,ssh-hostkey -p 22 <victim_IP> -
Analyse the output and identify potential weak algorithms or configurations.
-
Questions:
- What encryption algorithms does the SSH service support?
- Are any weak or outdated algorithms being used?
Exercise 6: Detecting OpenSSH Vulnerabilities Using Nmap (Similar to setup 6 above from part-2)
Use Nmap to check for known OpenSSH vulnerabilities on the victim machine.
Steps:
- Run the Nmap
vulnscript to detect SSH-related vulnerabilities:nmap --script vuln -p 22 <victim_IP> - Questions:
- Were any SSH vulnerabilities detected?
- How can these vulnerabilities be mitigated?
Exercise 7: Mitigating SSH Port Scanning
Understand how changing the default SSH port or using tools like Fail2Ban can mitigate SSH port scanning and brute-force attacks.
Steps:
-
Change the SSH port on the victim machine:
- Edit the SSH configuration file:
sudo nano /etc/ssh/sshd_config - Change the SSH port from 22 to another port, e.g.:
Port 2222 - Restart SSH:
sudo systemctl restart ssh
- Edit the SSH configuration file:
-
Install and configure Fail2Ban to block repeated failed login attempts:
sudo apt-get install fail2ban sudo systemctl enable fail2ban sudo systemctl start fail2ban -
Questions:
- How does changing the SSH port and using Fail2Ban reduce the likelihood of attacks?
- What are the limitations of these methods?
Conclusion
By following the steps above, you will have successfully used Nmap to perform various vulnerability assessments on the Victim Machine. You have learned how to:
- Discover hosts and services.
- Detect open ports, operating systems, and service versions.
- Run vulnerability detection scripts.
- Conduct stealth scans.
- Save scan results for reporting purposes.
Each of these techniques is vital for understanding the security posture of a target system, helping to identify potential vulnerabilities and entry points for further investigation.
Part-4: On your own time GUI based tools for VA
In cybersecurity, vulnerability scanning is a critical process to identify and address security risks in systems before attackers exploit them. Two popular tools used for this purpose are Nessus and OpenVAS. Both are vulnerability scanners that help you detect weaknesses in your systems, but they differ slightly in their functionality and licensing.
1. Nessus
Nessus, developed by Tenable, is a powerful and widely-used commercial vulnerability scanner. It is designed to scan systems, networks, and applications to identify vulnerabilities, misconfigurations, and compliance issues.
-
Key Features:
- Extensive database of known vulnerabilities.
- Regular updates to stay current with new threats.
- Supports a wide range of platforms (Windows, Linux, macOS, and more).
- Generates detailed reports for remediation.
- Free version available with limited features (Nessus Essentials), suitable for home or lab use.
-
Use Cases:
- Identifying unpatched systems and outdated software.
- Scanning for known vulnerabilities in servers, routers, and devices.
- Ensuring compliance with security standards like PCI DSS and HIPAA.
-
Why Use Nessus: Nessus is known for its ease of use and comprehensive vulnerability scanning capabilities. If you're looking for a scanner that's user-friendly with a wide range of detection options, Nessus is a great choice, especially in professional environments.
-
Installation: Students can download Nessus Essentials for free from Tenable's website, which allows for vulnerability scanning with some restrictions.
Link for Download: Nessus Essentials
2. OpenVAS
OpenVAS (Open Vulnerability Assessment Scanner) is an open-source vulnerability scanner maintained by the Greenbone Networks as part of the Greenbone Vulnerability Management (GVM) solution. It's free to use and is often seen as a good alternative to Nessus, especially for users who prefer open-source tools.
-
Key Features:
- Open-source and free to use.
- Regularly updated vulnerability feed.
- Supports complex vulnerability scanning of networks and hosts.
- Includes tools for scanning, vulnerability detection, and reporting.
- Integrated with GVM, which offers a comprehensive vulnerability management solution.
-
Use Cases:
- Free alternative for scanning systems for known vulnerabilities.
- Suitable for students, researchers, or companies preferring open-source solutions.
- Can be integrated into other security tools and workflows.
-
Why Use OpenVAS: OpenVAS is widely used in both academic and professional environments due to its flexibility and the fact that it's open-source. While it might require more configuration compared to Nessus, it's perfect for those who want a no-cost option for learning vulnerability scanning.
-
Installation: OpenVAS can be installed on various Linux distributions. It's recommended to run OpenVAS on a dedicated virtual machine due to its system requirements.
Link for Installation Instructions: OpenVAS Documentation