Learning C Lab
-
After creating a GitHub account ( in the previous lab: see here)), open the following link: GitHub Classroom Activity Link, and accept the activity.
-
Refresh the page and make sure to keep the provided link for the repository.
1. Opening Visual Studio Code
To get started, follow one of the follwing:
-
If you're using a university machine, follow these steps:
-
Open VSCode
-
Connect it to your Github account (recommended) and clone as follows:
-
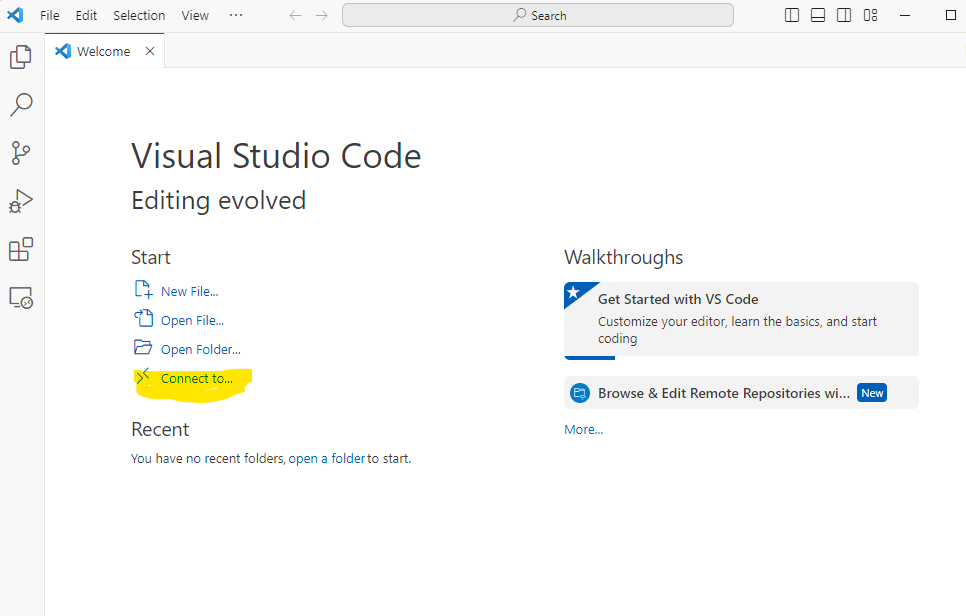
Step-1
-
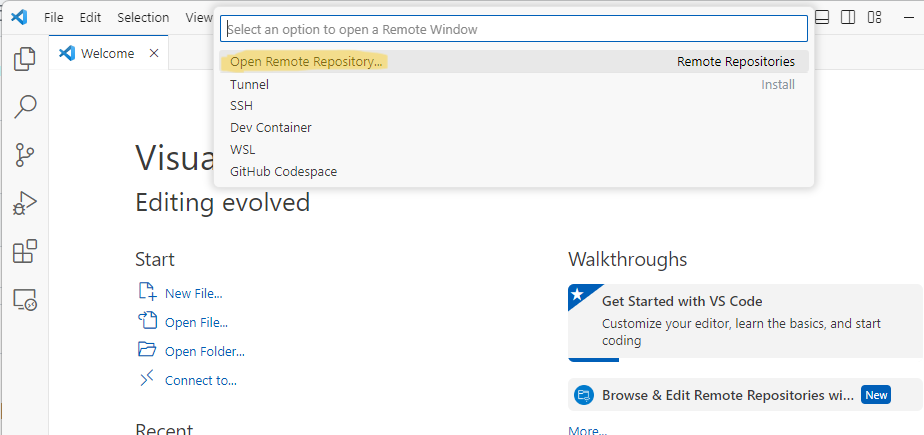
Step-2
-
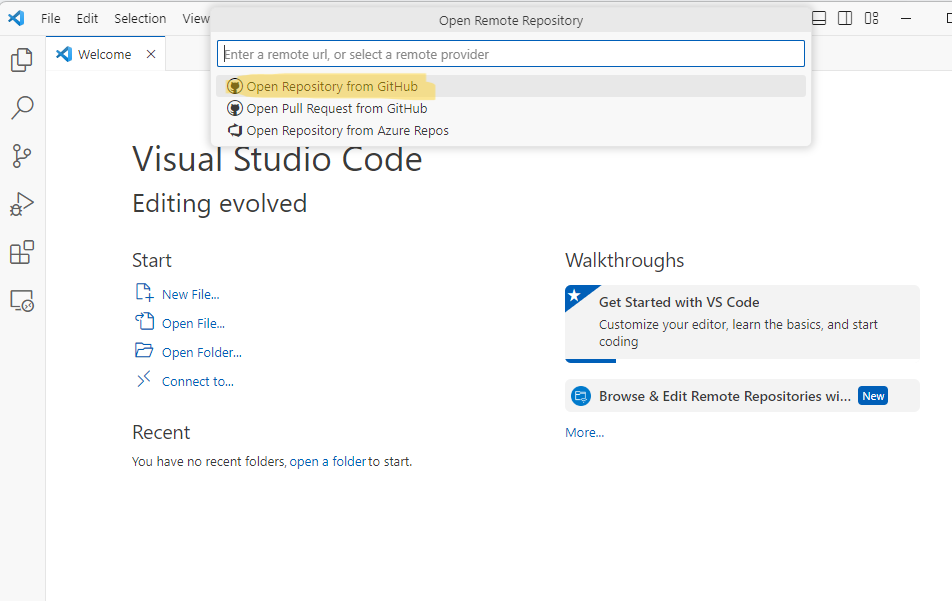
Step-3
-
Step-4 After fnihsing the authentection, repeat Step-1,2,3
-
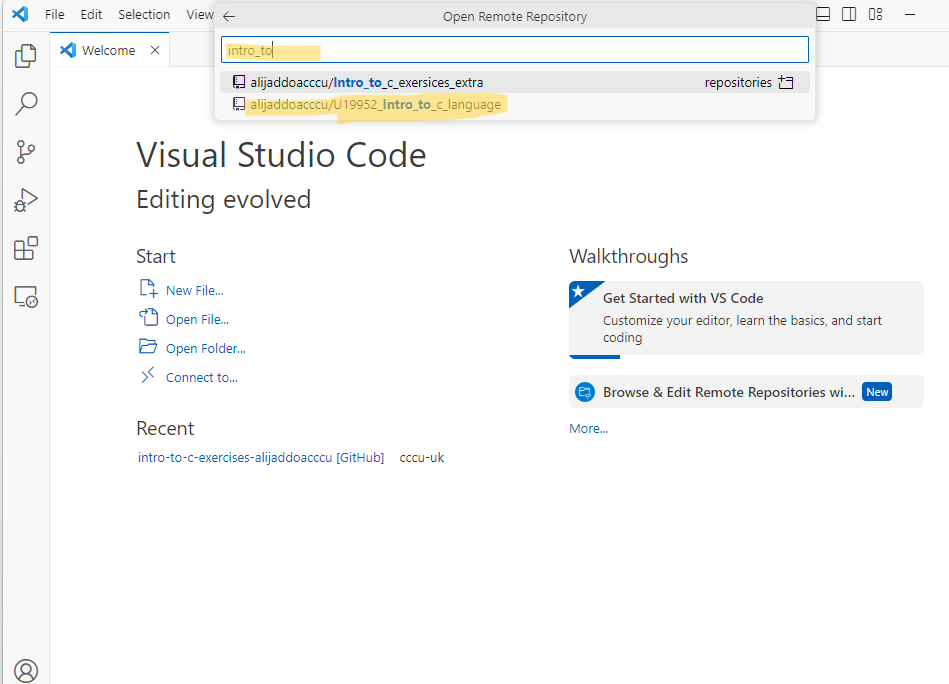
Step-5: open the provided lab
-
Step-6: You should be able to start working on the lab below.
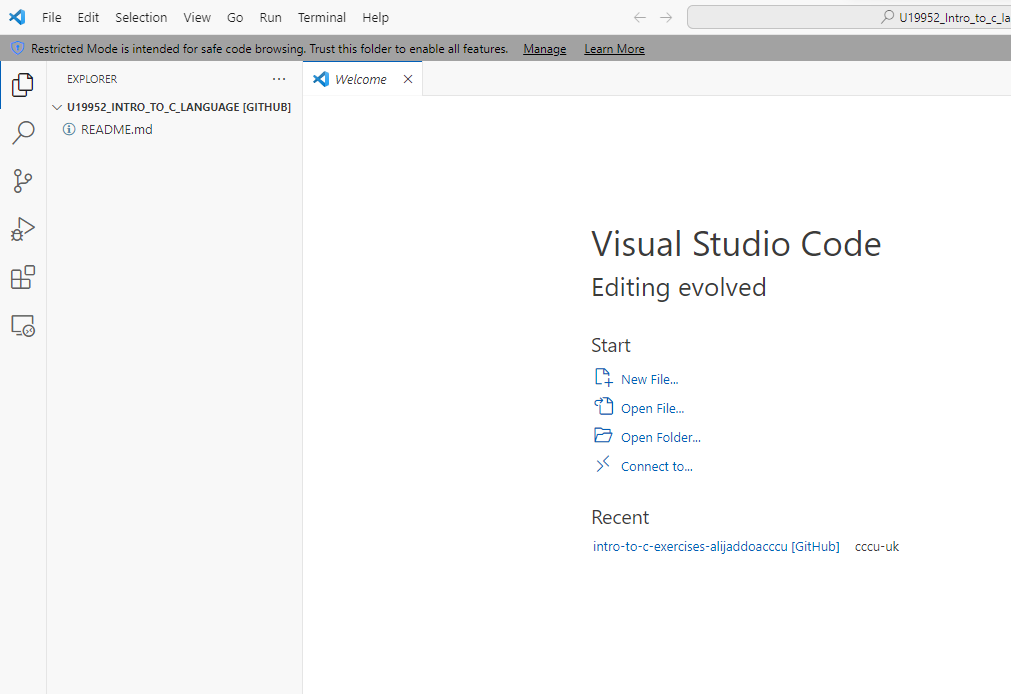
-
-
-
If you're using your own machine, follow these steps:
- Install VSCode from here.
- Open VSCode after installation follow steps above (1-6).
-
Alternatively, you can use Codespaces after accepting the activity repository.
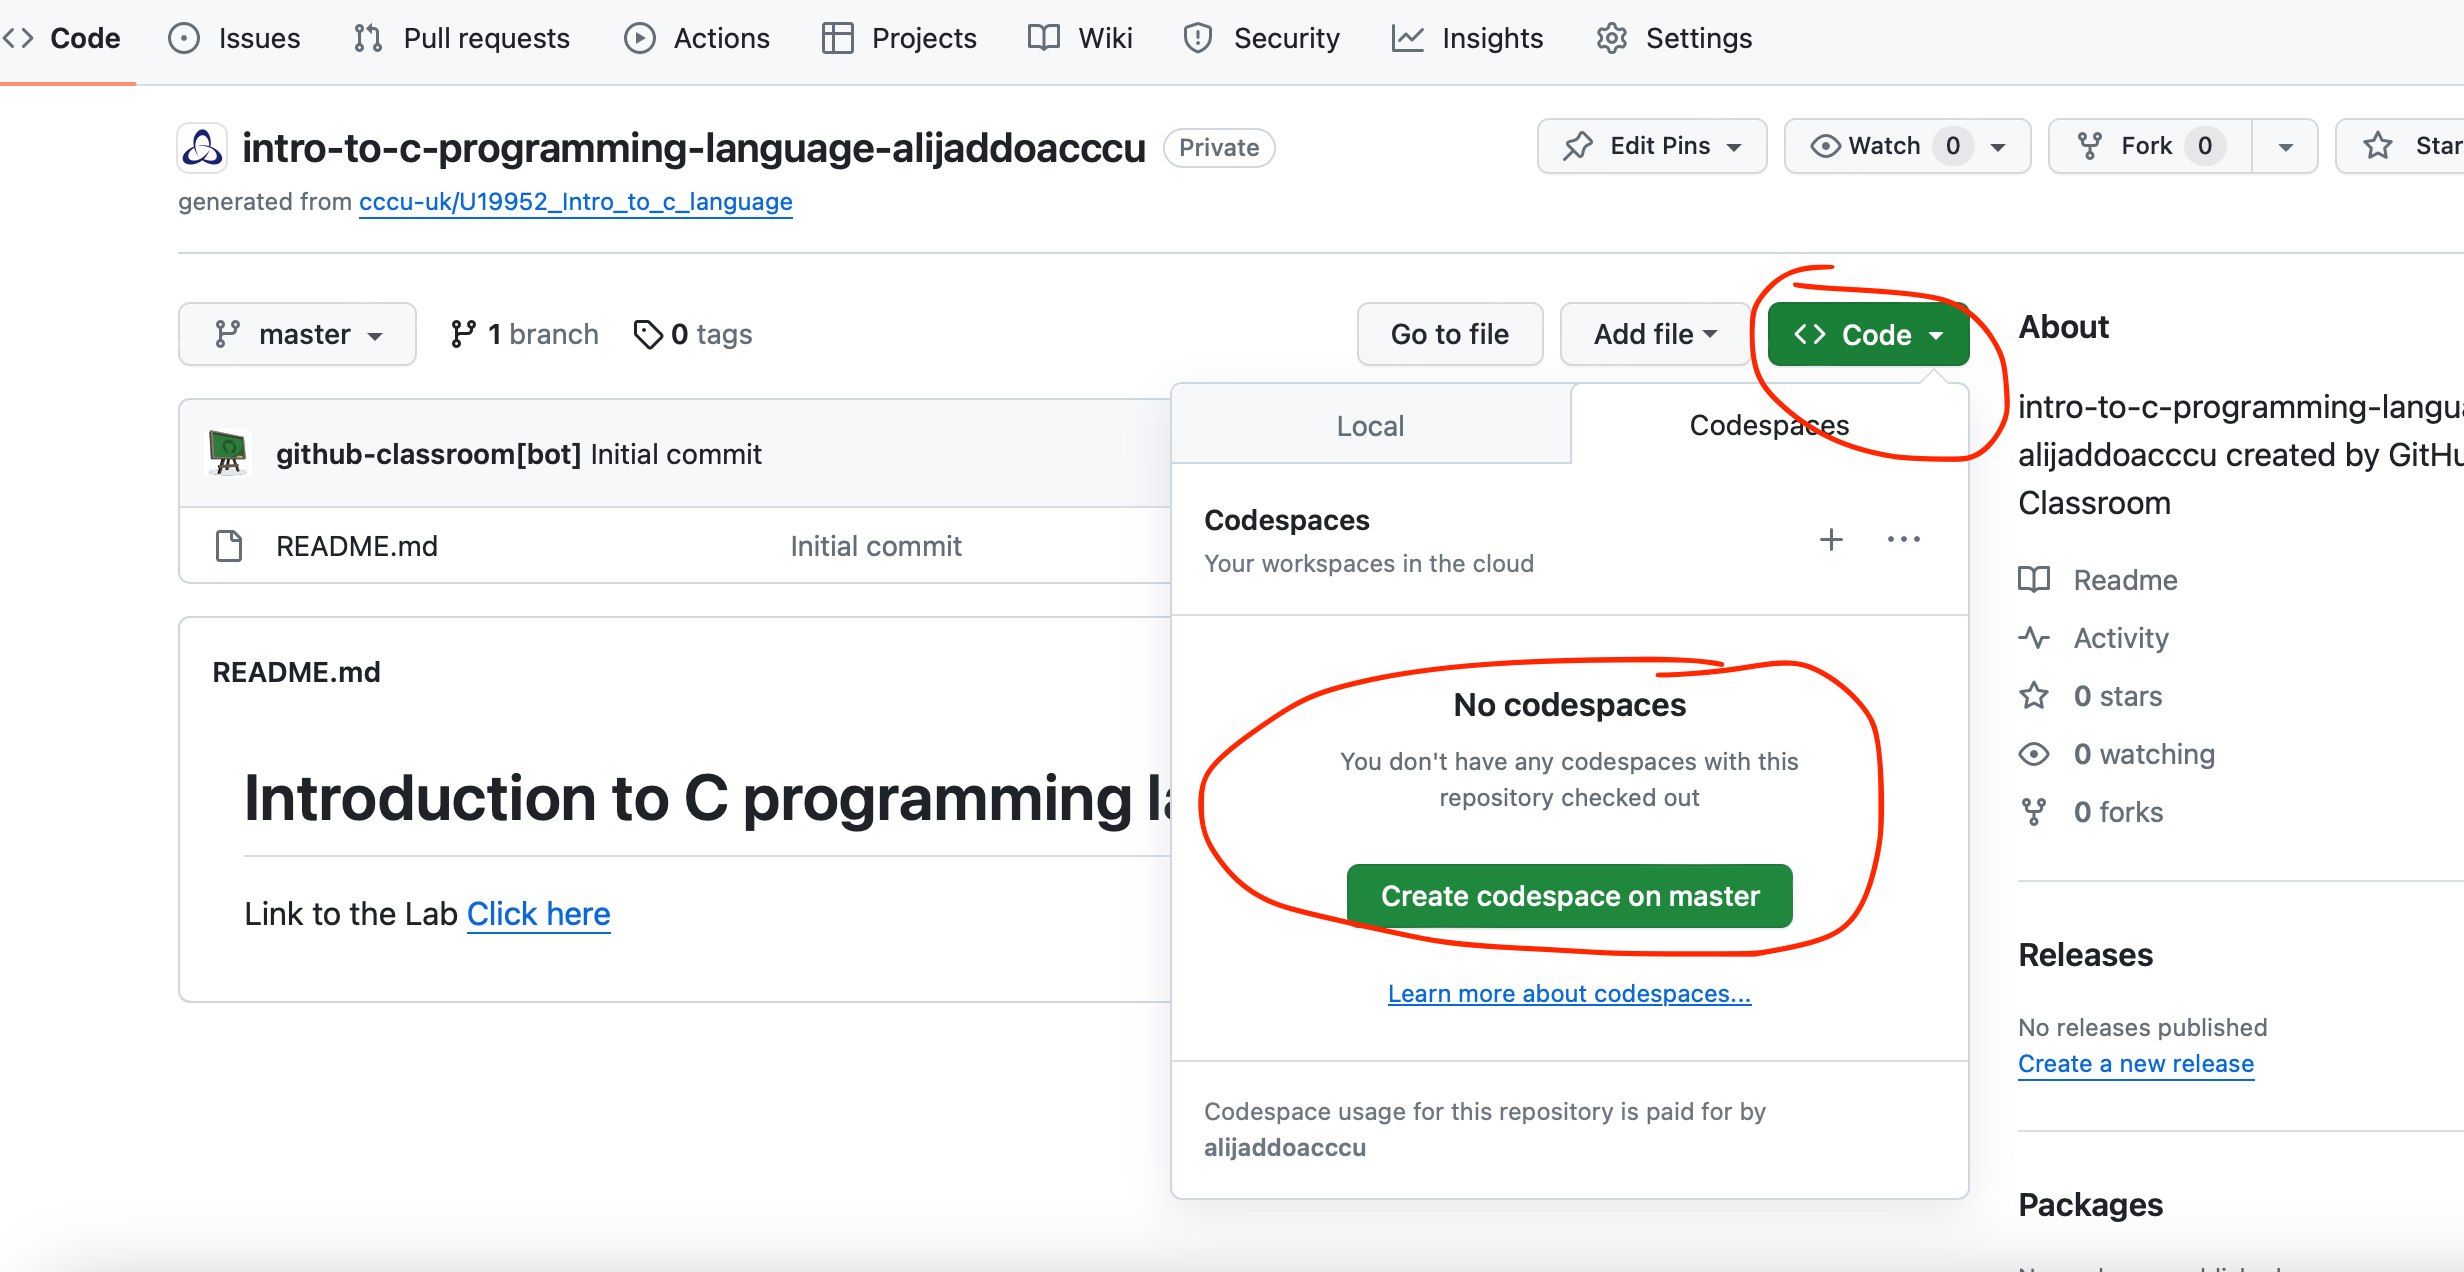
If you choose to go with either option 1 or 2, after opening VSCode, go to the "Go" menu and open the "Terminal".
2. Installing Extensions in Visual Studio Code
VS Code offers numerous extensions to enhance your development experience. Explore and install relevant extensions from the Visual Studio Code Marketplace within the editor.
Installing Extensions in Visual Studio Code
To work efficiently with C/C++ code in VS Code, you'll need to install some extensions and configure settings. Follow these steps in the previous lab see below (previous lab: see here) scroll to the 'Installing Extensions in Visual Studio Code' section'.
To work efficiently with C/C++ code in VS Code, you'll need to install some extensions and configure settings. Follow these steps:
-
Install C/C++ Support:
-
Go to the Extensions tab in VS Code. You can access it from the sidebar on the left or by using the shortcut
Ctrl + Shift + X(orCmd + Shift + Xon Mac).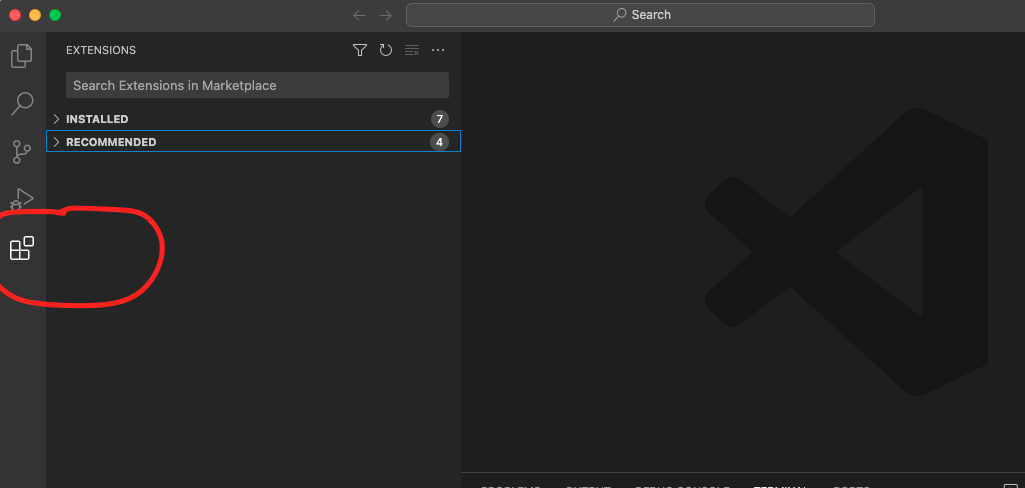
-
In the search bar, type "C" or "C++."
-
Install the first extension that is already verified by Microsoft itself.
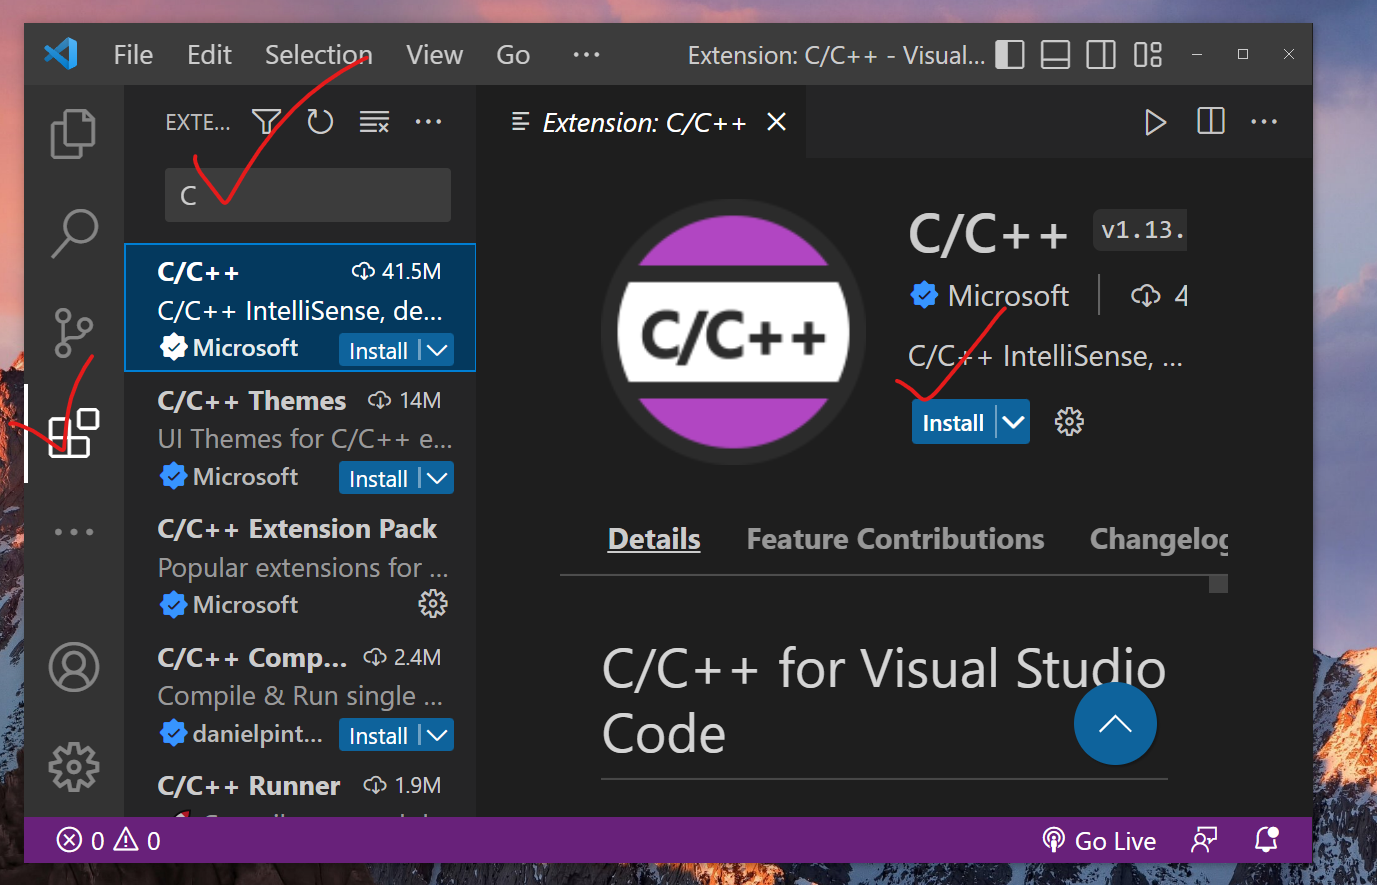
-
-
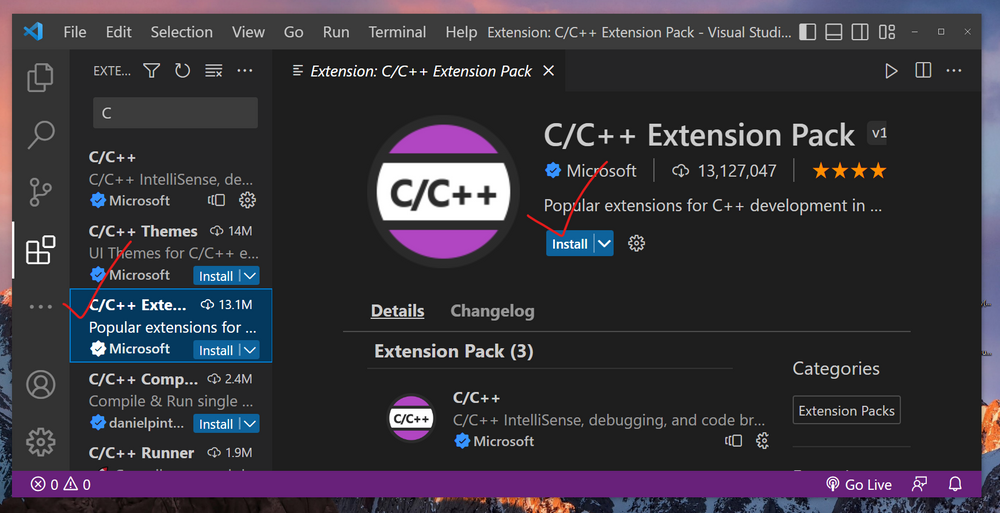
Install C/C++ Extension Pack:
-
While still in the Extensions tab, search for "C/C++ Extension Pack."
-
Make sure it is verified by Microsoft and install it.
-
The following steps (3,4,5) are optional:
-
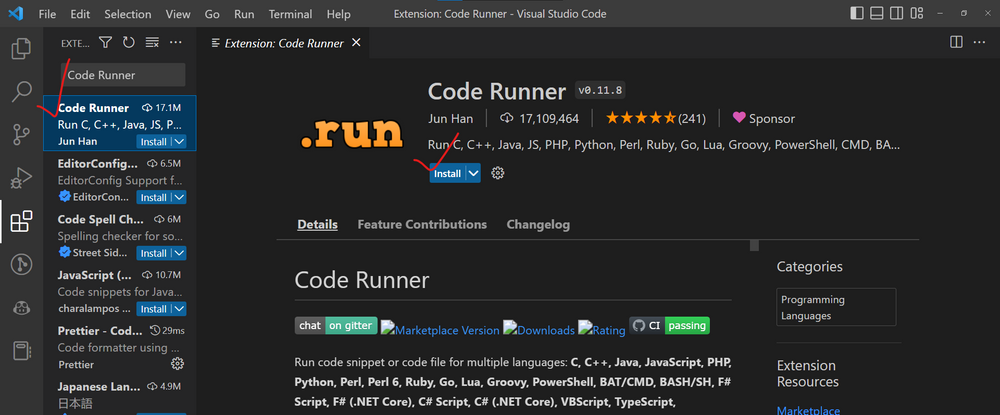
Install Code Runner:
-
Search for "Code Runner" in the Extensions tab.
-
Install the "Code Runner" extension.
-
Now that you have the necessary extensions installed, let's configure some settings:
-
-
Accessing Settings:
- Click on the gear icon in the lower-left corner (called the Manage section), and then click on Settings.
- Alternatively, you can use the shortcut keys
Ctrl + ,(Cmd + ,on Mac) to access the settings.
- Click on the gear icon in the lower-left corner (called the Manage section), and then click on Settings.
- Alternatively, you can use the shortcut keys
-
Enabling "Run Code in Terminal":
- In the search bar within the Settings panel, type "Run code in terminal" and press the Enter key.
- Scroll down the search results until you find "Code-runner: Run In Terminal."
- Make sure the checkbox is checked (✔) to enable running code in the terminal.
With these extensions and settings in place, you're now ready to work with C/C++ code effectively in Visual Studio Code. These tools will enhance your coding experience and streamline your development workflow.
3. Creating working directory
-
Create a new directory (folder) and call it
FCS/Learning_Cwe can do this using the following commands in terminal.$ mkdir -p FCS/Learning_CNote:
- the
$symbol used in the above indicates that this is a command that should be entered into the terminal. - these are shell commands written in
c.
Now you are to navigate to this directory using the following command and create your first file:
$  cd FCS/Learning_C
$  touch helloworld.c
Note:
- each line should be entered in seperately
If we use the command
lswe can list the content of the directory and should see at a file named 'helloworld.c'$ lsOutput:
helloworld.cNow we are going to open up and edit the content of the file and write it out:
$ nano helloworld.cEnter the following:
#include <stdio.h> // we need this library to get access to the input and out put methods for printing to terminal

int main()
{
    printf("Hello World\n"); // lets say hello, where it all began...

    printf("Goodbye World\n"); // this seems fitting as the program will close after this.

    return 0; // returns 0 to the int of main() and terminate the program
}
You will probably have noticed that at the bottom of the text editor there are a number of actions that can be completed.
The
^means ctrl and theMmeans alt keys + the corresponding symbol.Once entered use the keyboard shortcut to
writeoutctrl+o and then press the Enter followed by ctrl+x to exit the file.Some explanation about the above code:
-
All code gets executed inside of
main(), -
For the program to terminate the
main()has to have a returnable value,int, -
The keyword at the end of the
main()isreturn, this is will return the value preceeding it, -
A
0execute means no errors. -
Similar to
C#to use librariescprograms import with the#includekeyword instead ofusing. -
The included library is the standard input out header,
stdio.h. -
By including this header file we have access to the
printf()function that enables us to return information to the terminal in string format.
Now we are going to compile the code so that we have an executable file that can be run from the terminal:
$ gcc helloworld.c -o helloworld.exeNote:
gccis another shell command that is built inc, it's purpose is to compile.cfiles into executables using the thegcc.- Using the option
-owe specifiy the output path/to/file - For more info -> gcc
Now let's see the fruits of our labour, the file can be executed as follows:
$ ./helloworld.exe
Click for Expected Output
Hello World
Goodbye World
Congratulations, you used the programming language of the gods!
- the
4. Input/Output functions
In C programming, printf() is one of the main output function. The function sends formatted output to the screen. For example, the code below is a modified version of the helloworld programme we wrote a moment ago.
Create a new file nano inputoutput.c and reproduce the code below:
#include <stdio.h>
int main()
{
    // Displays the string inside quotations
    printf("C Programming");
    return 0;
}
Compile and run:
$ gcc inputoutput.c -o inputoutput.exe
$ ./inputoutput.exe
C Programming
Data Type: Printing Integer
Now we are going to modifiy the script again $ nano inputoutput.c to look like below:
#include <stdio.h>
int main()
{
    int testInteger = 5;
    printf("Number = %d", testInteger);
    return 0;
}
Write out and ctrl+x and press enter twice.
Run the script again...
$ ./inputoutput.exe
What happened?
Well we need to recompile the code.
$ gcc inputoutput.c -o inputoutput.exe
$ ./inputoutput.exe
Number = 5
We use %d format specifier to print int types. Here, the %d inside the quotations will be replaced by the value of testInteger.
Data Types: Printing Float and Double
Open and modify the same file again to look like below:
#include <stdio.h>
int main()
{
    float number1 = 13.5;
    double number2 = 12.4;

    printf("number1 = %f\n", number1);
    printf("number2 = %lf", number2);
    return 0;
}
Compile the code again using format gcc filesource -o fileoutput
Run it ./fileoutput:
$ ./inputoutput.exe
number1 = 13.500000
number2 = 12.400000
To print float, we use %f format specifier. Similarly, we use %lf to print double values.
Data Types: Printing Characters
Open and modify the same file again to look like below:
#include <stdio.h>
int main()
{
    char chr = 'a';
    printf("character = %c", chr);
    return 0;
}
Remember to compile and then run:
$ ./inputoutput.exe
character = a
To print char, we use %c format specifier.
User Input in C
In C programming, scanf() is one of the commonly used function to take input from the user. The scanf() function reads formatted input from the standard input such as keyboards.
Again we will modify the program to look like the code below:
#include <stdio.h>
int main()
{
    int testInteger;
    printf("Enter an integer: ");
    scanf("%d", &testInteger);
    printf("Number = %d",testInteger);
    return 0;
}
Compile and run:
$ ./inputoutput.exe
Enter an integer: 4
Number = 4
Here, we have used %d format specifier inside the scanf() function to take int input from the user. When the user enters an integer, it is stored in the testInteger variable.
Notice, that we have used
&testIntegerinsidescanf(). It is because&testIntegergets the address oftestInteger, and the value entered by the user is stored in that address. We will cover addressing and pointers at a later date.
Format Specifiers
Here is a table of possible format specifiers for input and output:
| Data Type | Format Specifier |
|---|---|
int | %d |
char | %c |
float | %f |
double | %lf |
short int | %hd |
unsigned int | %u |
long int | %li |
long long int | %lli |
unsigned long int | %lu |
unsigned long long int | %llu |
signed char | %c |
unsigned char | %c |
long double | %Lf |
5. Data Types
Create a new file with nano like this:
$ nano dataTypeSize.c
We are going to write a program that returns the size of each data type availabe in c.
#include<stdio.h>
int main(){

    printf("Data_Types\t\tStorage_Size \n");
    printf("char\t\t\t%d byte(s) \n", sizeof(char));
    printf("int\t\t\t%d byte(s) \n", sizeof(int));
    printf("double\t\t\t%d byte(s) \n", sizeof(double));
    printf("float\t\t\t%d byte(s) \n", sizeof(float));
    printf("unsigned char\t\t%ld byte(s) \n", sizeof(unsigned char));
    printf("long\t\t\t%d byte(s) \n", sizeof(long));
    printf("unsigned long\t\t%ld byte(s) \n", sizeof(unsigned long));
    printf("long double\t\t%ld byte(s) \n", sizeof(long double));

    return 0;
}
gcc dataTypeSize.c -o dataTypeSize.exe
Now enter the following to see the data types and there available sizes in bytes:
$ ./dataTypeSize.exe
Click for Expected Output
Data_Types              Storage_Size
char                    1 byte(s)
int                     4 byte(s)
double                  8 byte(s)
float                   4 byte(s)
unsigned char           1 byte(s)
long                    8 byte(s)
unsigned long           8 byte(s)
long double             16 byte(s)
6. Conditions in C (If-Statement)
Basic if statement
In C, the if statement is a fundamental control structure that allows you to make decisions based on certain conditions. It enables you to execute different blocks of code based on whether a condition is true or false.
Create a C Program
-
Create a new C file using a text editor like
nano:$ nano IfStatement.c -
Write a program that applies the
ifstatement in C to check if the variablenumis greater than 5 using anifstatement. If the condition is true, the code inside theifblock is executed, and it prints a message.#include <stdio.h> int main() { int num = 10; if (num > 5) { printf("The number is greater than 5.\n"); } return 0; } -
Save the file and exit the text editor.
-
Compile your C code using the
gcccompiler to generate an executable file:$ gcc IfStatement.c -o IfStatement.exe -
Run your C program using the generated executable file:
$ ./IfStatement.exe
This program will output "The number is greater than 5" because the condition num > 5 is true.
If-else statement
You can use an if-else statement to execute different code blocks for true and false conditions. Update your code as follows:
#include <stdio.h>

int main() {
    int num = 3;

    if (num > 5) {
        printf("The number is greater than 5.\n");
    } else {
        printf("The number is not greater than 5.\n");
    }

    return 0;
}
If-else if statement
You can use the if-else if statement to handle multiple conditions. Update your code as follows:
#include <stdio.h>

int main() {
    int num = 0;

    if (num > 0) {
        printf("The number is positive.\n");
    } else if (num < 0) {
        printf("The number is negative.\n");
    } else {
        printf("The number is zero.\n");
    }

    return 0;
}
Note: Make sure to save, commit, and sync your work regularly
Exersices
To write the code for each of the following tasks, open this link and accept the task. A C file has been created for each task; you only need to write the code for each one. Again, you can use either use VScode or Codepsaces on Github after accepting the task .
Exercise-1: Even or Odd
Create a program that checks whether a given integer is even or odd. Prompt the user to enter an integer, and then display a message indicating whether it's even or odd.
Solution
#include <stdio.h>

int main() {
    int num;

    printf("Enter an integer: ");
    scanf("%d", &num);

    if (num % 2 == 0) {
        printf("%d is even.\n", num);
    } else {
        printf("%d is odd.\n", num);
    }

    return 0;
}
Exercise-2 Prime Number Checker
Write a program that determines if a given number is prime or not.
Note:
- A prime number is a natural number greater than 1 that cannot be formed by multiplying two smaller natural numbers. In other words, a prime number has only two positive divisors: 1 and itself. For example, the first few prime numbers are 2, 3, 5, 7, 11, 13, 17, and so on. These numbers are only divisible evenly by 1 and the number itself.
Solution
#include <stdio.h>

int is_prime(int number) {
    if (number < 2) {
        return 0; // False
    }
    for (int i = 2; i * i <= number; i++) {
        if (number % i == 0) {
            return 0; // False
        }
    }
    return 1; // True
}

int main() {
    int num;

    printf("Enter a number: ");
    scanf("%d", &num);

    if (is_prime(num)) {// calling the function above.
        printf("%d is a prime number.\n", num);
    } else {
        printf("%d is not a prime number.\n", num);
    }

    return 0;
}
Exercise-3 : Simple Calculator
Write a basic calculator program that allows the user to perform addition, subtraction, multiplication, and division on two numbers. Ask the user to enter the operation they want to perform and the numbers to operate on.
Solution
 #include <stdio.h>

int main() {
    char operation;
    double num1, num2, result;

    printf("Enter operation (+, -, *, /): ");
    scanf(" %c", &operation);

    printf("Enter first number: ");
    scanf("%lf", &num1);

    printf("Enter second number: ");
    scanf("%lf", &num2);

    if (operation == '+') {
        result = num1 + num2;
    } else if (operation == '-') {
        result = num1 - num2;
    } else if (operation == '*') {
        result = num1 * num2;
    } else if (operation == '/') {
        if (num2 != 0) {
            result = num1 / num2;
        } else {
            printf("Cannot divide by zero. Please enter a non-zero second number.\n");
            return 1; // Return an error code
        }
    } else {
        printf("Invalid operation. Please choose +, -, *, or /.\n");
        return 1; // Return an error code
    }

    printf("Result: %lf\n", result);

    return 0;