Part-1 Getting started with working tools
For this module, we will use Git, Visual Studio Code (VS Code), and Codespaces for coding in C (on any other lanugae)to enhance collaboration and efficiency. These tools will play a significant role in the upcoming modules over the next two years and beyond.
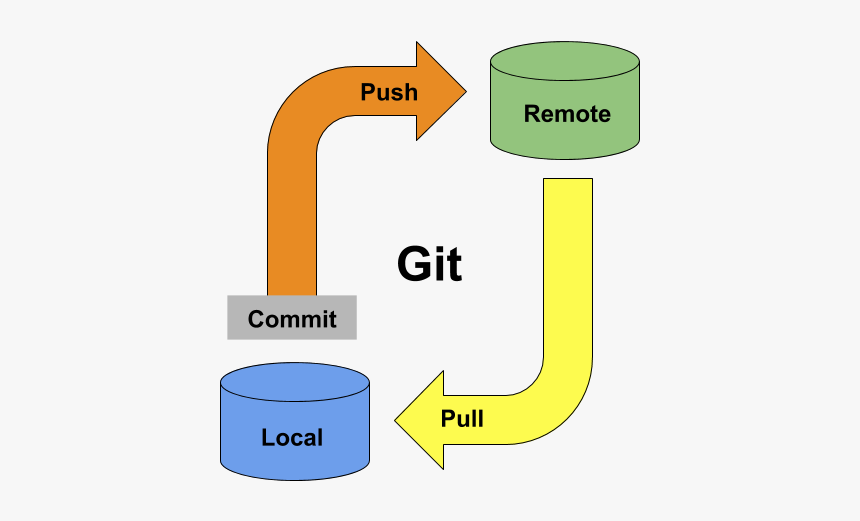
Git is a free and open source distributed version control system designed to handle everything from small to very large projects with speed and efficiency. And for this we will be using Github.
The following explains why:
-
Version Control
GitHub is a robust platform for version control, enabling you to monitor changes in youe code, collaborate effectively, and effortlessly revert to previous versions when needed. This skill is fundamental for software development and collaborative projects.
-
Collaboration
GitHub provides a suite of features for team collaboration, simplifying teamwork on coding projects. you can share code, review and comment on each other's work, and jointly resolve issues.
-
Professional Skills
Proficiency in GitHub is a valuable skill for prospective careers in software development, web development, and various tech-related domains. Numerous companies and organisations utilise GitHub for their projects.
-
Open Source Contribution
GitHub serves as a central hub for open-source projects.
-
Documentation and Portfolio
GitHub enables you to present their work, including coding projects, in a structured and organised format. This serves as an effective portfolio for potential employers to review.
-
Real-World Experience
Using GitHub introduces you to real-world development practices, encompassing code review, issue tracking, and collaborative work, which will better prepare them for professional development environments.
Task-1 Creating a GitHub Account
To create your GitHub account using your university email address (@canterbury.ac.uk), follow these steps:
-
Visit GitHub in your web browser.
-
Click on the "Sign Up" button.
-
Complete the necessary information:
- Username: Please use your first name, surname, and student ID as your username (e.g., JohnDoe12345).
- Email address: Use your university email address (@canterbury.ac.uk).
- Password: Choose a secure password.
-
Complete the remaining registration steps as instructed.
-
Verify your email address by clicking on the link sent to your university email.
With your GitHub account created, you'll be ready to utilise it for your coursework and collaborations. Ensure you remember your username and password for future access.
Should you encounter any issues during the registration process, don't hesitate to seek assistance.
Task-2 Getting Started with VS Code and GitHub
To set up VS Code and link it to GitHub, follow these steps:
-
Install Visual Studio Code (VS Code):
- If you are using your personal computer, download and install VS Code from the official website.
- If you are using a university machine, check if VS Code is already installed. If not, contact your university's IT support for installation guidance.
-
Open VS Code:
- Launch VS Code on your computer.
-
Extensions:
-
VS Code offers numerous extensions to enhance your development experience. Explore and install relevant extensions from the Visual Studio Code Marketplace within the editor.
-
Installing Extensions in Visual Studio Code
To work efficiently with C/C++ code in VS Code, you'll need to install some extensions and configure settings. Follow these steps:
- Install C/C++ Support:
-
Go to the Extensions tab in VS Code. You can access it from the sidebar on the left or by using the shortcut
Ctrl + Shift + X(orCmd + Shift + Xon Mac).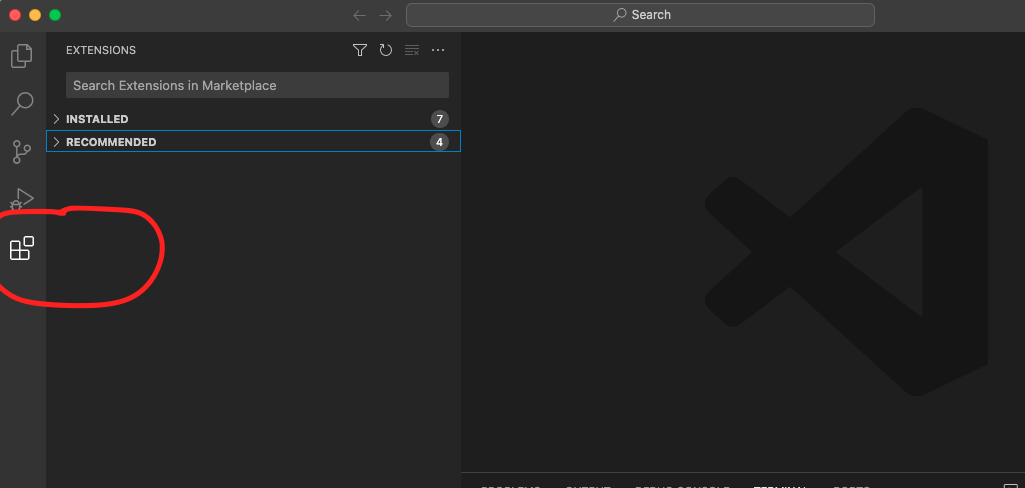
-
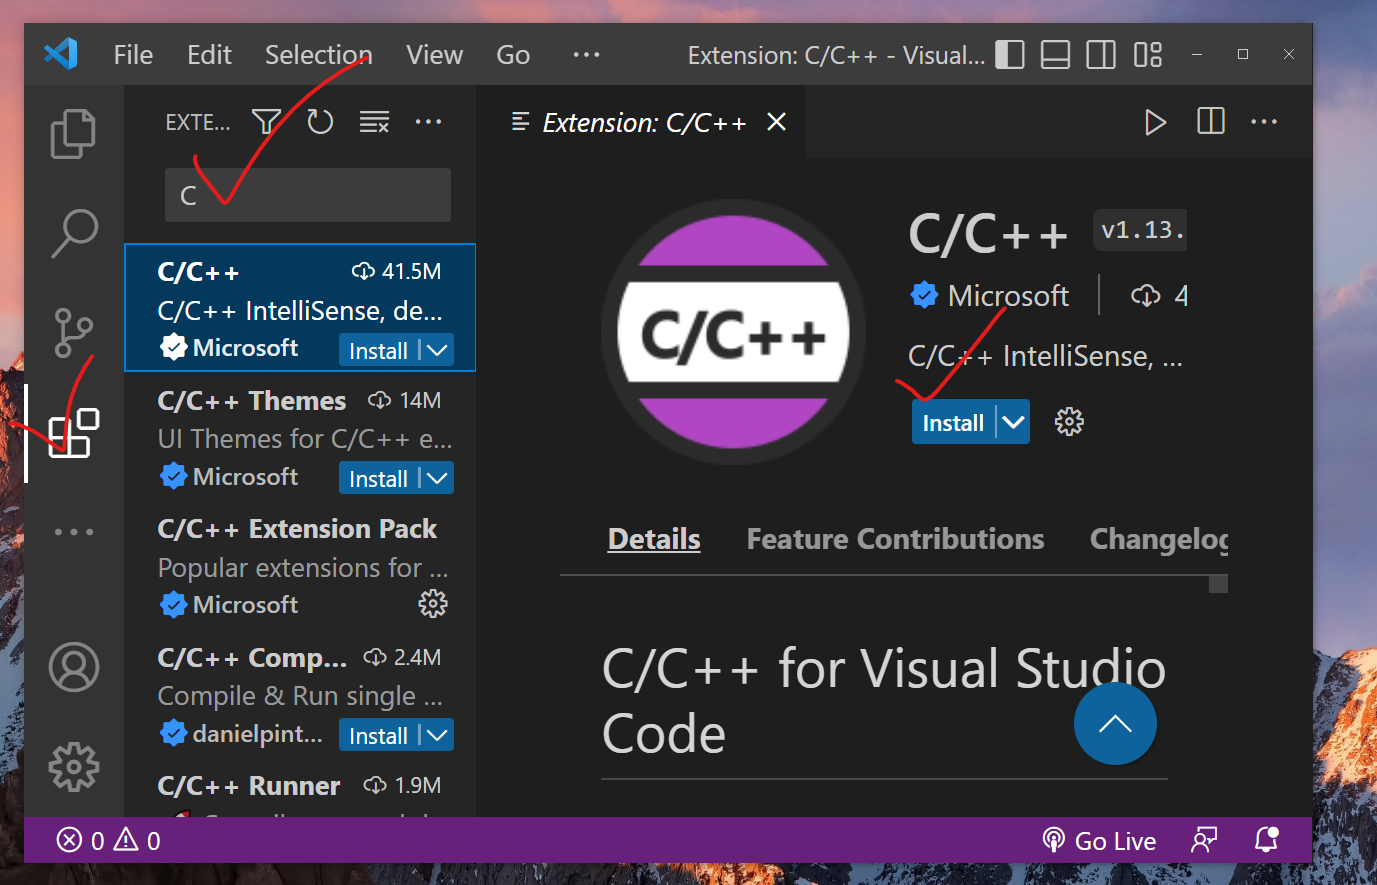
In the search bar, type "C" or "C++."
-
Install the first extension that is already verified by Microsoft itself.
-
-
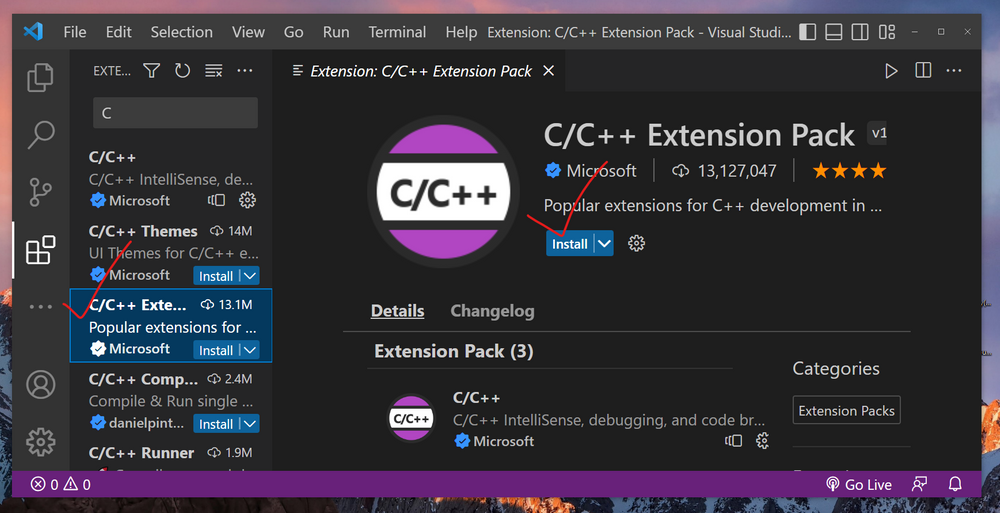
Install C/C++ Extension Pack:
- While still in the Extensions tab, search for "C/C++ Extension Pack."
- Make sure it is verified by Microsoft and install it.
-
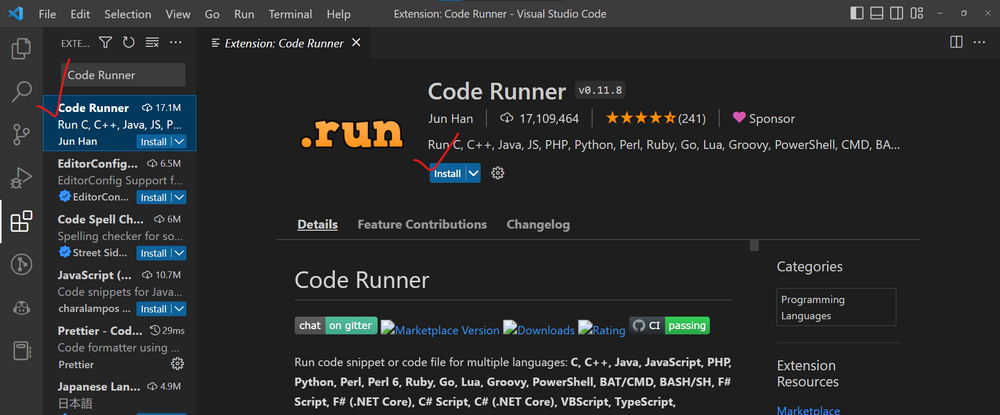
Install Code Runner:
- Search for "Code Runner" in the Extensions tab.
- Install the "Code Runner" extension.
Now that you have the necessary extensions installed, let's configure some settings:
-
Accessing Settings:
- Click on the gear icon in the lower-left corner (called the Manage section), and then click on Settings.
- Alternatively, you can use the shortcut keys
Ctrl + ,(Cmd + ,on Mac) to access the settings.
-
Enabling "Run Code in Terminal":
- In the search bar within the Settings panel, type "Run code in terminal" and press the Enter key.
- Scroll down the search results until you find "Code-runner: Run In Terminal."
- Make sure the checkbox is checked (✔) to enable running code in the terminal.
With these extensions and settings in place, you're now ready to work with C/C++ code effectively in Visual Studio Code. These tools will enhance your coding experience and streamline your development workflow.
-
-
GitHub Account:
- If you don't already have a GitHub account, refer to the instructions provided earlier to create one.
-
Linking VS Code to GitHub:
- To initiate your first project, click on this link.
- Click the "Accept this assignment" button. This action will create your personal repository for the assignment.
-
Repository Creation:
- Your personal repository for the assignment will be created on GitHub, granting you read and write access.
-
Clone the Repository (Optional):
- If you prefer working on the assignment locally in your development environment (e.g., VS Code), you can clone the repository using the provided URL after accepting the project. This enables you to work on the assignment on your computer and push your changes back to your GitHub repository.
-
Begin Your Work:
- With the assignment/task accepted, you can commence your work.
Remember that when using university machines, use the local software to ensure compatibility and access to essential tools.
By following these steps, you'll be well-prepared to work with VS Code and GitHub for your coding projects.
Task-3 Getting Started with GitHub Codespaces
If you don't have access to Visual Studio Code locally or remotely, you can utilise GitHub Codespaces. GitHub Codespaces is a robust cloud-based development environment that simplifies coding and collaboration. Follow these steps to learn how to use it.
Creating a Codespace
-
Navigate to Your Repository:
- Visit your GitHub repository that you want to work on.
-
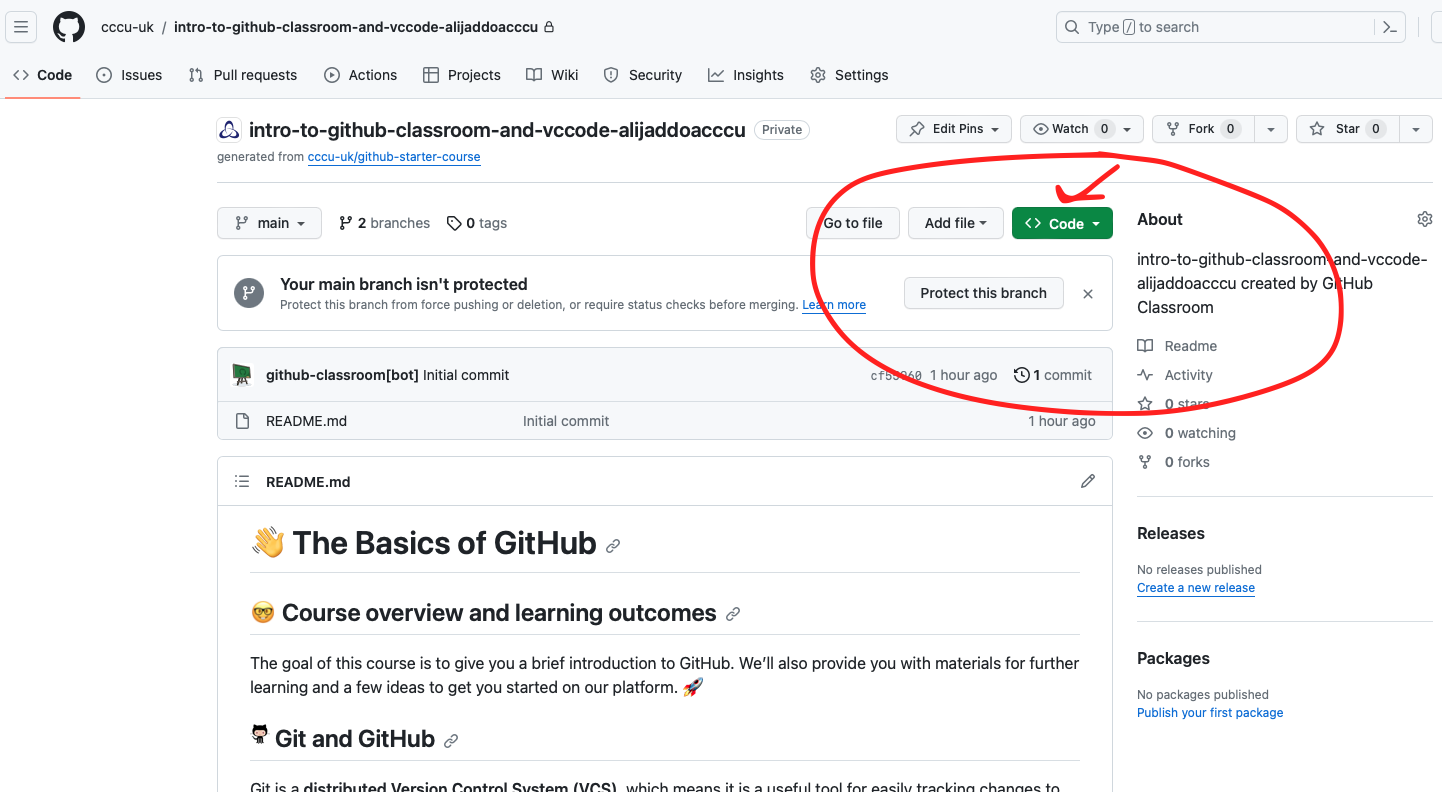
Click on "Code":
- In your repository, click the "Code" button.
-
Select "Open with Codespaces":
- From the dropdown menu, select "Open with Codespaces."
-
Configure Codespace (If Necessary):
- You can configure your Codespace by choosing the development environment settings, such as the programming language, runtime, and tools. You can also use a predefined Codespace configuration if provided by your project.
-
Click "Create Codespace":
- Click the "Create Codespace" button to initialize your Codespace. This may take a few moments.
-
Accessing Your Codespace:
- Once your Codespace is ready, you'll be directed to the Codespace's web-based development environment. You can start coding right away.
Using Your Codespace
Here are some essential actions and features you can use within your GitHub Codespace:
-
Integrated Development Environment (IDE): Codespaces provide a full-fledged IDE with code editing, debugging, and terminal access.
-
Git Integration: You can commit, push, and pull changes directly from your Codespace.
-
Collaboration: Share your Codespace with others, allowing for collaborative development.
-
Extensions: Customize your Codespace by installing VS Code extensions just as you would in a local development environment.
-
Cloud-Powered: Your Codespace is hosted in the cloud, so you can access it from anywhere with an internet connection.
-
Terminal Access: Open a terminal in your Codespace to run commands, manage dependencies, and execute scripts.
Task-4 Commit, Push, and Sync with Visual Studio Code
In this lab, you will learn how to use essential Git commands like commit, push, and sync within VS Code. These commands are crucial for managing your Git repositories and collaborating with others.
Step 1: Open Your Project in VS Code
-
Open Visual Studio Code.
-
Use the "Open Folder" option to select and open your project directory.
Step 2: Making Changes
-
Make some changes to your project's files. This could be modifying existing files or creating new ones.
-
Save your changes within VS Code.
Step 3: Commit Your Changes
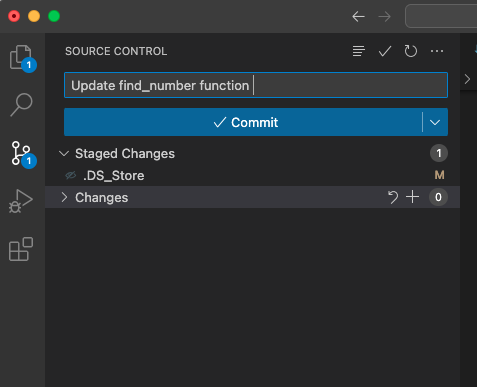
- In VS Code, open the Source Control panel. You can do this by clicking on the Source Control icon in the left sidebar (it looks like a checkmark).

-
You'll see a list of files with changes. Stage the changes by clicking the "+" icon next to each file, or you can stage all changes by clicking the "+" icon at the top.
-
Enter a commit message in the provided field. This message should briefly describe the changes you made.
-
Click the checkmark icon to commit your changes.
Step 4: Push, Sync Changes with Remote
- Click the "Sync" button in the Source Control panel to ensure your local and remote repositories are in sync.
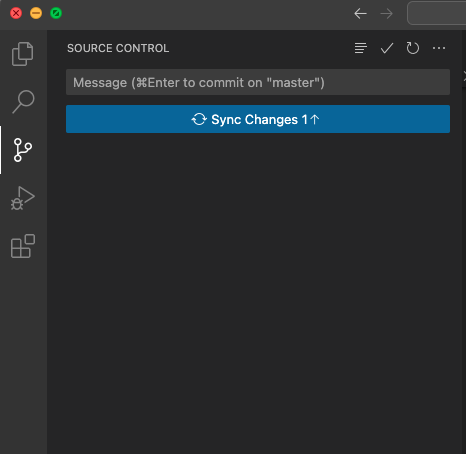
You're now up to date and can continue working.
Step 5: Verify Your Changes on GitHub
- Visit your GitHub repository in your web browser to verify that your changes have been pushed to the remote repository.
Now! You've successfully learned how to commit, push, and sync your changes using Visual Studio Code. These skills are vital for effective version control and collaboration when working on coding projects.
Saving and Exiting
Remember to save your work in your Codespace, just like you would with a local development environment. To exit your Codespace, simply close the browser tab or navigate back to GitHub.
GitHub Codespaces offers a flexible and collaborative coding environment that enables you to work seamlessly from anywhere. Enjoy your coding experience with the power of the cloud!
Part-2 : CPU-Z: Local Hardware Investigation Lab
This lab is designed to enhance your understanding of local hardware configurations using CPU-Z.
-
Software Installation:
- Download and install the CPU-Z software from the "Week-1" folder on Blackboard: Download Link.
-
Hardware Investigation:
- Use CPU-Z to investigate the following hardware components:
- CPU:
- Identify the CPU model.
- Note down the base and boost clock speeds.
- Determine the number of cores and threads.
- Cache:
- Explore the L1, L2, and L3 cache sizes.
- Memory:
- Obtain information about the installed RAM.
- Identify RAM type (DDR, DDR2, DDR3, DDR4).
- Note down the frequency and size of the RAM.
- CPU:
- Use CPU-Z to investigate the following hardware components:
-
Reporting:
- Write a small report summarizing your findings.
- Include a brief overview of your CPU, cache, and memory specifications.
- Highlight any interesting observations or variations.