Session 07 - Carving a Picture out of a file with dd
Requirements are found here
This exercise is designed to teach you the very basics of hand-carving specific data from an image file, or directly from a damaged filesystem.
Settings things up
Additionally, ensure that your Linux distribution has the following tools installed:
First check if these tools are installed using which (e.g., $ which xxd and $ which bc, if you simply get your prompt back then they are not installed, if you get something back like /usr/bin/xxd, then you have them installed).
xxda hexdumperbca commandline calculator
How these tools must be installed depends on your distribution. If you're using a Debian-derived Linux distribution such as Ubuntu, Mint, or Kali, to name a few, then the following will install the above software using the apt package manager:
$ sudo apt update
$ sudo apt install xxd bc
If your Linux distribution is not based on Debian, find out which one it is based on and use the appropriate package manager for that distribution instead. The invocation will be very similar.
Make sure you've transferred the file
image_carve.rawto your machine.
Start the Task
Create a directory called carving, move the image file into it, and change into the directory.
$ mkdir -p ~/analysis/carving
Assuming you've saved the image_carve.raw file in your home, move it to the newly created directory.
$ mv ~/image_carve.raw ~/analysis/carving/
Change into the directory.
$ cd ~/analysis/carving
View image_carve.raw using xxd.
$ xxd image_carve.raw | less
Note: You'll see a bunch of random characters flying past your screen. Somewhere in there is a JPEG file.
The Concept
Conceptually, Figure 1 below should help visualise what our goal is:
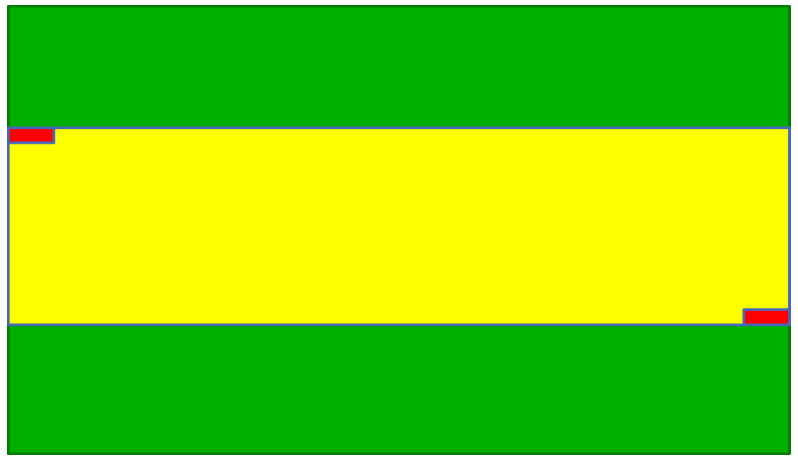 Figure 1: Conceptual diagram of a picture surrounded by junk data
The green represents "random" characters, which might be actually random data, or it might be another file, or it might be only part of another file. The yellow and red represents the JPEG file. The red parts indicate the header (ffd8) and trailer/footer (ffd9) of the JPEG.
Extraction Plan
Here's what you'll want to do:
- Find the start of the JPEG (using xxd and grep)
- Find the end of the JPEG (using xxd and grep)
- Calculate the size of the JPEG (in bytes using bc)
- Cut from the start to the end and output a file (using dd)
First Step
$ xxd image_carve.raw | grep ffd8
Note: You might recall, most files have header and footer information, JPEG's have
ffd8as their header identifier, andffd9as the footer.
You will see the offset 00052a0, which is the beginning of the line where ffd8 was found.
Note: The view is similar to what you're used to in
HxD, so row, and column - except thatxxddoesn't provide columns! (╯°□°)╯︵ ┻━┻
Second Step
Next, we must convert that offset to a number we can later pass on to dd (more later).
$ echo "ibase=16;000052A0" | bc
Note:
bccan't deal with lower-case letters, so you must make sure you remember to replace any lower-case letter with its upper-case equivalent!
This will return 21152 (same offset, just converted to decimal). The start of the JPEG, however, is actually 4 bytes further in, so we need to add 4 bytes to the current offset, which gives us a new offset of 21156, see the below image with yellow highlighting the 4 bytes that need to be added just before ffd8 starts.

Third Step
Now that we know where the beginning of the JPEG file is, we must find its end. To do that, we include the offset from earlier in the search (so we can avoid false-positive results):
$ xxd -s 21156 image_carve.raw | grep ffd9
This will return an offset in hex of 00006c74 as the beginning of the line containing ffd9.
Fourth Step
As before, we will also need to convert the footer offset from hex to decimal. We will need this information so we can calculate how big the JPEG is.
$ echo "ibase=16;0006C74" | bc
This will return 27764 (same offset, converted to decimal, as before).
We also need to include the remainder of ffd9. If we were to just carve up to ffd9 we would miss the entire footer which, forensically speaking, is not ideal. We can simply add 2 bytes to the offset in this case, and our result will be: 27766.

Fifth Step
With the adjusted offsets we found and calculated earlier, we can now calculate the size of the JPEG file, using simple arithmetic and the useful commandline calculator, bc.
$ echo "27766-21156" | bc
This will return 6610 bytes, which tells us how big the JPEG is.
Sixth Step
We have all the information we need to manually carve the JPEG from the image file.
$ dd if=image_carve.raw of=result.jpg skip=21156 bs=1 count=6610
The process will be really quick and if you now type ls to list your directory contents, you'll see a new file, result.jpg. Launch a command, or double-click on the file in your file manager, to view it.
You are encouraged to view the man page for dd to understand the commandline switches we used, but here's a quick breakdown:
| Switch | Description |
|---|---|
| if= | Input File, the file you want dd to work on |
| of= | Output File, the file name you want dd to write the result to |
| skip= | Skip n bytes into the input file before starting the extraction |
| bs= | The amount of bytes dd should read at once. By default dd uses 512 bytes, which is not precise enough for our purposes, so we set it to 1 |
| count= | This tells dd how many times dd should apply the bs= count from earlier |
If we were to leave bs= alone, the default of 512 bytes would apply, and subsequently dd would carve 512 * 6610 bytes, which is not what we want. We want dd to carve exactly 6610 bytes (as this is the size of the JPEG file), hence 1 * 6610.
Now What?
At some point soon, you'll receive instructions on how to create your own image file. You are in control of the contents of that image file, and therefore you'll be able to experiment with different file signatures (i.e. headers and footers/tails). This exercise used a very simple image file where the offsets are grouped (e.g., ffd9 vs ff d9). As you continue to experiment, you'll have to find ways of compensating for such discrepancies.