Welcome to U19968 --- Digital Forensics and Ethical Hacking
This lab material accompanies your lectures for this module. Please use the navigation bar on the left to select the lab material you want to view.
Lab material will be release on a weekly basis.
| To quickly access these labs on your mobile phone or tablet, simply scan the QR code. |  |
Accessibility and Navigation
There are several methods for navigating through the chapters (i.e., sessions), and pages.
The page table of contents bar on the right provides a list of sections in the currently opened page. You can click on each entry to quickly jump between sections and subsections. This is particularly useful if the page is very long and scrolling up and down is annoying.
The sidebar on the left provides a list of all chapters/sessions. Clicking on any of the chapter/session titles will load that page.
The sidebar may not automatically appear if the window is too narrow, particularly on mobile displays. In that situation, the menu icon () at the top-left of the page can be pressed to open and close the sidebar.
The arrow buttons at the bottom of the page can be used to navigate to the previous or the next chapter.
The left and right arrow keys on the keyboard can be used to navigate to the previous or the next chapter.
Top menu bar
The menu bar at the top of the page provides some icons for interacting with the book. The icons displayed will depend on the settings of how the book was generated.
| Icon | Description |
|---|---|
| Opens and closes the chapter listing sidebar. | |
| Opens a picker to choose a different color theme. | |
| Opens a search bar for searching within the book. | |
| Instructs the web browser to print the entire book. | |
| Opens a link to the website that hosts the source code of the book. | |
| Opens a page to directly edit the source of the page you are currently reading. |
Tapping the menu bar will scroll the page to the top.
Search
Each book has a built-in search system.
Pressing the search icon () in the menu bar, or pressing the S key on the keyboard will open an input box for entering search terms.
Typing some terms will show matching chapters and sections in real time.
Clicking any of the results will jump to that section. The up and down arrow keys can be used to navigate the results, and enter will open the highlighted section.
After loading a search result, the matching search terms will be highlighted in the text.
Clicking a highlighted word or pressing the Esc key will remove the highlighting.
You have the ability to change the theme of the mdBook by clicking the icon on the top left mdBook. Additionally, there is a toggle for the table of content, and a search tool.
Session 01 - Choose your Deployment Method
Choose one of the options below.
Bare-metal Deployment
If you want to run Kali Linux directly on a PC (Laptop or Desktop) proceed with the below link to the bare-metal deployment instructions:
Virtual Machine Deployment
If you want to run Kali Linux as a Virtual Machine on your PC, proceed with the below link to the virtual machine deployment instructions:
USB-only Deployment
If you want to run Kali Linux off a USB stick in a live-environment (i.e., not altering the locally installed operating system), proceed with the below link to the live USB-only deployment instructions:
Session 01 - Bare-metal Deployment
Requirements
- A PC (Laptop or Desktop) that you own (so, not machines belonging to the university)
- 1 USB Stick (min. 4GB; any data on it will be destroyed)
Steps
01 Get the Kali Linux Image
- Click on this link https://www.kali.org/get-kali/#kali-installer-images
- It is recommended to use the "Installer 64" image for most use-cases
- If you have a torrent client installed, click "torrent" (maximum download speed)
- If you don't or just want to download using the web browser, click on the down-arrow
In any case, you should end up with an image file called kali-linux-YYYY.N-installer-amd64.iso (where YYYY is the year and N is the annual release).
02 Prepare the USB Stick
You now need to transfer the ISO to the USB stick. This depends on the operating system you're using.
On Windows
- Download "Rufus" from here: https://rufus.ie/en/
See instructions below the pictures.
- If not already done, plug in your USB stick and select your USB stick from the "Device" List (if Rufus hasn't done so for you already)
- Click on "SELECT" and choose the image you downloaded earlier
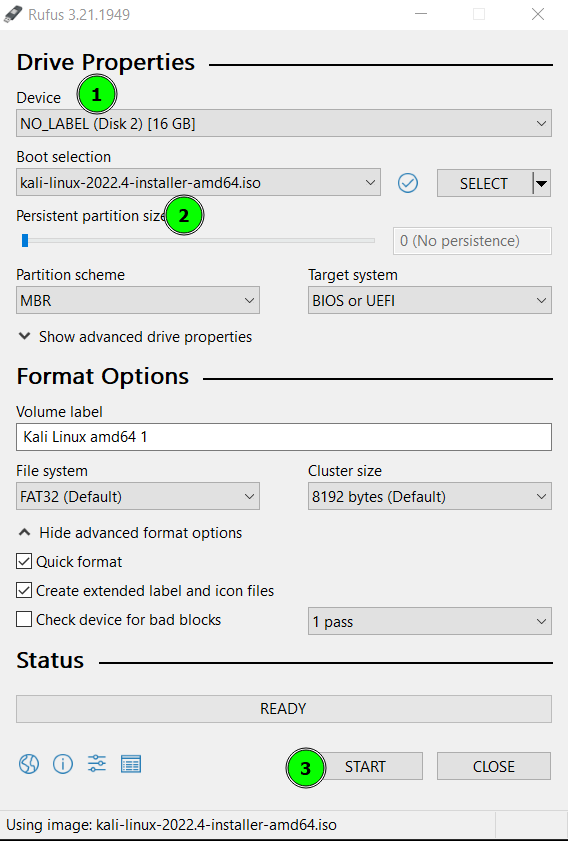
Rufus will populate the settings, but ensure that:
- The USB stick is listed in the "Device" section
- The correct ISO image file is selected
- Click START once satisfied
After a few minutes you should have a USB stick ready for installation.
On macOS
There are various ways to write an ISO image to a USB stick, but the most straightforward is probably to use UNetbootin, which you can download here: https://unetbootin.github.io/
- Launch UNetbootin once downloaded
- Click on Diskimage and click on the "..." button to select the ISO image downloaded previously
- Ensure that your USB stick is listed under Drive
- Click on OK to start the writing process
On Linux
The most straightforward way is to use DD.
- Open a terminal
- Change directory to where you downloaded the ISO image (e.g.,
cd ~/Downloads) - Write the image to the USB stick:
sudo dd if=kali-linux-YYYY.N-installer-amd64.iso of=/dev/sdX bs=64k status=progress
- Make sure that you are referencing the correct ISO file you downloaded (e.g., kali-linux-2022.4-installer-amd64.iso)
- Make sure that you're referencing the correct device identifier to write the image to (e.g., replace X in
sdXwith the appropriate letter for the USB stick; double check which letter to use by callingdmesgin the terminal)
03 Prepare the PC
- Make sure the PC to have Kali installed on is powered off
- Insert the USB stick into the PC's USB port
- Power on the PC and immediately start repeatedly pressing the key responsible for activating the boot menu (this might be F11 or F12, or something else, in which case you'll have to look up your PCs manual and find out how to get to the boot menu)
- From the boot menu, select the USB stick
- Read and follow the installation prompts carefully; use https://www.kali.org/docs/installation/hard-disk-install/ if necessary
04 Post-Installation Configuration
Once completed, follow the post-installation steps to complete the installation!
Session 01 - Virtual Machine Deployment
Requirements
- A PC or Mac running a virtualisation platform
- On Windows: VirtualBox or VMware
- On macOS: VirtualBox or VMware or Parallels
- On Linux: VirtualBox or QEMU/libvirt
You can download an image for your platform from https://www.kali.org/get-kali/#kali-virtual-machines.
Once downloaded, import the image to your virtualisation platform and then follow the post-installation configuration to complete the installation.
Session 01 - USB-only Live-environment
Requirements
- A PC or Mac running Windows, Linux, or macOS
- 1 USB stick (at least 16GB storage capacity)
Download the live image from https://www.kali.org/get-kali/#kali-live.
It is suggested that you use the Everything Kali image (left) and download it either directly or using a torrent client (which is probably faster).
01 Prepare the USB Stick
You now need to transfer the ISO to the USB stick. This depends on the operating system you're using.
On Windows
- Download "Rufus" from here: https://rufus.ie/en/
See instructions below the pictures.
- If not already done, plug in your USB stick and select your USB stick from the "Device" List (if Rufus hasn't done so for you already)
- Click on "SELECT" and choose the image you downloaded earlier
Rufus will populate the settings, but ensure that:
- The USB stick is listed in the "Device" section
- The correct ISO image file is selected
- Click START once satisfied
After a few minutes you should have a USB stick ready for use.
On macOS
There are various ways to write an ISO image to a USB stick, but the most straightforward is probably to use UNetbootin, which you can download here: https://unetbootin.github.io/
- Launch UNetbootin once downloaded
- Click on Diskimage and click on the "..." button to select the ISO image downloaded previously
- Ensure that your USB stick is listed under Drive
- Click on OK to start the writing process
On Linux
The most straightforward way is to use DD.
- Open a terminal
- Change directory to where you downloaded the ISO image (e.g.,
cd ~/Downloads) - Write the image to the USB stick:
sudo dd if=kali-linux-YYYY.N-installer-amd64.iso of=/dev/sdX bs=64k status=progress
- Make sure that you are referencing the correct ISO file you downloaded (e.g., kali-linux-2022.4-installer-amd64.iso)
- Make sure that you're referencing the correct device identifier to write the image to (e.g., replace X in
sdXwith the appropriate letter for the USB stick; double check which letter to use by callingdmesgin the terminal)
Test the Live-environment
Either reboot your PC/Mac, or use the USB stick on another machine to test that it worked.
- Make sure the PC/Mac you want to run Kali on via USB, is powered off
- Insert the USB stick into the PC/Mac's USB port
- Power on the PC and immediately start repeatedly pressing the key responsible for activating the boot menu (this might be F11 or F12, or something else, in which case you'll have to look up your PCs manual and find out how to get to the boot menu)
- From the boot menu, select the USB stick
- After a little while you should have a fully-functioning USB-only live-environment ready
Session 01 - Post-installation Configuration
Requirements
- A Kali Linux installation or virtual machine
- Ensure that you're connected to the Internet (WiFi or LAN; use the network manager applet on the top right next to the clock for WiFi)
Updating the System
- Open a terminal
- Gain root privileges:
$ sudo su(password by default iskali) - Update the system:
$ sudo apt update && sudo apt full-upgrade - If necessary, reboot the system
Finally, if you haven't done so already during installation, ensure that a good collection of tools are installed on your system.
- Open a terminal
- Install everything available:
$ sudo apt install kali-linux-everything
Setting Keyboard Layout
By default, Kali uses the US keyboard layout. To switch to the UK keyboard layout proceed as follows:
- Click on the Kali logo on the top left
- Click on
Settingsand then on the right sideKeyboard
In the keyboard dialogue:
- Click on the
Layouttab - Click on the button next to "Use system defaults"
- At the bottom, click on the "+ Add" button, then scroll down and click on "English (UK)" (no need to expand the sub-list), and click OK
- Click on "English (US)" and then click on "- Remove" to remove the US layout permanently
Session 02
This was a long teaching session, therefore, there is no explicit lab for this session. However, you'll want to start practising the use of Python in addition to the contents of this module.
Some good resources to get you started:
- learnpython.org
- The Hitchhiker's Guide to Python
- Real Python
- Phil Jones' YouTube channel has lots of extremely well explained Python stuff (highly recommended)
Session 03 - Python for Forensics
- simplemaths.py
- simplemaths2.py
- magic8ball.py
- guessingGame.py
- snakes.py
- passwordmanager.py
- wordswap.py
- database.py
- tcpClient.py
- tcpServer.py
- udpClient.py
- udpServer.py
- passwordCrackZipExtA.py
- passwordCrackZipExtB.py
- passwordCrackZipExtC.py
- passwordCrackZipExtD.py
- passwordCrackZipExtE.py
- passwordCrackZipSimple.py
- logParserExt.py
Session 03 - Python for Forensics
The code here is to support the Session 03 lecture.
simplemaths.py
def convertInteger(numberInput):
    convertedNumber = int(numberInput)

    return convertedNumber

def sum(firstNumber,secondNumber):
    firstNumberInt = convertInteger(firstNumber)
    secondNumberInt = convertInteger(secondNumber)

    result = firstNumberInt + secondNumberInt

    return result

answer = sum("1","2")

print("Answer is: " + str(answer))
Session 03 - Python for Forensics
The code here is to support the Session 03 lecture.
simplemaths2.py
def convertInteger(numberStr):
    convertedInt = int(numberStr)

    return convertedInt

def sum(numberOneStr,numberTwoStr):
    numberOneInt = convertInteger(numberOneStr)
    numberTwoInt = convertInteger(numberTwoStr)

    result = numberOneInt + numberTwoInt

    return result

numberOneStr = input("Please enter the first number: ")
numberTwoStr = input("Please enter the second number: ")

answer = sum(numberOneStr,numberTwoStr)

print("Answer is: " + str(answer))
Session 03 - Python for Forensics
The code here is to support the Session 03 lecture.
magic8ball.py
import random

def getAnswer(answerNumber):
    if answerNumber == 1:
        return 'It is certain'
    elif answerNumber == 2:
        return 'It is decidedly so'
    elif answerNumber == 3:
        return 'Yes'
    elif answerNumber == 4:
        return 'Reply hazy, try again'
    elif answerNumber == 5:
        return 'Ask again later'
    elif answerNumber == 6:
        return 'Concentrate and ask again'
    elif answerNumber == 7:
        return 'My reply is no'
    elif answerNumber == 8:
        return 'Outlook not so good'
    elif answerNumber == 9:
        return 'Very doubtful'

r = random.randint(1, 9)
fortune = getAnswer(r)
print(fortune)
Session 03 - Python for Forensics
The code here is to support the Session 03 lecture.
guessingGame.py
import random

def main():
    print("Hello! What is your name?")
    userName = input()

    print(f"Well, {userName}, I am thinking of a number between 1 and 20!")

    secretNumber = random.randint(1, 20)
    attempts = 0

    while attempts < 6:
        print("Take a guess:")
        userGuess = int(input())

        attempts += 1

        if userGuess < secretNumber:
            print("Too Low!!")
        elif userGuess > secretNumber:
            print("Too High!!")
        else:
            print(f"Good Job! It took you {attempts} attempts to guess the number.")
            break

    if userGuess != secretNumber:
        print(f"Sorry, {userName}. The number I was thinking of was {secretNumber}.")

if __name__ == "__main__":
    main()
Session 03 - Python for Forensics
The code here is to support the Session 03 lecture.
snakes.py
import random

def main():
    print("You are in a realm full of snakes. You can see two large tree-houses in front")
    print("of you at the top of two trees. In one tree, there are friendly snakes who will")
    print("share some treasures, but in the other, there are pythons who will kill you.")

    playAgain = "yes"

    while playAgain.lower() == "yes":
        chosenTree = input("Which tree will you go to? (1 or 2): ")

        if chosenTree == "1" or chosenTree == "2":
            print("You approach the tree...")
            print("It is dark and spooky...")

            snakeType = random.choice(["friendly", "python"])

            if snakeType == "python":
                print("A large snake jumps out at you! It hisses and opens its jaws...")
                print("It wraps itself around you tightly and crushes your ribs. You are dead.")
            else:
                print("A large snake jumps out at you! It hisses and opens its jaws...")
                print("It gives you some treasure!")

        else:
            print("Invalid choice. Please choose tree 1 or 2.")

        playAgain = input("Do you want to play again? (yes or no): ")

if __name__ == "__main__":
    main()
Session 03 - Python for Forensics
The code here is to support the Session 03 lecture.
passwordmanager.py
import sys
import random
import string
import pyperclip  # You might need to install this library using pip if it's not already installed

def genRandPassword(length=12):
    characters = string.ascii_letters + string.digits + string.punctuation
    return ''.join(random.choice(characters) for _ in range(length))

def savePassword(service, password):
    with open('passwords.txt', 'a') as file:
        file.write(f"{service}: {password}\n")

def main():
    print("Welcome to the Password Manager!")

    service = input("Enter the name of the service (e.g., email, website, bank): ")
    userChoice = input("Do you want to generate a random password? (yes/no): ")

    if userChoice.lower() == 'yes':
        password = genRandPassword()
    else:
        password = input("Enter your password: ")

    savePassword(service, password)
    print("Password saved successfully!")

    copyToClipboard = input("Do you want to copy the password to the clipboard? (yes/no): ")

    if copyToClipboard.lower() == 'yes':
        pyperclip.copy(password)
        print("Password copied to clipboard.")

if __name__ == "__main__":
    main()
Session 03 - Python for Forensics
The code here is to support the Session 03 lecture.
wordswap.py
import re

def replaceWords(text, wordType, userInput):
    pattern = r'\b' + wordType + r'\b'
    return re.sub(pattern, userInput, text)

def main():
    with open('wordswap.txt', 'r') as file:
        text = file.read()

    wordTypes = ['ADJECTIVE', 'NOUN', 'ADVERB', 'VERB']

    for wordType in wordTypes:
        userInput = input(f'Enter {wordType.lower()}: ')
        text = replaceWords(text, wordType, userInput)

    print(text)

    with open('wordswaped.txt', 'w') as file:
        file.write(text)

if __name__ == "__main__":
    main()
Session 03 - Python for Forensics
The code here is to support the Session 03 lecture.
database.py
import sys, sqlite3

def getCSV(conn, tgtTbl):
    csv = ""
    csv_cursor = conn.cursor()
    data = csv_cursor.execute("SELECT * FROM " + tgtTbl + ";")
    for row in data:
        csv += ', '.join(map(str, row)) + "\n"
    return csv

def usage():
    print("[-] Incorrect arguments...")
    print("Usage:", sys.argv[0], "<database>")
    sys.exit()

if len(sys.argv) != 2:
    usage()

tgtBase = sys.argv[1]

conn = sqlite3.connect(tgtBase)
c = conn.cursor()
results = c.execute("SELECT tbl_name FROM sqlite_master WHERE type = 'table';")

for table in results:
    tableName = table[0]
    print("[+] Processing Table:", tableName)
    fileName = tableName + ".csv"
    f = open(fileName, 'w')
    f.write(getCSV(conn, tableName))
    f.close()

conn.close()
Session 03 - Python for Forensics
The code here is to support the Session 03 lecture.
tcpClient.py
import socket, sys

def client():
    host = "127.0.0.1"
    port = 5000

    try:
        clientSocket = socket.socket(socket.AF_INET, socket.SOCK_STREAM)
        print("[+] Socket successfully created!")

        clientSocket.connect((host, port))
        print("[+] Socket connected successfully to " + host + " on " + str(port) + "!\n")

    except socket.error as error:
        print("[E] There was an issue with the socket, due to %s" %(error))
        print("[!] Exiting...")
        sys.exit()

    message = input(" (send message): ")

    while message.lower().strip() != 'bye':
        clientSocket.send(message.encode())
        data = clientSocket.recv(1024).decode()

        print(" (received message): " + data)

        message = input(" (send message): ")

    clientSocket.close()

if __name__ == '__main__':
    client()
Session 03 - Python for Forensics
The code here is to support the Session 03 lecture.
tcpServer.py
import socket, sys

def server():
    host = "127.0.0.1"
    port = 5000

    try:
        serverSocket = socket.socket(socket.AF_INET, socket.SOCK_STREAM)
        print("[+] Socket successfully created!")

        serverSocket.bind((host, port))
        print("[+] Socket bound to " + host + " on " + str(port) + "!\n")

        serverSocket.listen(2)
        print("[+] Successfully created bi-directional sockets...")
        print("[i] Server accepting incoming connection now...")

        conn, address = serverSocket.accept()
        print("[i] Detected incoming connection from " + str(address))

    except socket.error as error:
        print("[E] There was an issue with the socket, due to %s" %(error))
        print("[!] Exiting...")
        sys.exit()

    while True:
        data = conn.recv(1024).decode()
        if not data:
            break
        print(" (received message): " + str(data))
        data = input(" (send message): ")
        conn.send(data.encode())

    conn.close()

if __name__ == '__main__':
    server()
Session 03 - Python for Forensics
The code here is to support the Session 03 lecture.
udpClient.py
import socket, sys

def client():
    host = "127.0.0.1"
    port = 5000

    try:
        clientSocket = socket.socket(socket.AF_INET, socket.SOCK_DGRAM)
        print("[+] UDP socket successfully created!")

    except socket.error as error:
        print("[E] There was an issue with the socket, due to %s" %(error))
        print("[!] Exiting...")
        sys.exit()

    message = input(" (send message): ")

    while message.lower().strip() != 'bye':
        clientSocket.sendto(message.encode(), (host, port))
        message, addr = clientSocket.recvfrom(1024)
        print(" (received message): " + message.decode())

        message = input(" (send message): ")

    clientSocket.close()

if __name__ == '__main__':
    client()
Session 03 - Python for Forensics
The code here is to support the Session 03 lecture.
udpServer.py
import socket, sys

def server():
    host = "127.0.0.1"
    port = 5000

    try:
        serverSocket = socket.socket(socket.AF_INET, socket.SOCK_DGRAM)
        print("[+] UDP socket successfully created!")

        serverSocket.bind((host, port))
        print("[+] Socket bound to " + host + " on " + str(port) + "!\n")

    except socket.error as error:
        print("[E] There was an issue with the socket, due to %s" %(error))
        print("[!] Exiting...")
        sys.exit()

    print("Server listening...")

    while True:
        message, addr = serverSocket.recvfrom(1024)
        if not message:
            break
        print(" (incoming message origin): " + str(addr))
        print(" (incoming message body): " + message.decode())
        data = message.decode().upper()
        print("Sending uppercased string back to sender: " + data)
        serverSocket.sendto(data.encode(), addr)

    serverSocket.close()

if __name__ == '__main__':
    server()
Session 03 - Python for Forensics
The code here is to support the Session 03 lecture.
passwordCrackZipExtA.py
import sys, zipfile

def usage():
    print("Incorrect number of arguments")
    print(f"Usage: python {sys.argv[0]} <zipfile> <dictionary file>")
    sys.exit()

def main():
    if len(sys.argv) == 1 or len(sys.argv) > 3:
        usage()
    else:
        zname = sys.argv[1]
        dname = sys.argv[2]

    zFile = zipfile.ZipFile(zname)
    with open(dname, 'r') as f:
        for line in f.readlines():
            password = line.strip('\n')
            try:
                zFile.extractall(pwd=password.encode('utf-8'))
                message = f'Password Found: {password}'
                print(message)
            except Exception as e:
                pass

if __name__ == '__main__':
    main()
Session 03 - Python for Forensics
The code here is to support the Session 03 lecture.
passwordCrackZipExtB.py
import argparse, zipfile

def main():
    parser = argparse.ArgumentParser(description="Zip file password cracker.")
    parser.add_argument('-f', dest='zname', type=str, help='specify zipfile')
    parser.add_argument('-d', dest='dname', type=str, help='specify dictionary file')
    args = parser.parse_args()

    if not (args.zname and args.dname):
        parser.print_help()
        exit(0)

    zname = args.zname
    dname = args.dname

    zFile = zipfile.ZipFile(zname)
    with open(dname, 'r') as f:
        for line in f.readlines():
            password = line.strip('\n')
            try:
                zFile.extractall(pwd=password.encode('utf-8'))
                message = 'Password Found: %s' % password
                print(message)
            except Exception as e:
                pass

if __name__ == '__main__':
    main()
Session 03 - Python for Forensics
The code here is to support the Session 03 lecture.
passwordCrackZipExtC.py
import argparse, zipfile, time

def extract_zip(zFile, password):
    try:
        zFile.extractall(pwd=password.encode('utf-8'))
        print("[+] Password Found: " + password + "\n")
    except Exception as e:
        pass

def calc_times(time_zero, time_end):
    difference = time_end - time_zero
    return difference

def main():
    parser = argparse.ArgumentParser(description="Zip file password cracker.")
    parser.add_argument('-f', dest='zname', type=str, help='specify zipfile')
    parser.add_argument('-d', dest='dname', type=str, help='specify dictionary file')
    args = parser.parse_args()

    if not (args.zname and args.dname):
        parser.print_help()
        exit(0)
    else:
        zname = args.zname
        dname = args.dname

    zFile = zipfile.ZipFile(zname)
    t_zero = time.time()
    with open(dname, 'r') as f:
        for line in f.readlines():
            password = line.strip('\n')
            try:
                extract_zip(zFile, password)
                t_finish = time.time()
                print('Seconds Taken to Crack Password and Extract Files: ' + str(calc_times(t_zero, t_finish)))
            except Exception as e:
                pass

if __name__ == '__main__':
    main()
Session 03 - Python for Forensics
The code here is to support the Session 03 lecture.
passwordCrackZipExtD.py
import argparse, zipfile, time

def extract_zip(zFile, password):
    try:
        zFile.extractall(pwd=password.encode('utf-8'))
        print("[+] Password Found: " + password + "\n")
        return True
    except Exception as e:
        return False

def calc_times(time_zero, time_end):
    difference = time_end - time_zero
    return difference

def main():
    parser = argparse.ArgumentParser(description="Zip file password cracker.")
    parser.add_argument('-f', dest='zname', type=str, help='specify zipfile')
    parser.add_argument('-d', dest='dname', type=str, help='specify dictionary file')
    args = parser.parse_args()

    if not (args.zname and args.dname):
        parser.print_help()
        exit(0)
    else:
        zname = args.zname
        dname = args.dname

    zFile = zipfile.ZipFile(zname)
    t_zero = time.time()
    password_found = False

    with open(dname, 'r') as f:
        for line in f.readlines():
            password = line.strip('\n')
            try:
                if extract_zip(zFile, password):
                    password_found = True
                    break
            except Exception as e:
                pass

    if password_found:
        t_finish = time.time()
        print('Seconds Taken to Crack Password and Extract Files: ' + str(calc_times(t_zero, t_finish)))

if __name__ == '__main__':
    main()
Session 03 - Python for Forensics
The code here is to support the Session 03 lecture.
passwordCrackZipExtE.py
import argparse, zipfile, time, csv

def extract_zip(zFile, password):
    try:
        zFile.extractall(pwd=password.encode('utf-8'))
        print("[+] Password Found: " + password + "\n")
        return True
    except Exception as e:
        return False

def calc_times(time_zero, time_end):
    difference = time_end - time_zero
    return difference

def filenames_info(zFile, password):
    for info in zFile.infolist():
        print(info.filename, info.date_time, info.file_size)

def mkCSV(zFile, password):
    with open('extractResult.csv', 'a', newline='') as csvfile:
        outfile = csv.writer(csvfile, delimiter=',', quotechar='|', quoting=csv.QUOTE_MINIMAL)
        outfile.writerow(['Filename', 'File DateTime', 'File Size'])
        for info in zFile.infolist():
            outfile.writerow([info.filename, info.date_time, info.file_size])

def main():
    parser = argparse.ArgumentParser(description="Zip file password cracker and CSV generator.")
    parser.add_argument('-f', dest='zname', type=str, help='specify zipfile')
    parser.add_argument('-d', dest='dname', type=str, help='specify dictionary file')
    args = parser.parse_args()

    if args.zname is None or args.dname is None:
        print(parser.usage)
        exit(0)
    else:
        zname = args.zname
        dname = args.dname

    zFile = zipfile.ZipFile(zname)
    t_zero = time.time()
    password_found = False

    with open(dname, 'r') as f:
        for line in f.readlines():
            password = line.strip('\n')
            try:
                if extract_zip(zFile, password):
                    password_found = True
                    t_finish = time.time()
                    print('Seconds Taken to Crack Password and Extract Files: ' + str(calc_times(t_zero, t_finish)))
                    mkCSV(zFile, password)
                    break
            except Exception as e:
                pass

if __name__ == '__main__':
    main()
Session 03 - Python for Forensics
The code here is to support the Session 03 lecture.
passwordCrackZipSimple.py
import zipfile
from threading import Thread

def extract_zip(zFile, password):
    try:
        zFile.extractall(pwd=password.encode('utf-8'))
        print("[+] Password Found: " + password + "\n")
    except Exception as e:
        pass

def main():
    zFilename = 'Images.zip'
    dictionary = 'dictionary.txt'

    zFile = zipfile.ZipFile(zFilename)
    with open(dictionary, 'r') as f:
        for line in f.readlines():
            password = line.strip('\n')
            try:
                zFile.extractall(pwd=password.encode('utf-8'))
                print('Password Found: %s' % password)
            except Exception as e:
                pass

if __name__ == '__main__':
    main()
Session 03 - Python for Forensics
The code here is to support the Session 03 lecture.
logParserExt.py
import sys, re

def usage():
    print("Illegal usage")
    print("python " + sys.argv[0] + " <logfile>")
    sys.exit()

if len(sys.argv) != 2:
    usage()

logfile = sys.argv[1]

print("[+] Processing: " + logfile)

totalCount = 0
ipAddresses = {}

logPattern = r'((\d{1,3}\.){3}\d{1,3}) '
f = open(logfile, 'r')
entries = f.readlines()
f.close()

protocolType = input("Enter the protocol type to filter (TCP, UDP, IRC, ICMP): ").upper()

filteredEntries = [entry.strip() for entry in entries if re.search(f'{protocolType}', entry, re.IGNORECASE)]

print("\nFiltered Entries for Protocol: ", protocolType)
print("=" * 30)
for entry in filteredEntries:
    print(entry)
print("=" * 30)

i = 0
while i != len(filteredEntries):
    if not re.search(r'^#', filteredEntries[i]):
        totalCount = totalCount + 1
        match = re.search(logPattern, filteredEntries[i])
        if match:
            ip = match.group(1)
            if ip in ipAddresses.keys():
                ipAddresses[ip] = ipAddresses[ip] + 1
            else:
                ipAddresses[ip] = 1
    i = i + 1

print("\nSummary Stats for Filtered Entries")
print("=" * 30)
print("Entries:\t\t\t" + str(totalCount))
print("Distinct IPs:\t\t\t" + str(len(ipAddresses.keys())))
print("=" * 30)
print("IP Count:\t")
for key in ipAddresses.keys():
    print(key, " ", ipAddresses[key])
print("=" * 30)
Session 06
Vulnerable Machine I
Unless you've done some Hack The Box machines, this is your first vulnerable machine you'll try to break into and find the flag.txt file.
To make things a bit easier and straight-forward, here's a suggested list of tools that might help you accomplish the task, in no particular order:
nmapdirb(Dir Buster)john(John the Ripper)hydracurlftpsshfirefox(or any browser, really)hash-identifier
In the lab, the machine will be set up for you, and you'll be given a unique IP address for your group (2-3 students) to work on.
After the lab, if you're interested, you'll have the option to copy the machine to a USB stick and work on it in your own time. The VM is in an importable OVA format, ready to be imported into VirtualBox. The size is ~1.5GB.
Remember the different attack steps from the previous lectures, and which ones you will apply here.
Think: "What's the first thing I need to do to get information about the target?"
For the most part, you'll be on your own, and I'll come around and check on you. If you are stuck, let me know, and I'll try to help without giving away too much.